

Over the past few days, we announced ZSvirt’s open-source release, shared the reasoning behind that decision, walked you through creating your first VM, and broke down the architecture of the production-proven engine. In this final post of the series, we turn our attention to migration — how to move your existing VMware VMs into ZSvirt smoothly.
ZSvirt Migration in Practice: Three Ways to Migrate VMs from VMware
VM migration is an unavoidable part of building or replacing a virtualization platform. ZSvirt offers a complete migration capability matrix, with three ways to migrate depending on your migration scale, business continuity requirements, and data shape:
- ZMigrate migration service: an online migration option. Deploy the migration service and a data gateway to connect directly to source platforms such as VMware vSphere, fully syncing each VM’s OS and data to the target platform. It supports incremental sync, test-VM verification, and smooth cutover — a good fit for batch migration and scenarios with high business-continuity requirements.
- Import a VM: an offline import option. Export the source VM as an OVF template (OVF, VMDK, and MF files), then on the target platform use “New VM > Import VM” to upload the template files and complete the import. Suited to a small number of VMs where a brief outage for export is acceptable.
- Upload a VMDK image: a disk-level migration option. Simply upload the VM’s VMDK disk file as a platform image (automatically converted to qcow2/raw), then create a VM from that image. It’s the lightest option, suited to scenarios that only need the disk data migrated.
To help you choose, here’s a quick comparison:
| Dimension | ZMigrate migration service | Import VM (OVF) | Upload VMDK image |
|---|---|---|---|
| Approach | Online sync + cutover | Offline export/import | Offline disk upload |
| Business downtime | Short (cutover window only) | Longer (VM must be off during export) | Longer (VM must be off during copy) |
| Configuration preserved | Fully preserved; can clone network config/MAC | Based on the OVF descriptor | Not preserved; reconfigure needed |
| Scale | Batch migration | A few VMs | A few VMs, disk data only |
| Prerequisites | Deploy migration service, data gateway, VDDK | Export the OVF template | Prepare the VMDK disk file |
Let’s walk through each of the three approaches below.
1. ZMigrate Migration Service
ZMigrate is ZSvirt’s online migration service. Its core idea is “sync first, cut over later”: while a migration task runs, the source VM keeps serving traffic as usual and its data is continuously synced to the target platform, until a cutover window switches the business over and downtime is compressed to the absolute minimum.
Before you can use ZMigrate, you first need to install the migration service. Go to “Operations > Migration Service” to see the full workflow guide plus the basic and configuration info. The whole migration workflow can be summarized in six steps: download the installer from the official website → deploy ZMigrate → upload VDDK → add a data gateway → create the source platform → create the migration task, followed by the data sync and cutover stages.
1.1 Download the Installer from the Official Website
The migration journey starts on the official website. Go to the ZSvirt Resource Center, find ZMigrate for ZSvirt under the “Migration Tools” category, and download the installer for the version you need. The open-source version requires no license — download and go. Just confirm that the platform already has image storage configured, and that the image store has enough free space.
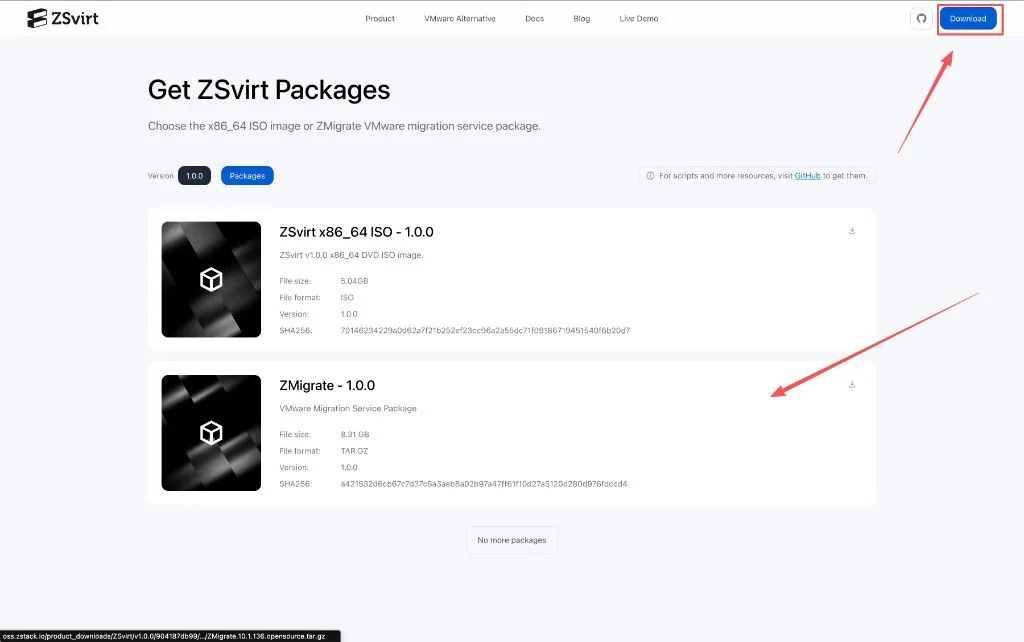
Once the installer is downloaded, you can start deploying it in the platform.
1.2 Deploy ZMigrate
Deploying the migration service takes two steps: upload the installer package, then install.
Upload the package: On the migration service page, click “Upload”. Both URL and local upload are supported, and you need to specify a storage path for the package and its extracted files. Make sure this directory has enough free space, and avoid system directories such as /, /dev, /proc, /sys, /usr/bin, /bin, and /opt — otherwise the install may fail or the server may behave abnormally.
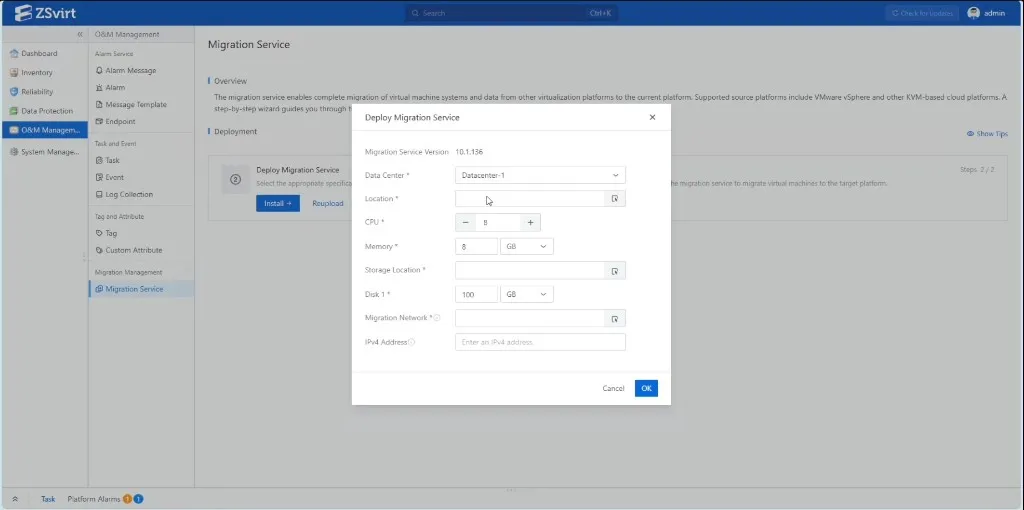
Install: After the upload finishes, click “Install” and choose an appropriate spec based on your needs. Key configuration items include:
- Datacenter / Running location: ZMigrate is deployed as a VM-based data gateway; choose its datacenter and running location;
- CPU / Memory: 8 vCPU / 8 GB by default; the number of CPUs directly affects migration concurrency;
- Storage location / Disk: 100 GB system disk by default; specify a storage pool when the storage location is distributed storage;
- Migration network / IPv4 address: specify a distributed port group as the migration network; it must be reachable from both the source and target platform networks. When DHCP is enabled on the network, an IP is assigned automatically; otherwise specify one manually.
Confirm and click OK; deployment of the migration service begins.
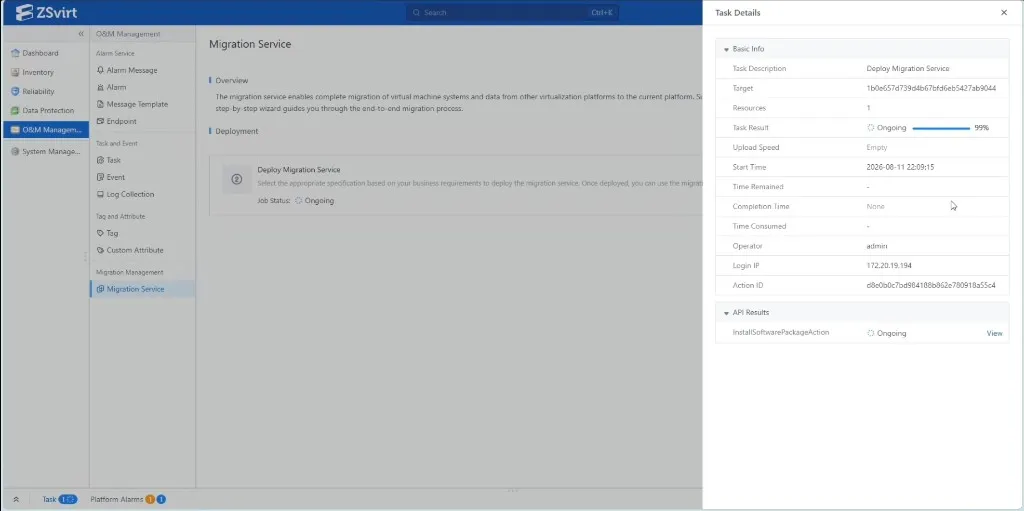
Deployment takes about 5–10 minutes. The page shows a “Deploying” status, so just wait.
1.3 Upload VDDK
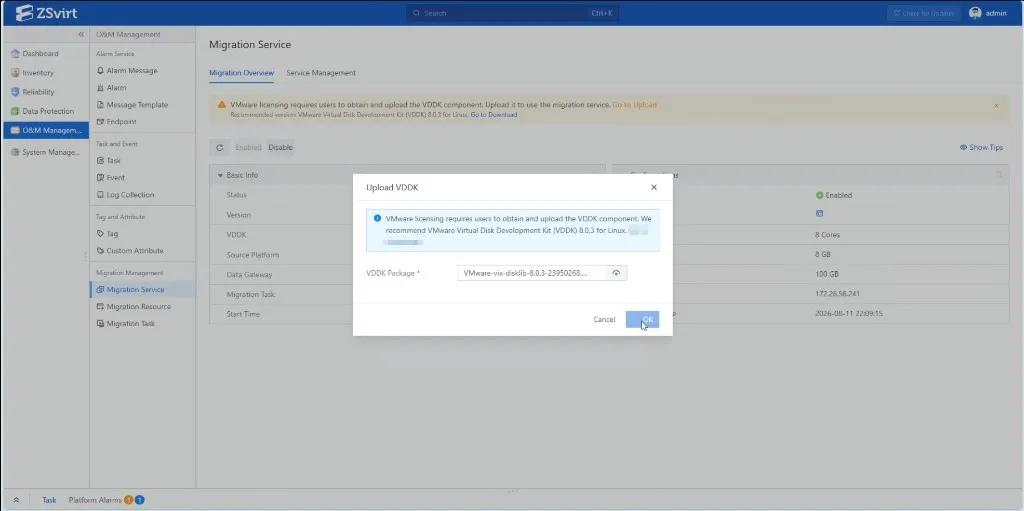
If the source platform is VMware, you also need to upload the VDDK (Virtual Disk Development Kit) package. ZMigrate reads disk data from VMware source VMs through the VDDK interface — an essential part of the VMware migration path. Click “Upload” on the migration service page and upload your prepared VDDK archive; the system loads it automatically once the upload succeeds.
1.4 Add a Data Gateway
A data gateway is the relay between the source and target platforms and plays the key role in data transfer. It usually runs as a VM in the platform to provide gateway services, and you need to make sure it has network connectivity to the source platform, the target platform, and the migration service.
When you deploy ZMigrate, the platform creates a default data gateway. If you need to migrate VMs in batches, you can create additional data gateways to increase migration concurrency.
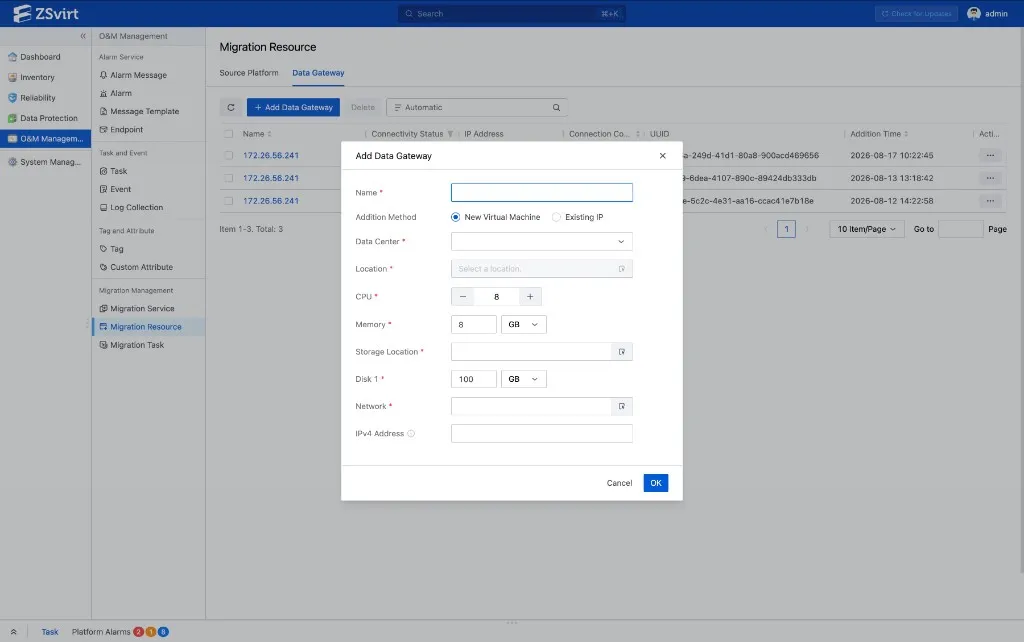
In the navigation bar, go to “Operations > Migration Resources > Data Gateways” and click “Add Data Gateway”. There are two ways to add one:
- Create a new VM: the platform creates a VM to act as the data gateway. Key settings include:
- Datacenter / Running location: choose the datacenter and running location for the VM;
- CPU / Memory: 8 vCPU / 8 GB by default; adjust based on migration concurrency needs;
- Storage location / Disk: 100 GB system disk by default;
- Network / IPv4 address: specify a distributed port group; it must be reachable from the source and target platform networks. When DHCP is enabled, an IP is assigned automatically; otherwise specify one manually. When IP address management is enabled, a manually specified address must be within the selected network segment.
- Existing IP: if you already have a gateway VM, just enter its IP address. Once connected, the system automatically fetches the host name; click “Test” to check reachability.
Confirm and click OK; the data gateway is created.
1.5 Create the Source Platform
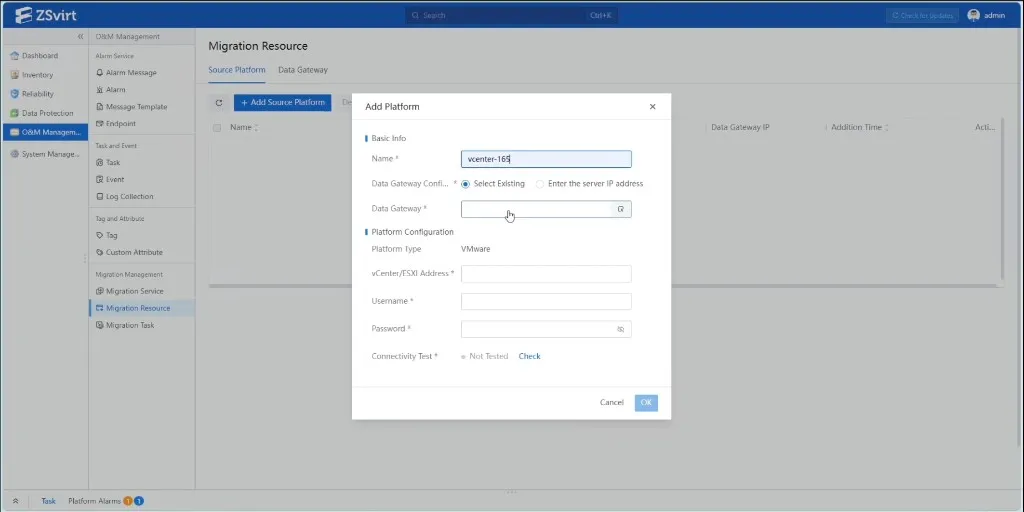
The source platform is the business platform to be migrated. When adding it, configure the following:
- Name: set a name for the source platform;
- Data gateway: select a created data gateway, or directly enter a new gateway IP address;
- Platform type: VMware;
- vCenter/ESXi address: enter the VMware environment address;
- Username / Password: enter login credentials.
After filling these in, click “Test” to run a connectivity check. Once the source platform and data gateway are both ready, you can start creating a migration task.
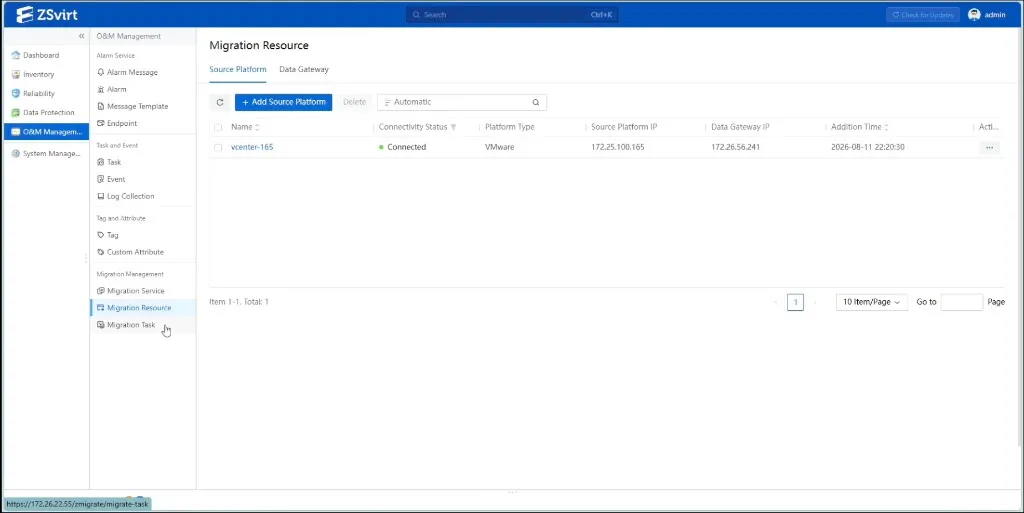
After creation, the source platform list shows the platform type, vCenter/ESXi address, associated data gateway, and connection status. A “Connected” status means the source platform is successfully integrated.
1.6 Create a Migration Task
Creating a migration task has two steps:
- Step 1: select the source platform and tick the source VMs you want to migrate.
- Step 2: configure the parameters of the migrated VMs — target datacenter, cluster, host, storage location, bus type, CPU mode, target network port group, and more — then fill in the cutover settings.
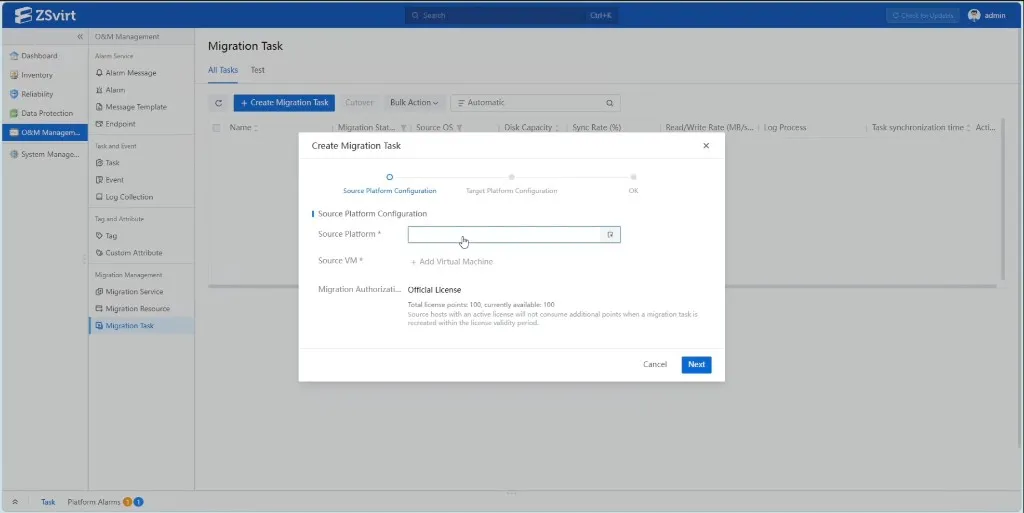
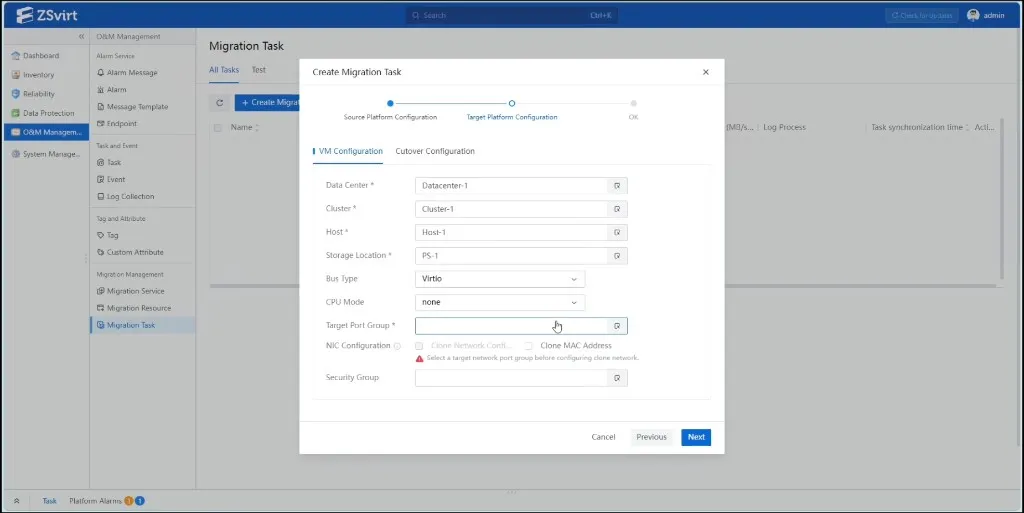
Cutover is the key step in the whole migration flow — once data sync completes, it stops the business on the old platform and smoothly switches it over to the new one. The cutover settings offer several practical options:
- Cut over immediately: automatically cut over once the initial data sync completes;
- Create a rollback snapshot: create a snapshot of the target VM before cutover so you can roll back if anything goes wrong;
- Power off the source VM automatically: shut down the source VM before cutover to avoid IP conflicts;
- Install VMTools automatically: install VMTools automatically after the OS conversion completes.
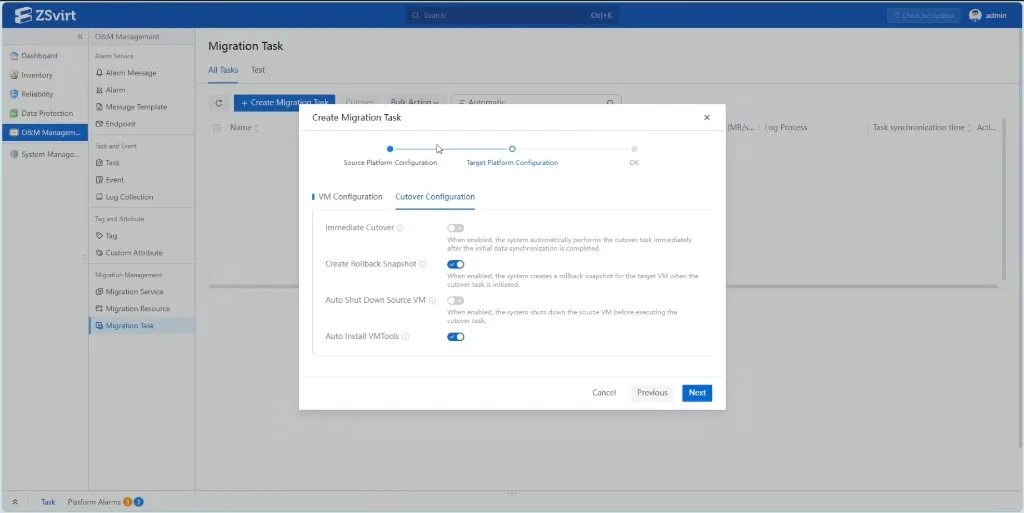
Confirm and click OK; the migration task is created and its status enters “Syncing”.
1.7 Sync and Cutover
After the task is created, the system automatically syncs the source VM’s data to the target platform. You can see the task status “Syncing” in the task list.
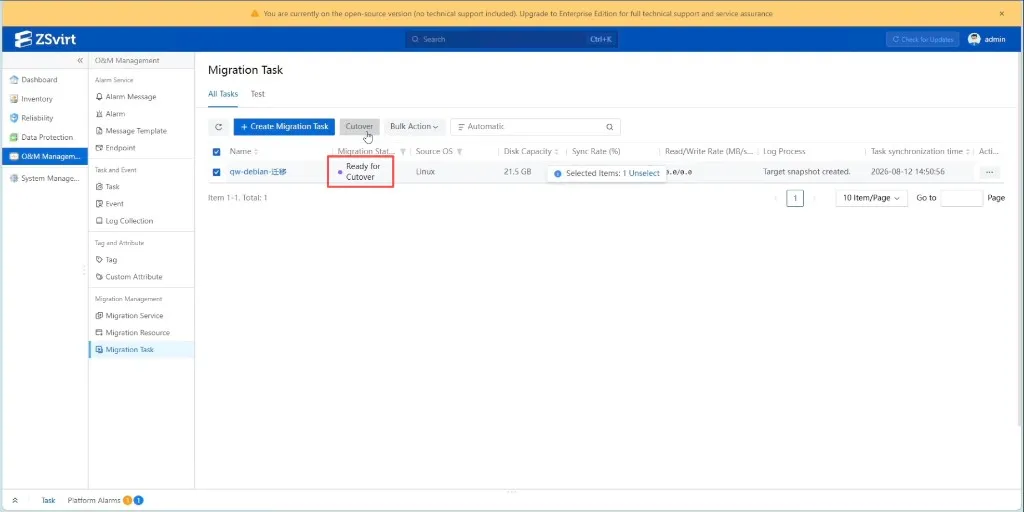
When the status changes to “Ready for cutover”, the data sync phase is complete and the flow enters the final cutover stage.
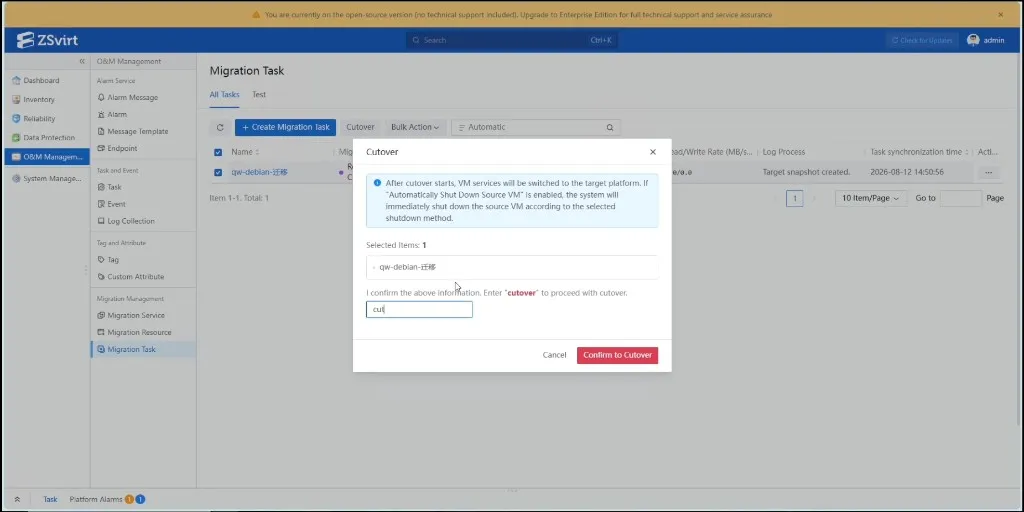
Click “Cut Over”, read and confirm the risk notice, and the cutover begins, switching the VM’s business to the target platform.
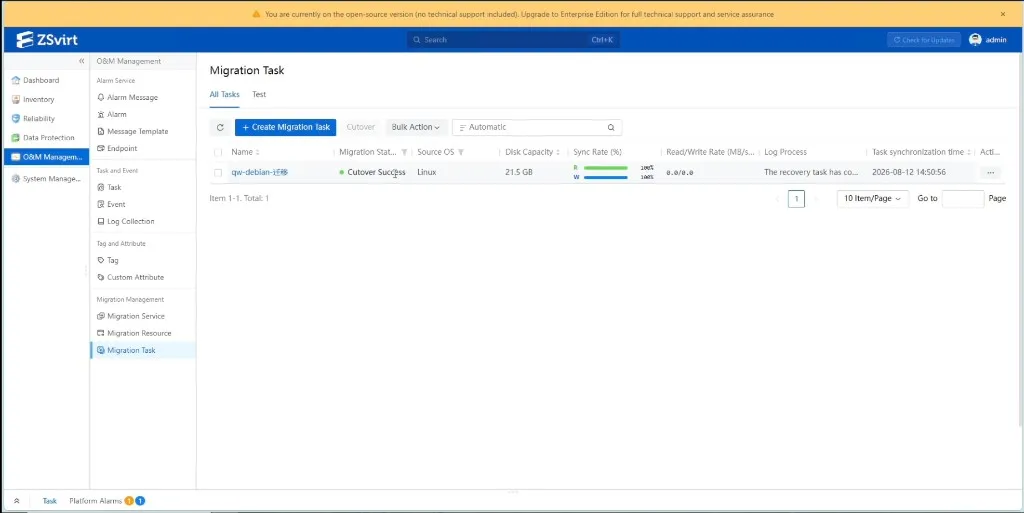
After a successful cutover, you can see that the VM from the original VMware platform has been migrated to this platform.
2. Importing a VM (OVF)
If you only have a few VMs to migrate and the business can tolerate a short outage for export, you can skip ZMigrate and migrate by importing an OVF template instead. The overall idea: export the VM as an OVF template on the source platform, then upload and import it on the target platform.
Step 1: Export the OVF template. On the source platform (such as VMware vSphere), shut down the target VM and export it as an OVF template. You usually end up with three kinds of files:
- OVF file: the VM’s descriptor file that defines its hardware configuration;
- VMDK file: the VM’s disk data file;
- MF file: the manifest file used to verify file integrity.
Step 2: Import on the target platform. In the navigation bar, right-click the target cluster, host, or image, click “New VM”, and choose “Import VM” as the creation method:
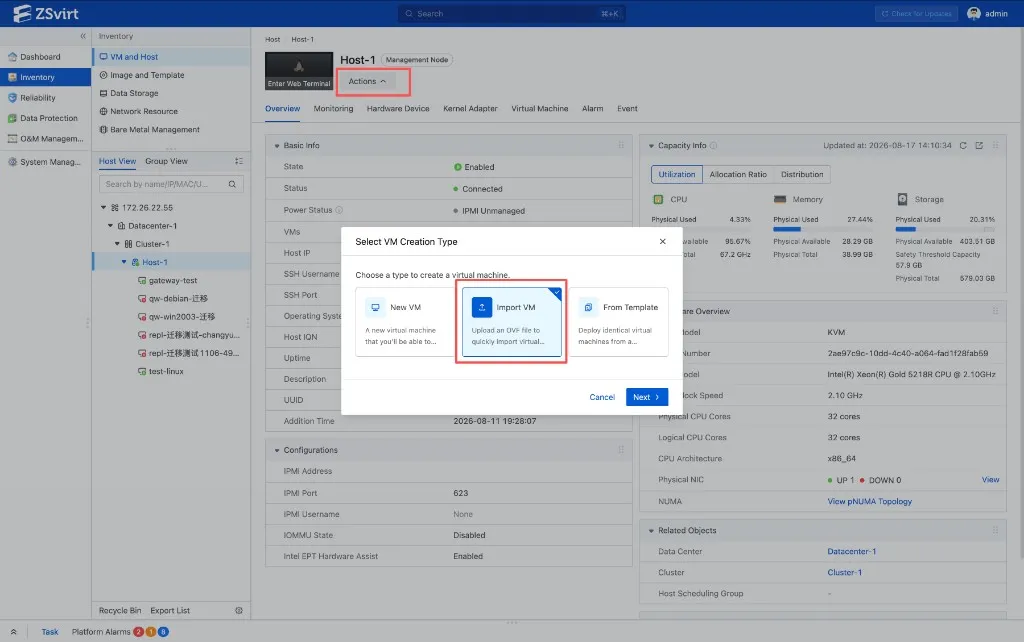
Then complete two parts of the configuration:
- Upload info: choose an image store (used to temporarily hold the uploaded template files and deleted automatically once the VM is created), set the template type to OVF, and upload the OVF, VMDK, and MF files in order. Note that the VMDK file must match the configuration defined in the OVF file, including the number and content of the files.
- Basic info: set the VM name, group, running location (host or cluster), and storage location (auto-allocated if not set); optionally configure high availability, VM/disk encryption, and whether to power on the VM automatically after import.
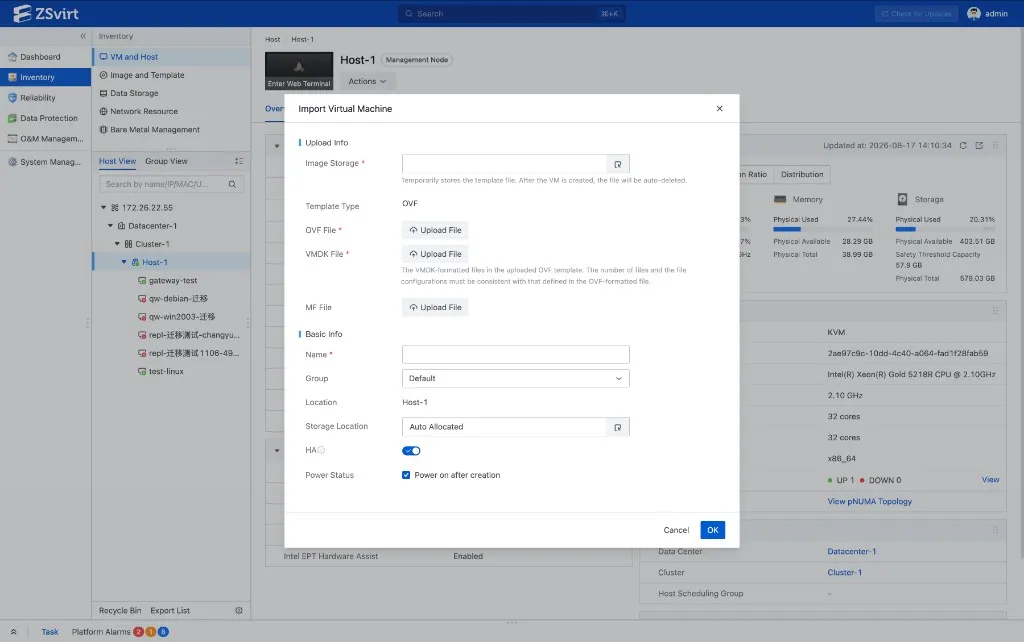
Confirm and click OK; the VM import completes. After import, it’s recommended to install VMTools so some of the VM’s configurations take effect.
3. Uploading a VMDK Image
Besides OVF template import, there’s an even more direct approach: upload only the VM’s disk files. If you already have the VM’s VMDK disk file (for example, exported from VMware), you can upload it as an image to the image server, and the platform handles the format conversion automatically — uploaded to an ImageStore server, it’s converted to qcow2; uploaded to a Ceph server, it’s converted to raw. Then create a VM from that image and the migration is done.
The steps are:
-
In the main menu, go to “Resource Center > Cloud Resource Pools > Compute Configuration > Images”, open the image page, and click “Add Image”.
-
Configure it with these points in mind:
- Image type: choose system image;
- Image format: choose vmdk;
- Platform / VirtIO: choose the platform type based on the OS inside the image, and decide whether to enable VirtIO (when enabled, the guest OS loads VirtIO disk and NIC drivers for better performance; for a few older OSes that don’t support VirtIO, you can leave it disabled);
- OS / CPU architecture / BIOS mode: choose settings that match the image; the BIOS mode must match how the image was packaged (Legacy or UEFI), otherwise the VM may not work properly;
- Image server: choose a created image server;
- Image path: supports URL (HTTP/HTTPS, FTP, SFTP) or local file upload; ImageStore servers support resumable uploads.
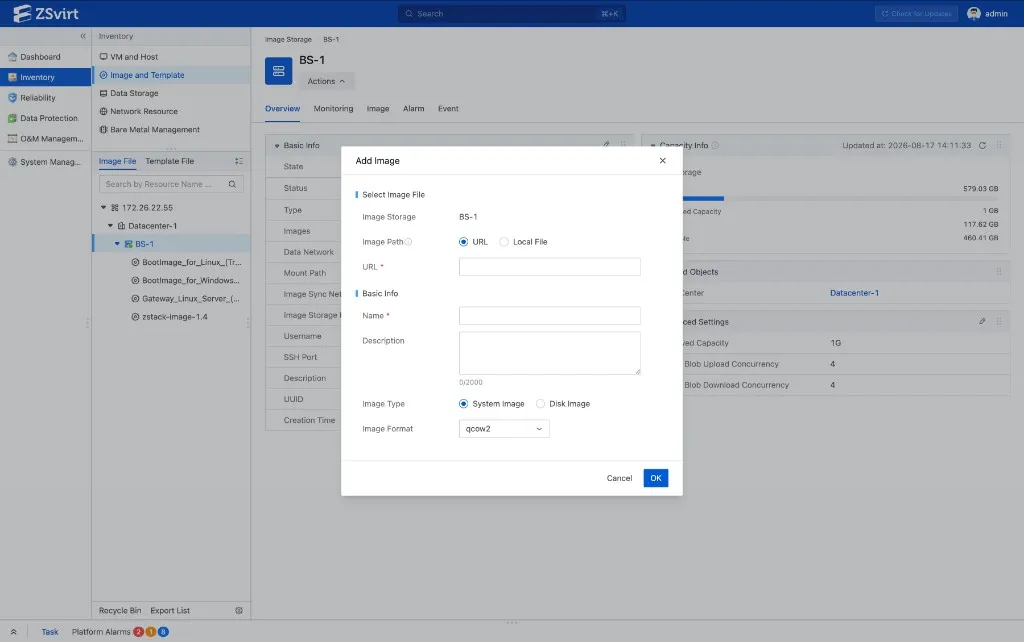
- Confirm and click OK; wait for the image upload and format conversion to complete.
After the upload, you can open the image details page and check the image’s MD5 value to verify integrity (note: VMDK uploads go through format conversion, so the MD5 value can’t be used as an integrity check afterward). Then use the image to “Create VM”, configuring CPU, memory, network, and other parameters as needed — once the VM is created, the migration is complete. Installing VMTools is recommended here as well.
In Conclusion
There’s no absolute winner among the three migration methods — it all depends on your scenario: batch migration where business can’t stop, choose ZMigrate; a few VMs that can tolerate a brief outage for export, choose OVF import; only disk files and you want to recover data quickly, choose VMDK image upload.
If you’re planning a migration from VMware to ZSvirt, we suggest running through the full flow with one or two non-critical VMs first, getting familiar with the rhythm of sync, testing, and cutover, and then rolling out in batches. If you run into issues during migration, feel free to reach out to the ZSvirt open-source community for more details.
Join the Community
- Issue reports: GitHub Issues
- Community discussions: GitHub Discussions
- Social media:
- YouTube: https://youtube.com/@ZSvirt
- LinkedIn: https://www.linkedin.com/in/zsvirt-community/
- X/Twitter: https://x.com/ZSvirt
- Email: community@zsvirt.io