

If you’re evaluating ZSvirt, the fastest way to learn it isn’t reading the entire user manual — it’s getting a VM running with your own hands.
This tutorial walks you through a minimal end-to-end path: install the management node → initialize the platform → add hosts, storage, networks, and images → create your first VM and log in to it. The whole process takes about 30-40 minutes (excluding image download time). When you’re done, you’ll have a VM that can reach the internet and open a console — which means every core platform link is working.
Note: low-level command and API names still use legacy fields such as
zstack-ctl,zstack-cli, PrimaryStorage, and BackupStorage. These are command-layer names and don’t affect platform operations.
Before You Start: One Server Is Enough
The minimal setup is All-in-One: a single server acts as both the management node and a compute node. The hardware bar is low:
| Item | Minimum | Recommended |
|---|---|---|
| CPU | Intel VT or AMD-V, at least 8 cores | 24 cores or more |
| Memory | 8 GB | 24 GB or more |
| System disk | 100 GB | 200 GB or more |
| NIC | 1 management NIC | Separate management, storage, and service networks |
| IP | Static IP | Static IP with DNS/NTP configured in advance |
Two easily overlooked points:
- Don’t use DHCP. The management node IP is written into the platform configuration during installation, and changing it later is painful.
- Sync the system time. If the management node’s clock is earlier than the installation package’s build time, the installer will fail outright — this is the first pit most newcomers hit.
Also prepare the ISO installation media: ZSvirt-x86_64-DVD-<version>-h84r.iso. You can boot from a physical optical drive, a USB stick, or an ISO mounted via the server’s remote console. For USB creation we recommend Rufus or Fedora Media Writer — both support Legacy and UEFI boot.
Step 1: Install the Management Node from the ISO
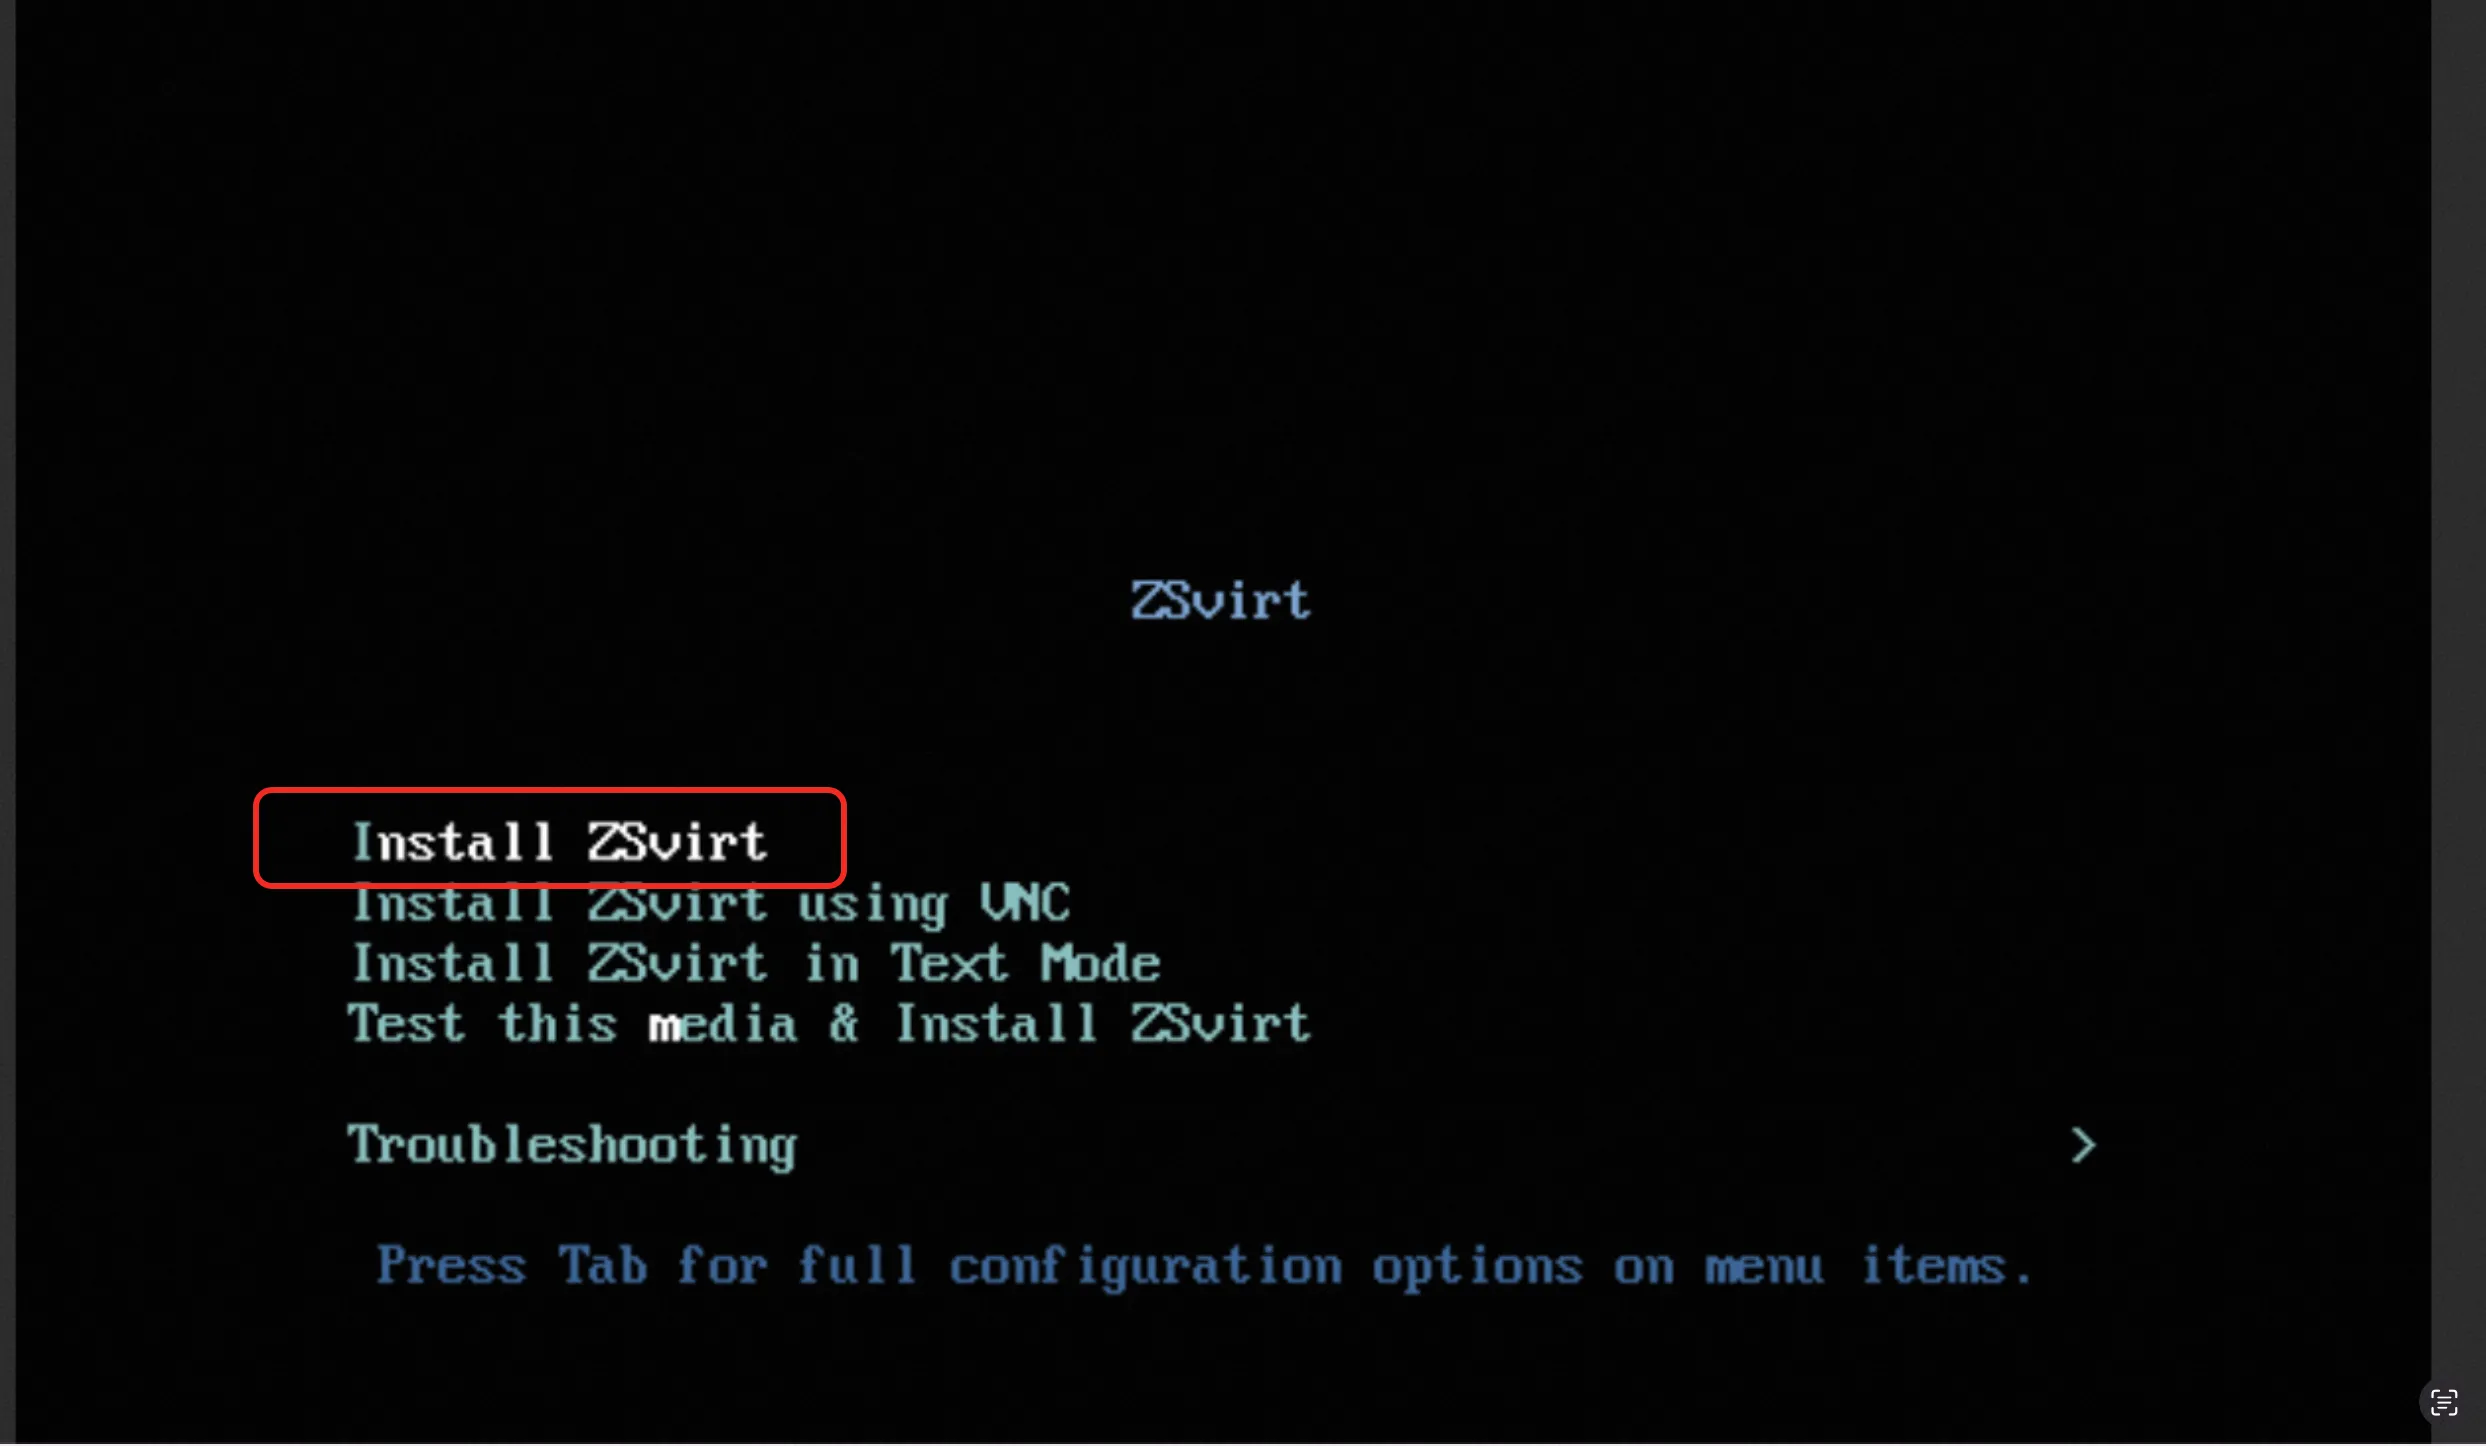
Boot from the ISO and the installer enters Install ZSVirt by default — no manual selection needed. You’ll land on the INSTALLATION SUMMARY screen:
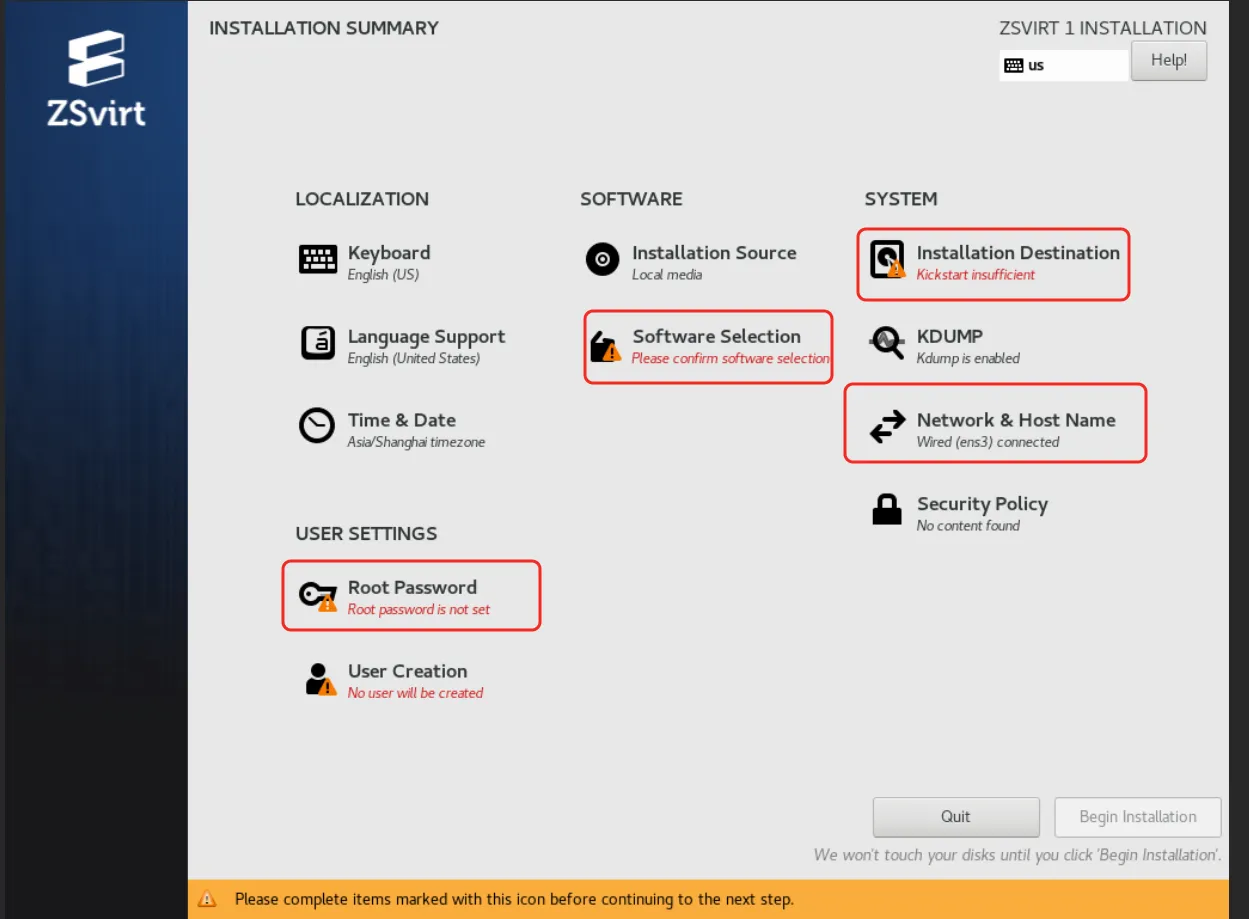
Complete the four configuration items in order:
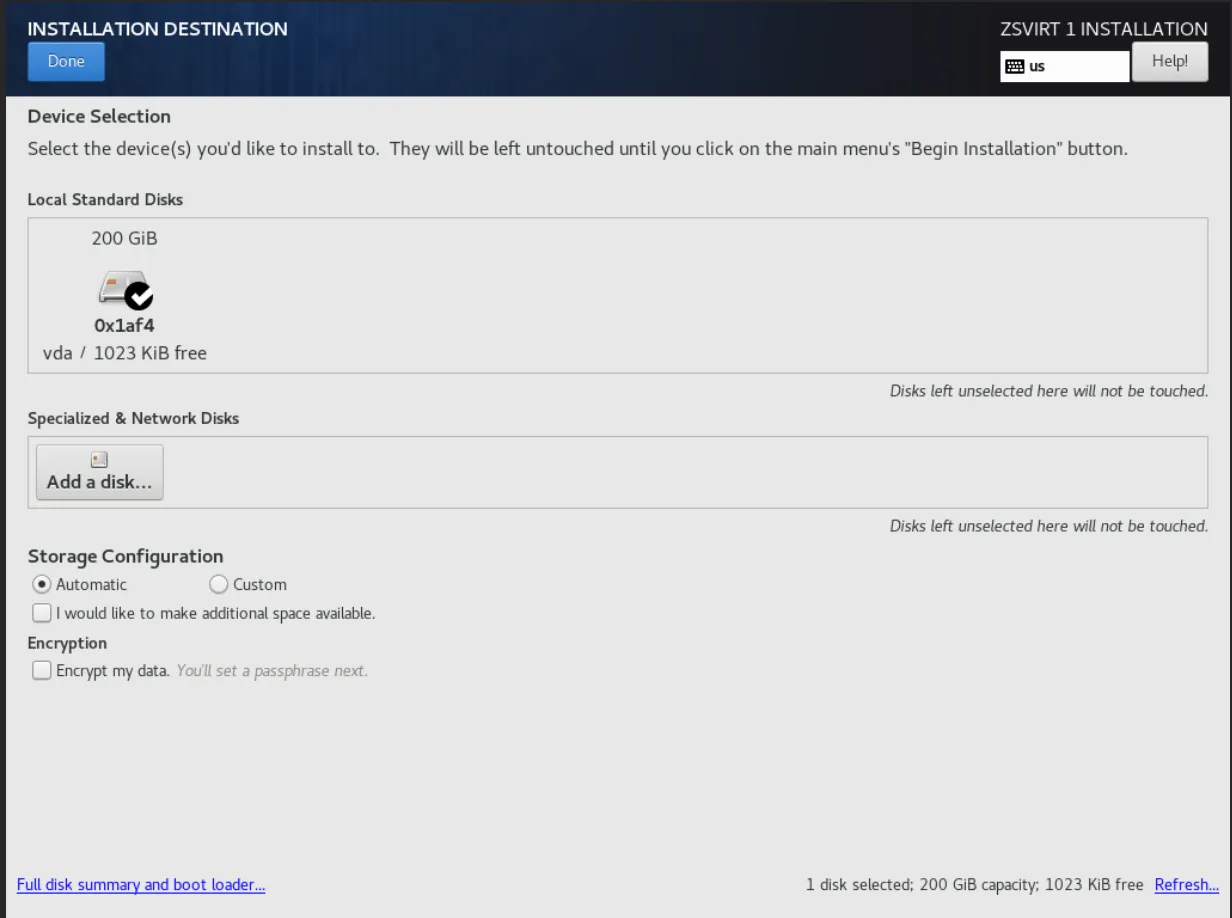
1. Installation Destination (system disk): select a disk as the system disk and click Done.
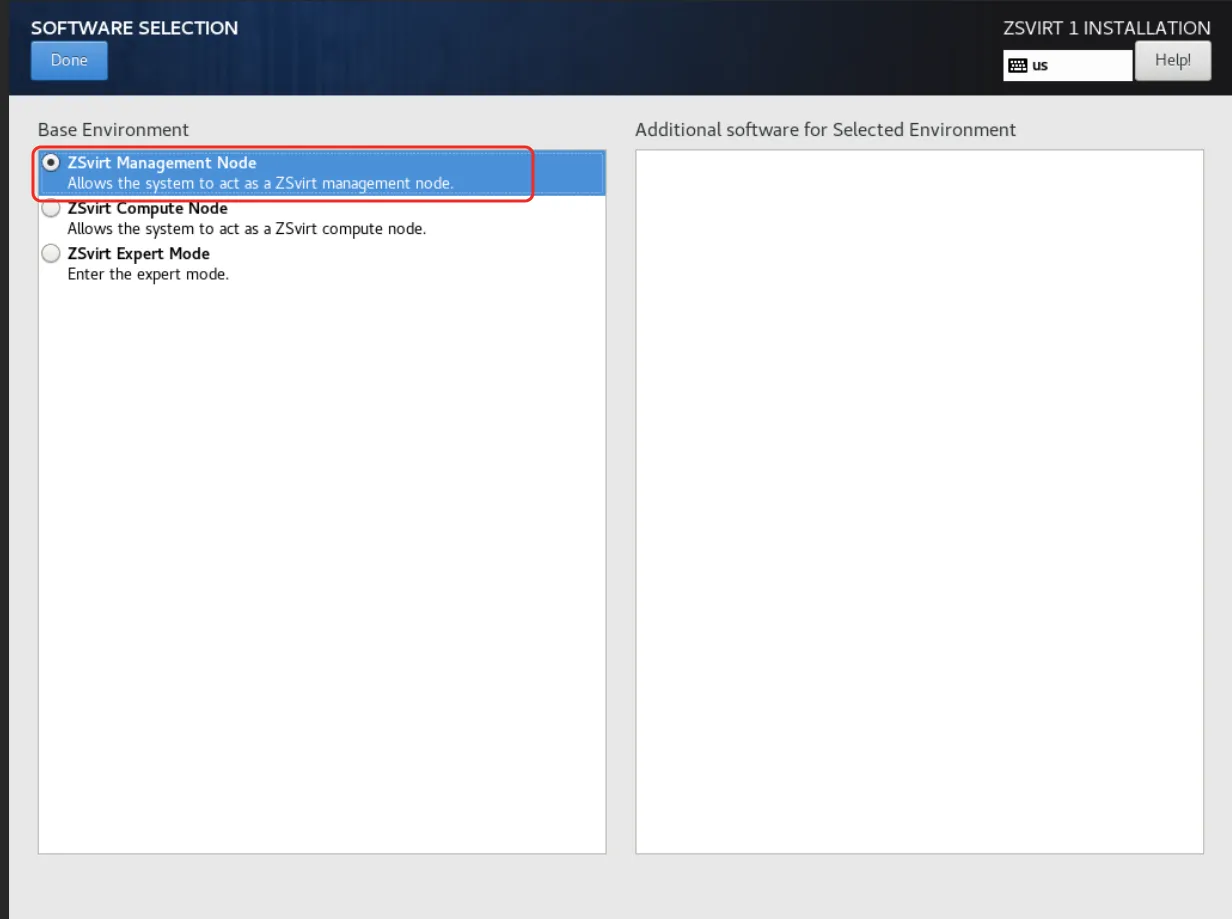
2. Software Selection (installation mode): choose ZSvirt Management Node and click Done.
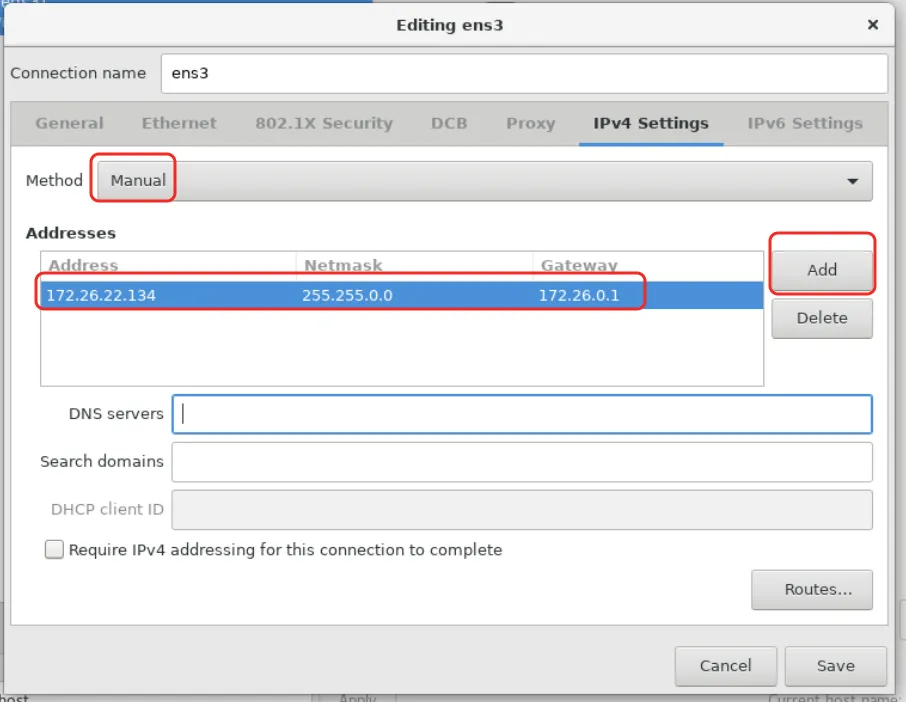
3. Network & Host Name: click Configure… to open the NIC settings, switch IPv4 Settings > Method to Manual, click Add, and fill in your planned IP, netmask, and gateway:
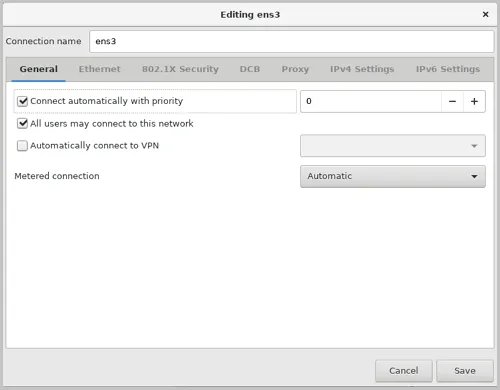
Don’t forget to enable Connect automatically with priority (0) on the General tab — otherwise the NIC won’t come up after reboot:
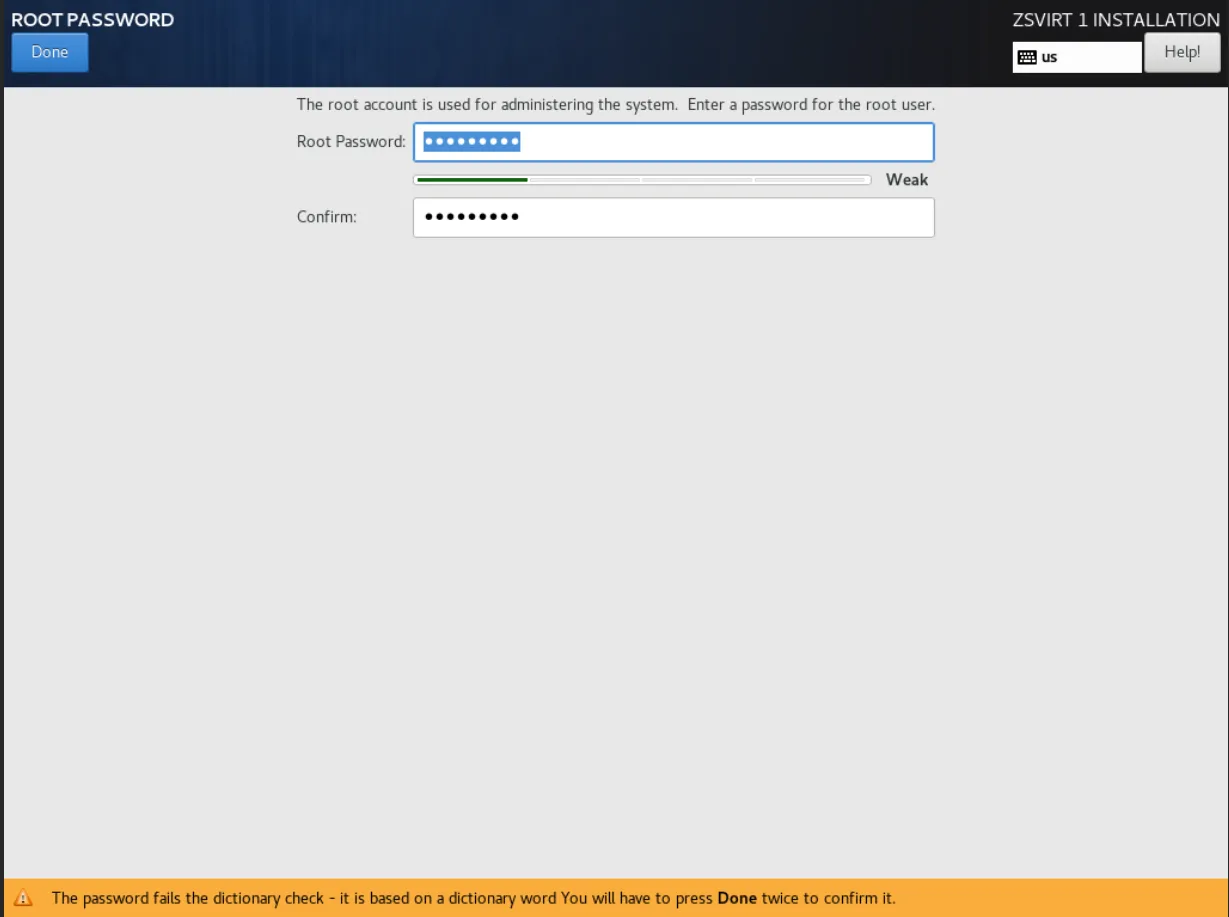
4. Root Password: enter the root password twice and click Done.
Once all four items are ready, click Begin Installation. The installation takes about 10 minutes; the system then reboots automatically and continues installing the ZSvirt management node service:
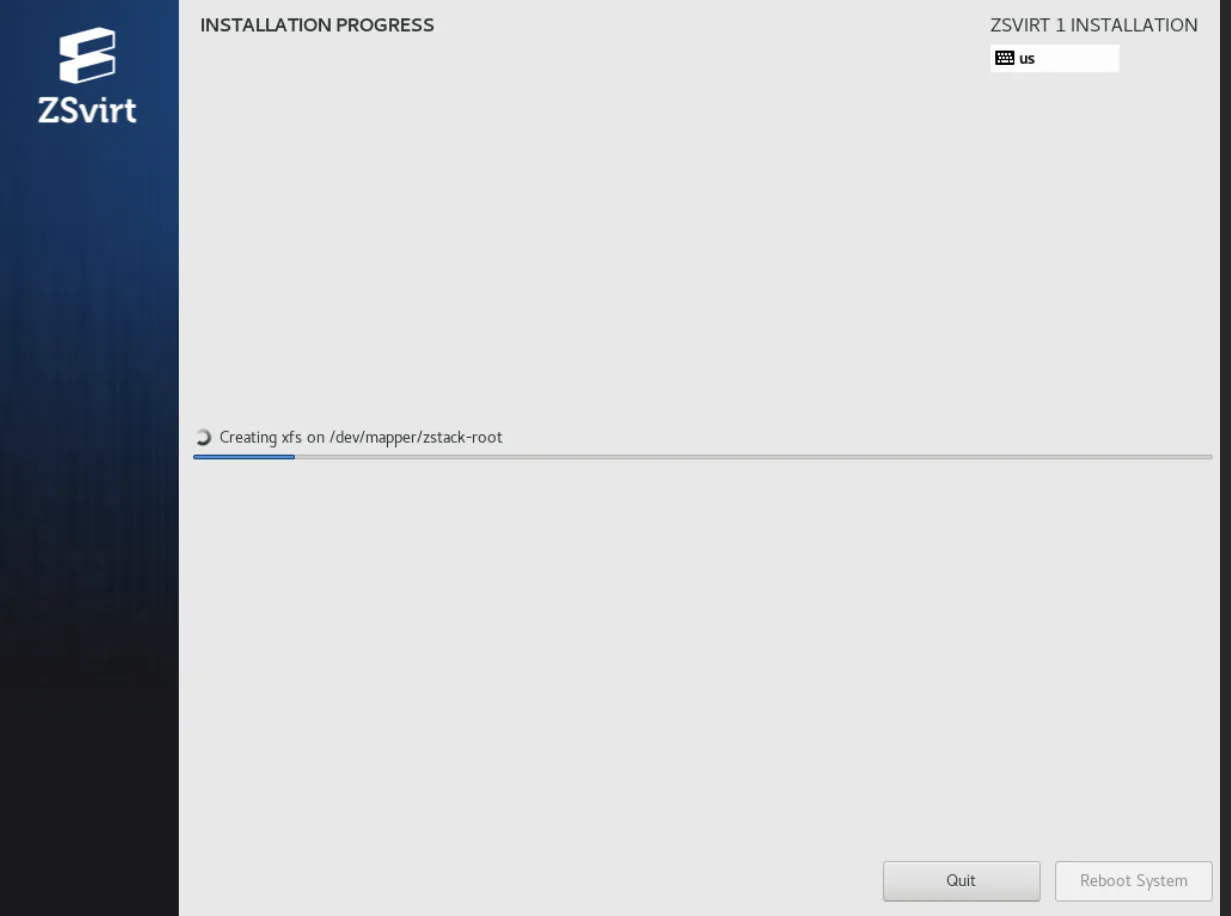
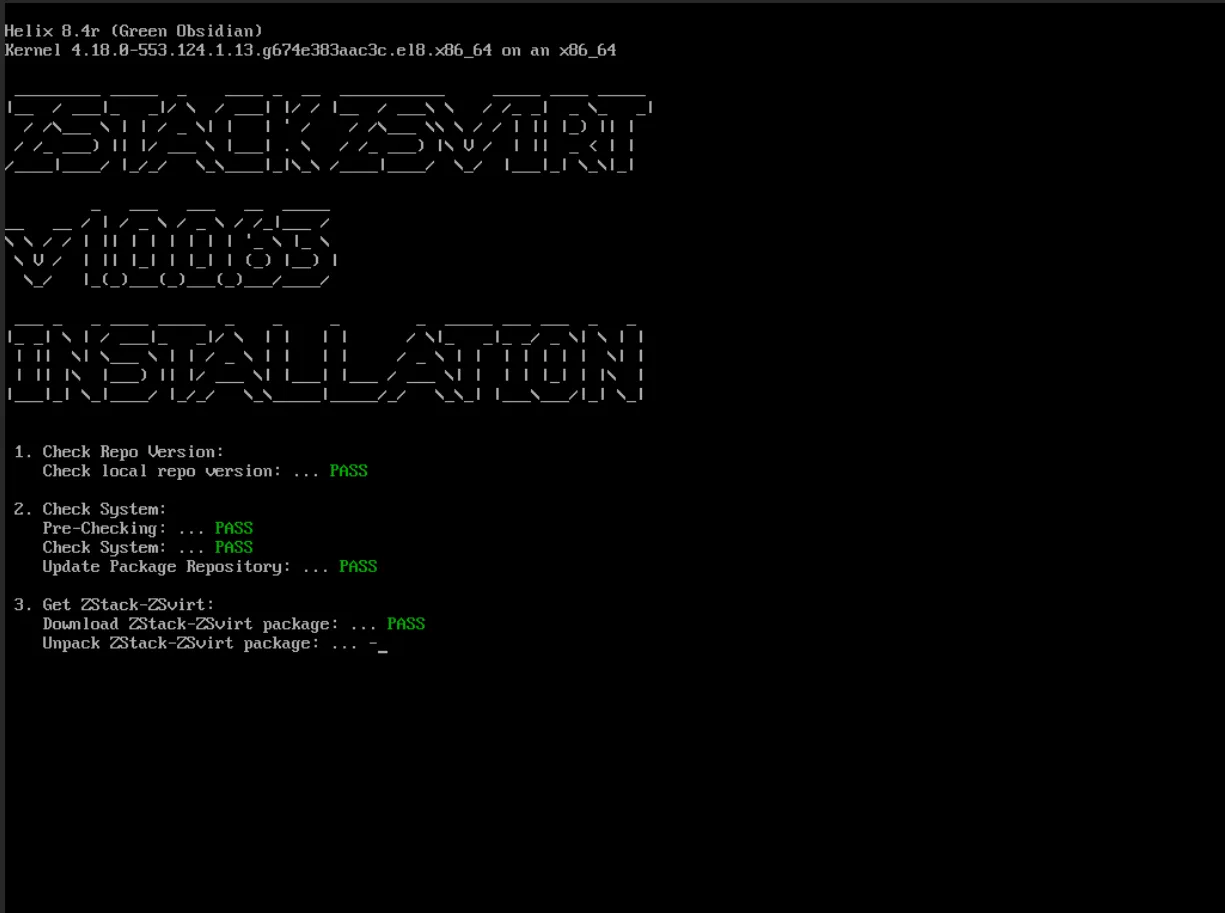
When the system enters the TUI and both MN and UI show Running, the management node is ready:
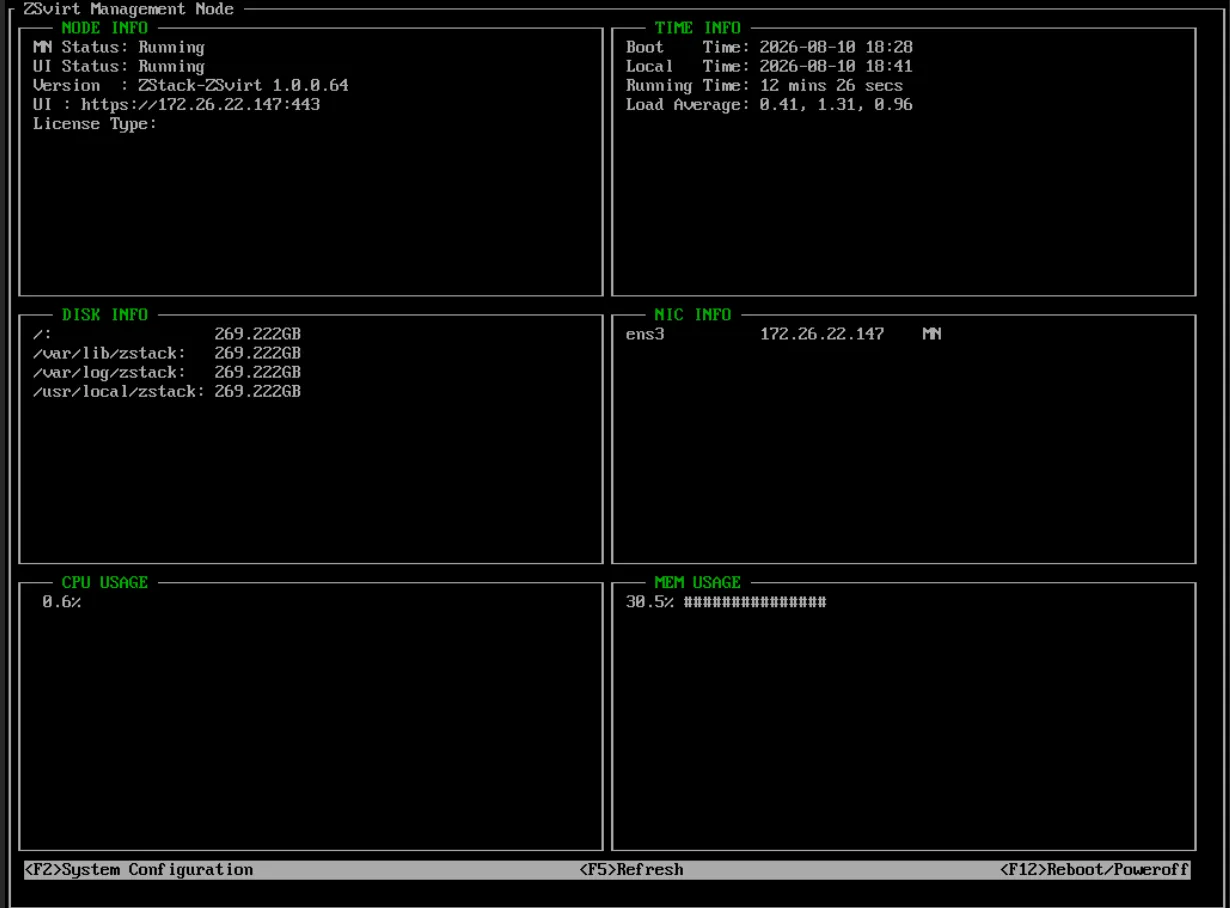
If you want extra assurance, log in and run two quick checks:
zstack-ctl status
zstack-ctl show_configuration | grep management.server.ip
If the installation fails, check /tmp/zstack_installation-*.log first; for Web UI issues, look at /usr/local/zstack/zstack-ui/logs/ui-install.log.
Step 2: Initialize the Platform
Point your browser at the management node IP and log in with the default credentials admin/password:
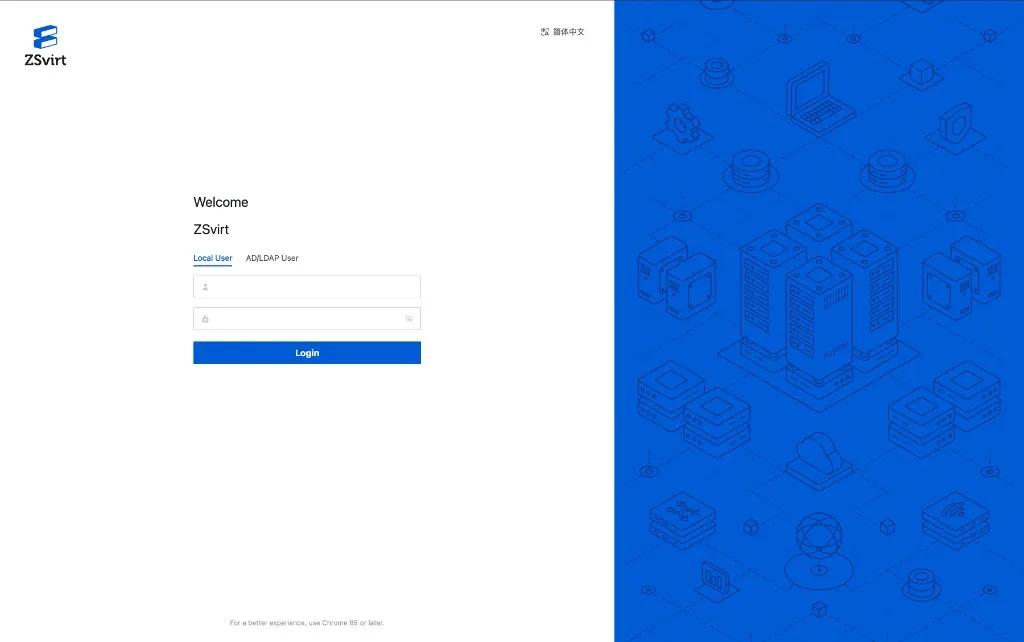
⚠️ In production, always change the default password immediately after your first login. It’s a good habit even in test environments.
On first login, the platform guides you through creating a datacenter and a cluster. QuickStart only needs one of each: name the datacenter Datacenter-1 and the cluster Cluster-1:
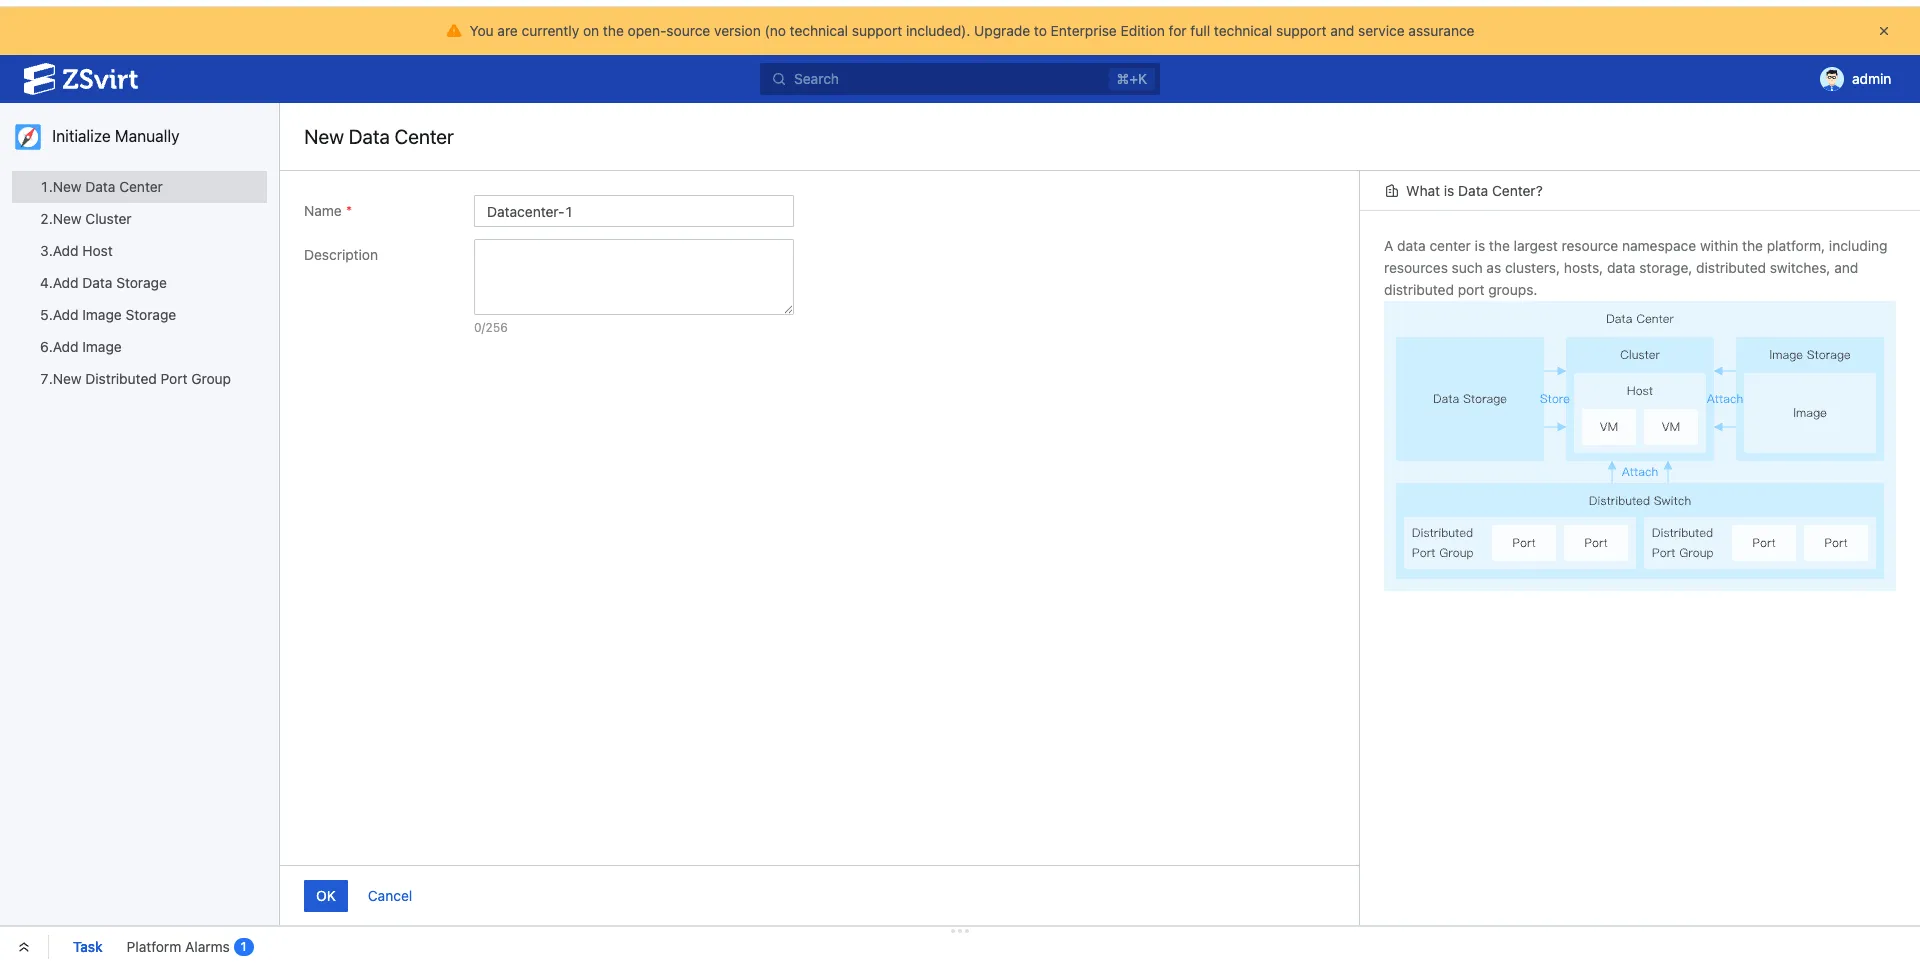
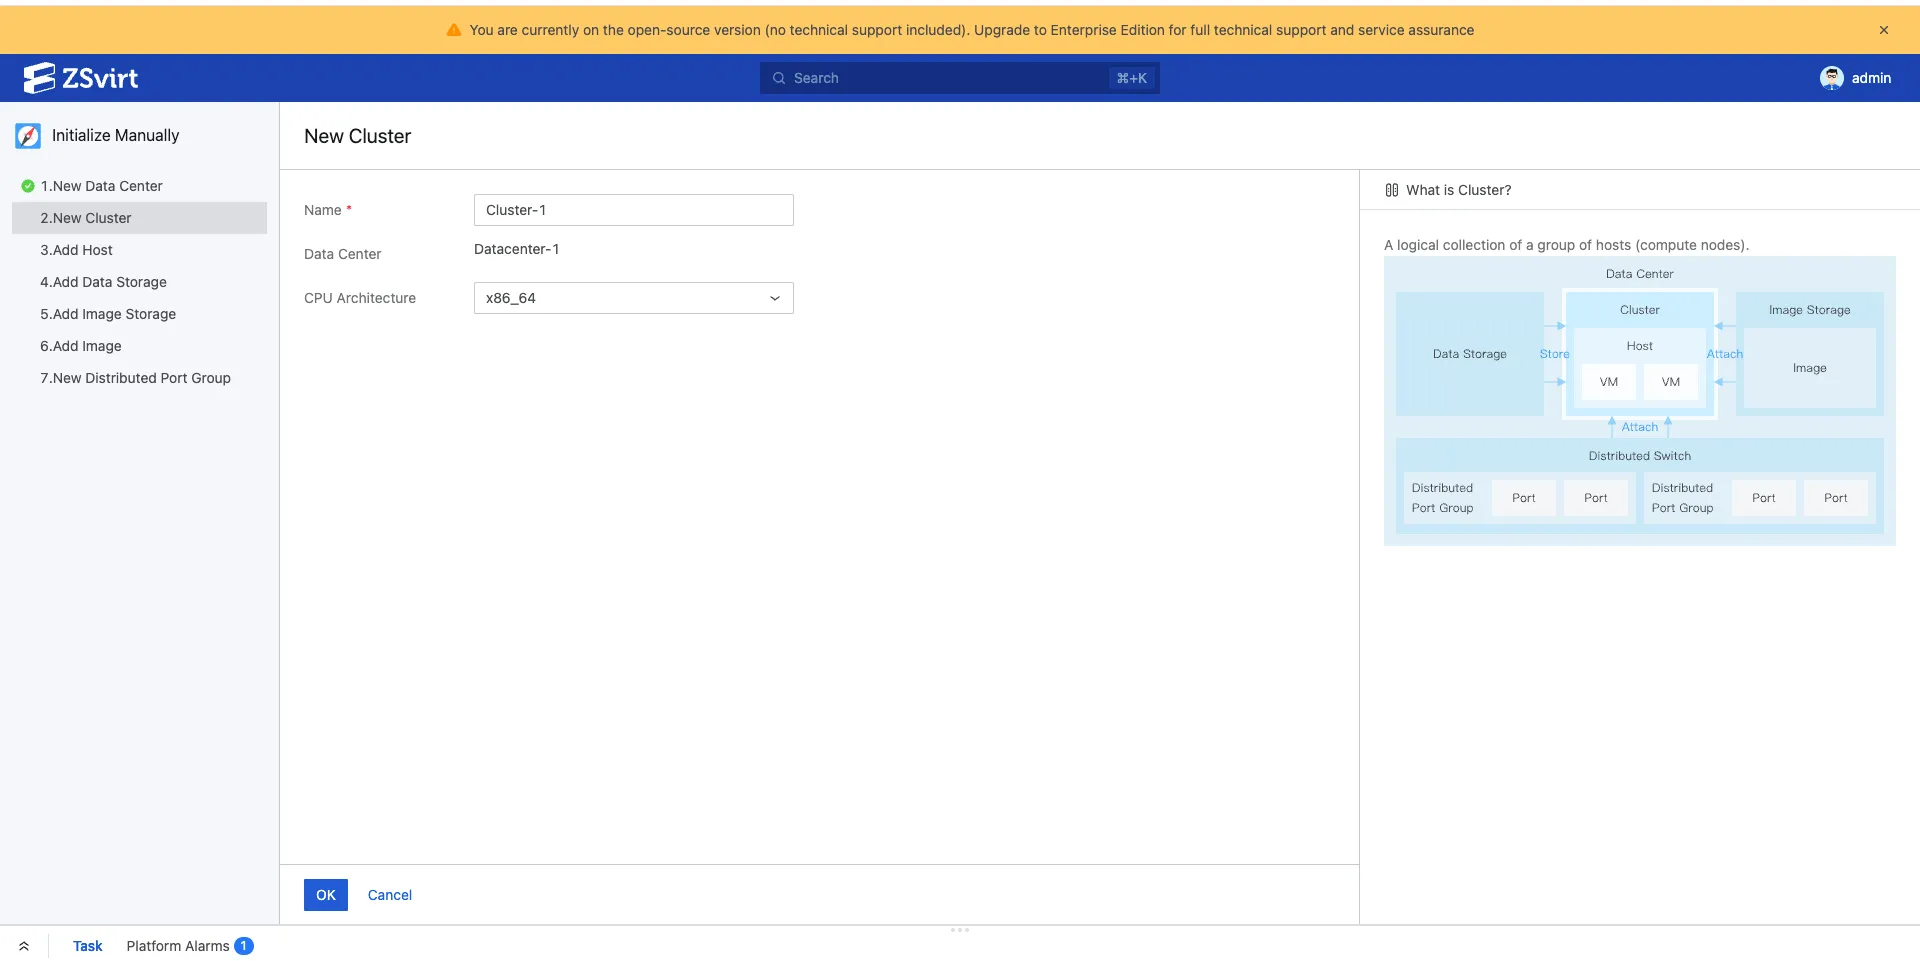
Conceptually, a datacenter hosts a group of compute, storage, and network resources, while a cluster organizes hosts, datastores, and distributed switches. Create them first — everything else attaches underneath.
Step 3: Add the Management Node as a Host
The All-in-One trick is to add the management node itself as a host. Enter a name, the IP address (the management node IP), and the root password, click OK, and wait until the host shows as connected:
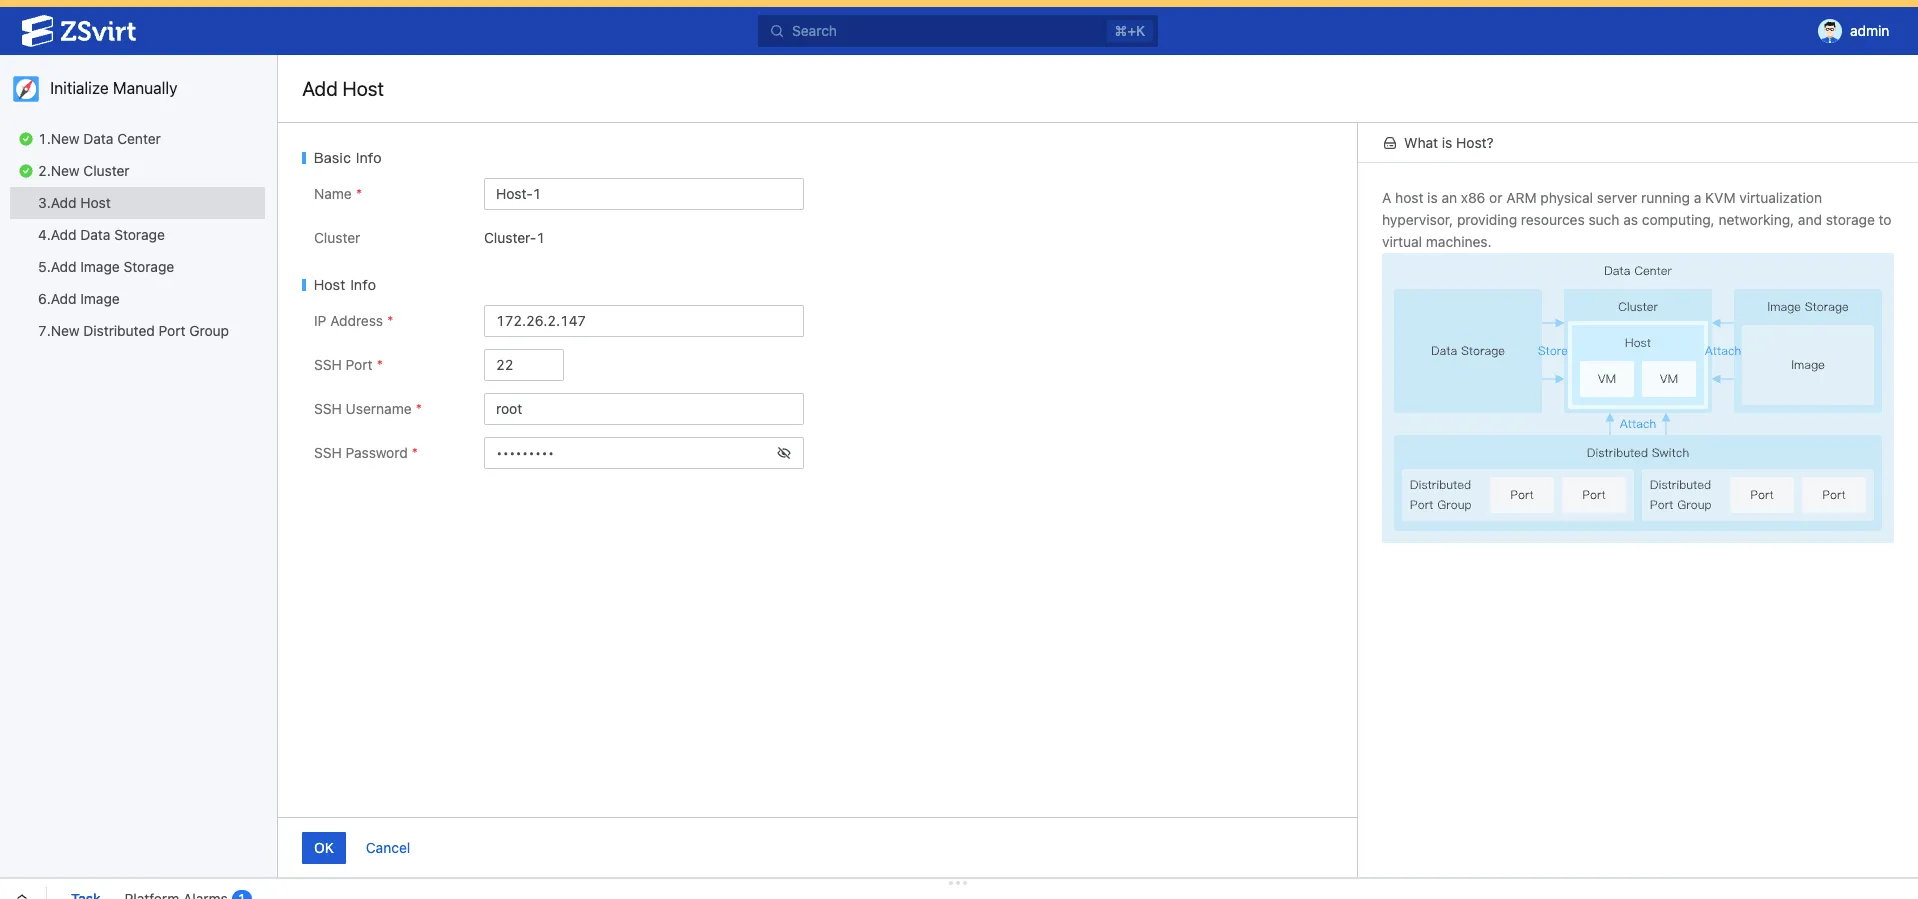
If this step fails, nine times out of ten it’s SSH connectivity or a wrong root password — test manually with ssh root@<host IP> first.
Step 4: Add a Datastore and Image Storage
VM disks live on datastores; system images live on image storage. You need both.
Datastore: for testing, a local datastore is fine. Enter a name and a mount path (don’t reuse the system root or a temp directory), then click OK:
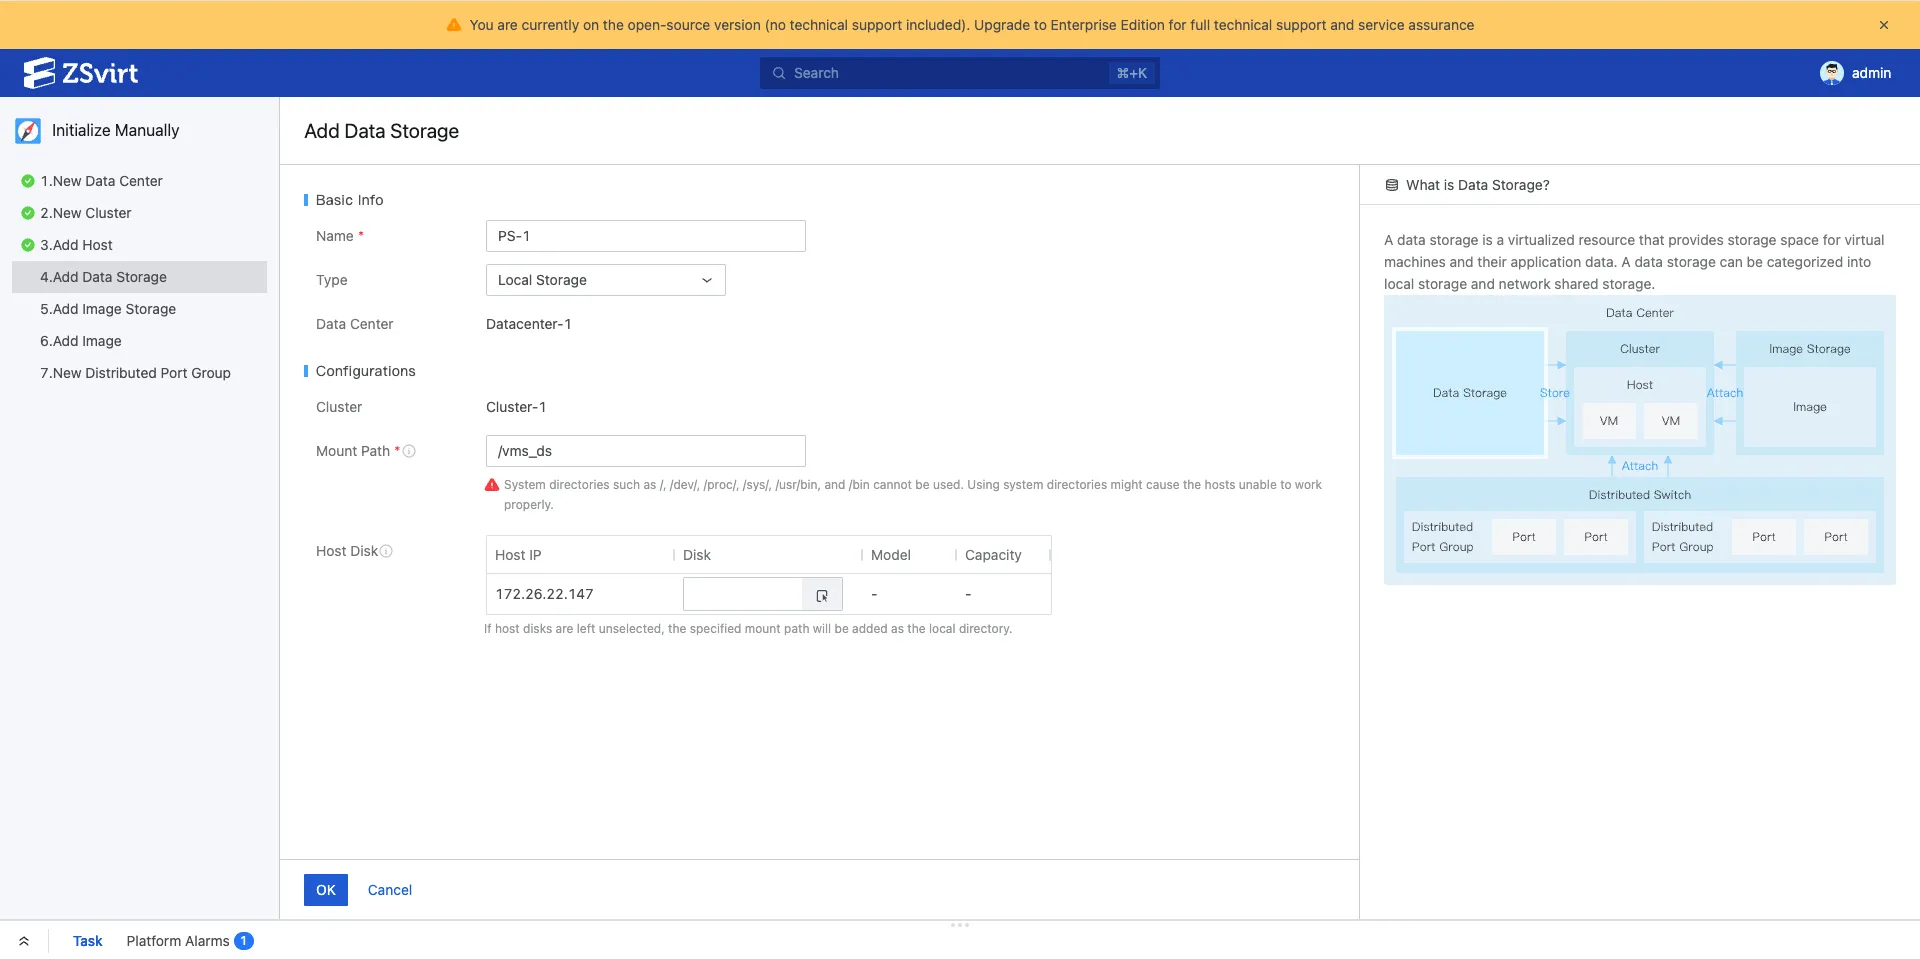
Note: local datastores work for single-host verification but can’t do cross-host migration. To try live migration later, switch to shared storage that all hosts can access.
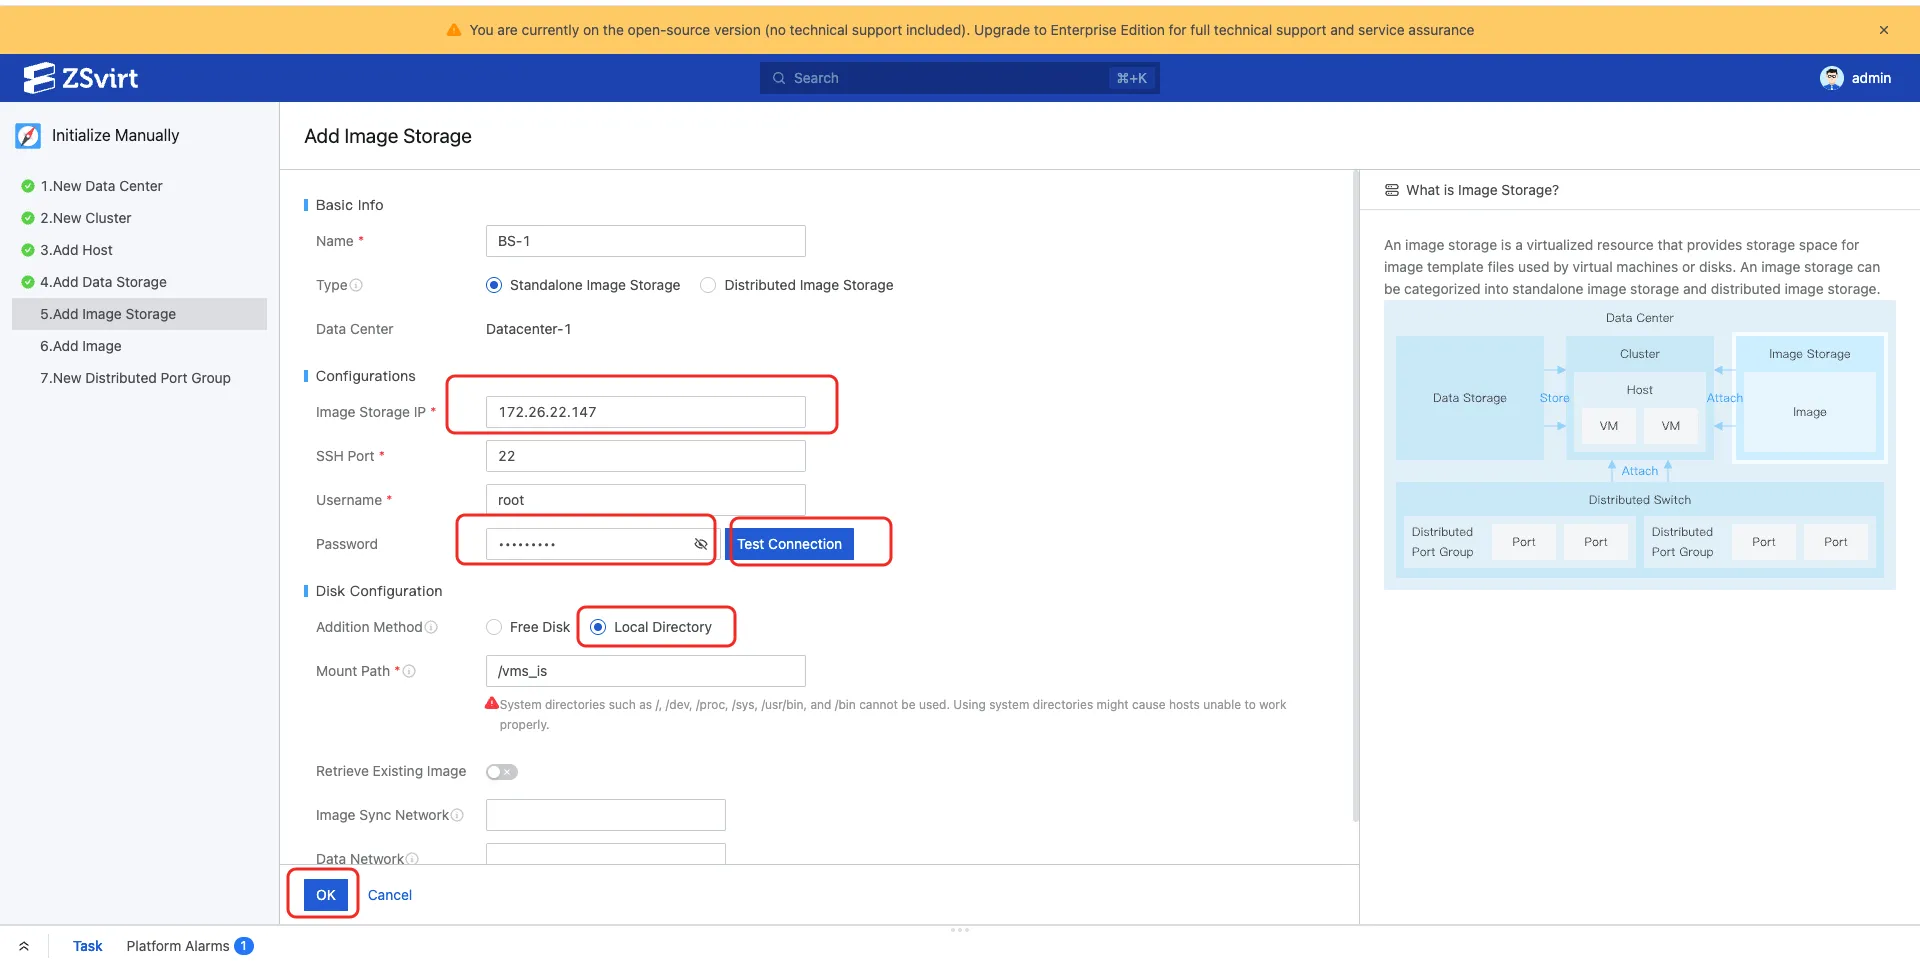
Image storage: enter a name, the image storage IP (again the management node IP), and the password, click Test Connection, select Local Directory, and click OK:
Then add a system image (qcow2 or raw). For testing, the defaults are fine — just click OK. The system automatically provisions a test image, ZStack-image-1.4, which you can use right away to verify VM creation:
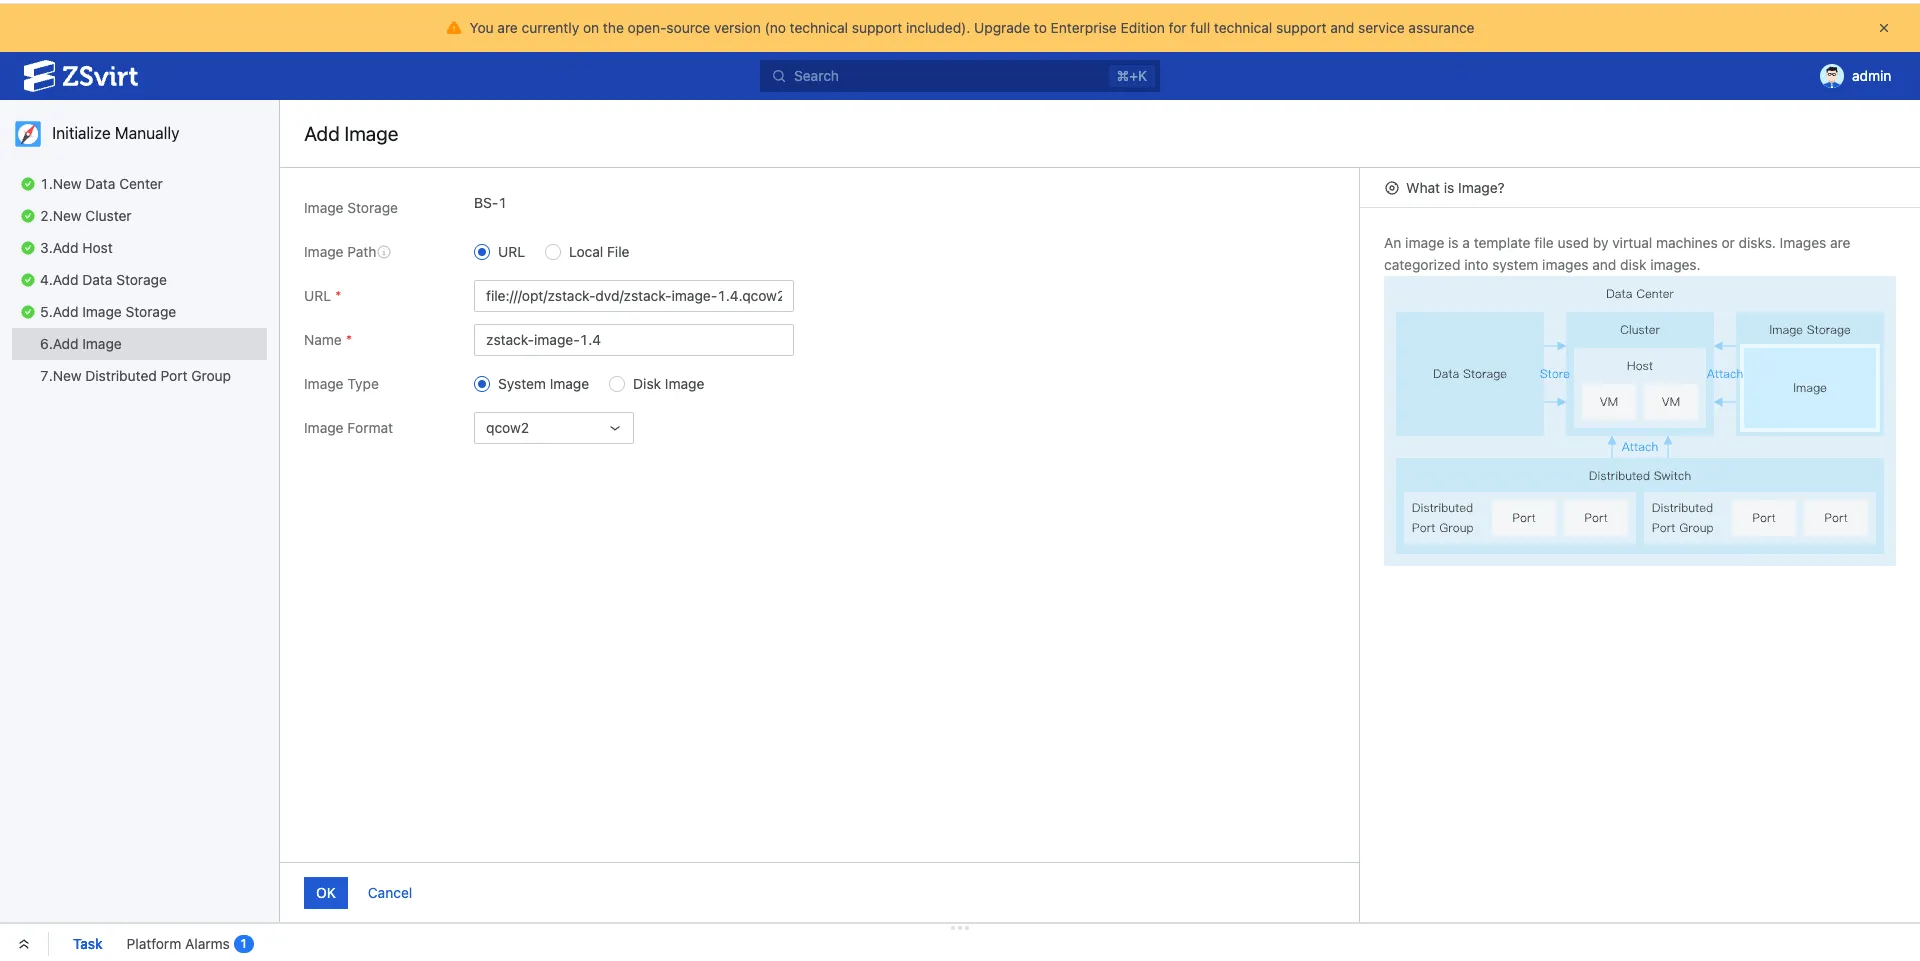
Import speed depends on the network path between the image storage, management node, hosts, and datastores, so be patient with large images. If it fails, first confirm the platform can read the image URL or local path (curl -I <image URL> or qemu-img info <image file> are handy).
Step 5: Create the Network
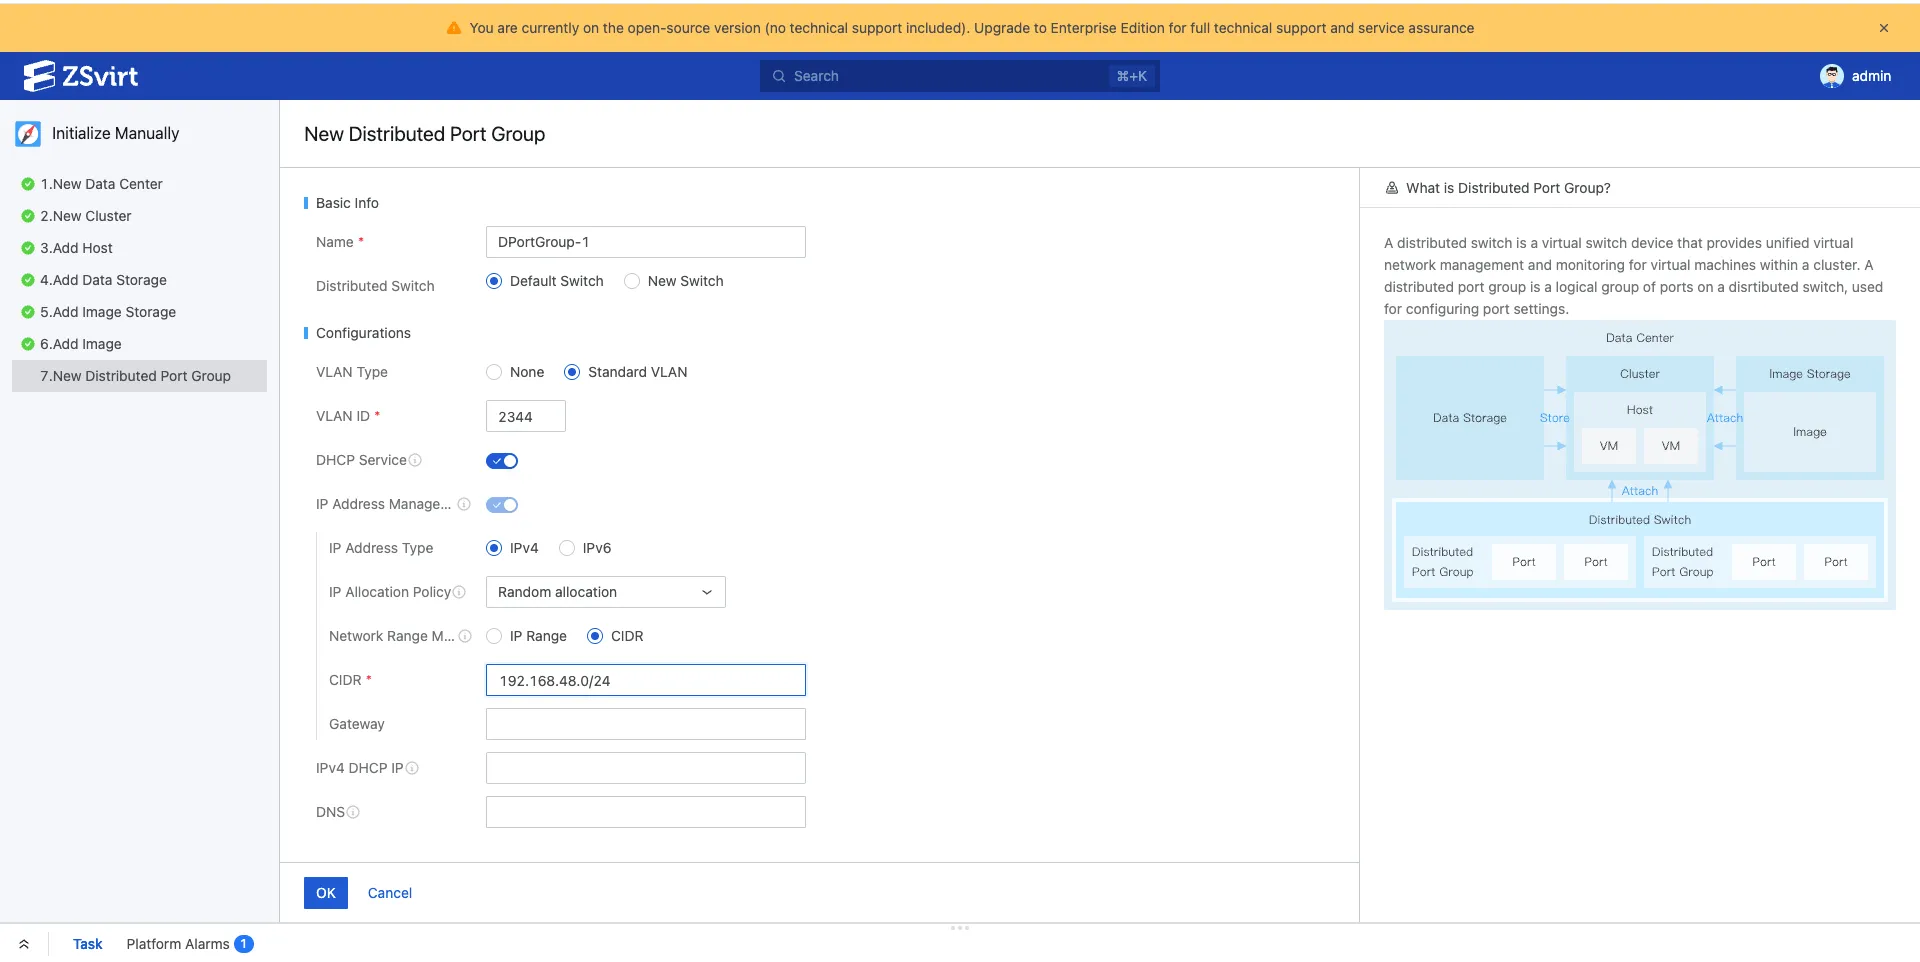
Create a distributed switch and a distributed port group. Using vlan-2344 as an example, configure the VLAN ID, IP allocation method, and DNS, then click OK:
A few tips:
- For quick verification, enable IP address management and DHCP so VMs get IPs automatically.
- Don’t let the network segment overlap the gateway, DHCP service IP, or existing service addresses — this is the second most common pit, and it’s why most “VM got no IP” reports happen.
- All hosts in the cluster need a physical interface or bond with the same name; when using VLANs, the switch-side trunk/access configuration must match the platform.
Step 6: Create Your First VM
Click Create VM, enter a name, select the system image you just imported for disk 1, pick NIC 1, and confirm:
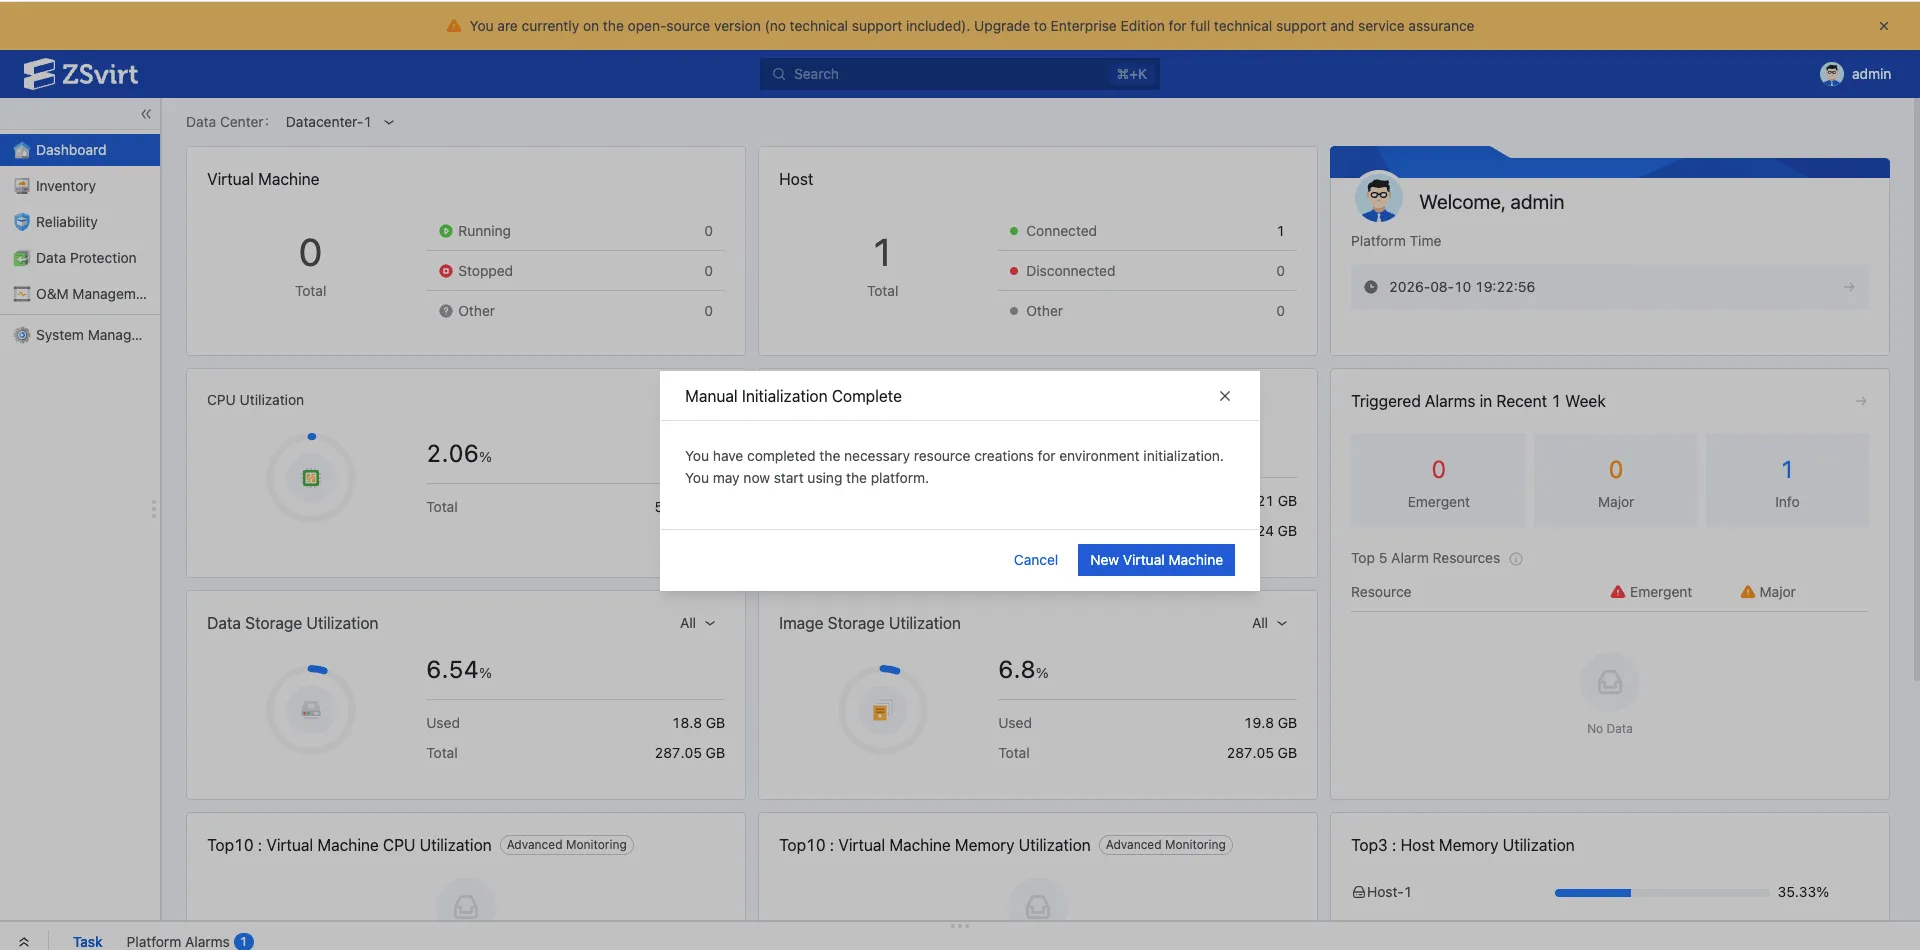
When the VM shows as Running and the console reaches a login screen, you’re most of the way there.
Log in to the guest and run a quick verification:
ip addr
ip route
ping -c 4 <gateway IP>
ping -c 4 223.5.5.5
ping -c 4 www.baidu.com
Reading the results is simple:
- Gateway reachable → distributed switch, port group, DHCP, and VLAN are all working;
- External IP reachable → upstream routing works;
- Domain resolves and responds → DNS works.
Step 7: Double-Check via CLI (Optional)
If you prefer the command line, run a full-chain health check on the management node:
zstack-cliLogInByAccount accountName=admin password=<admin password>
QueryHost fields=uuid,name,managementIp,state,status
QueryPrimaryStorage fields=uuid,name,type,state,status,availableCapacity,totalCapacity
QueryBackupStorage fields=uuid,name,type,state,status,availableCapacity,totalCapacity
QueryL3Network fields=uuid,name,type
QueryImage fields=uuid,name,state,status
QueryVmInstance name=vm-test-01 fields=uuid,name,state,hostUuid,vmNicsExpected output:
Host state=Enabled status=Connected
PrimaryStorage state=Enabled status=Connected
BackupStorage state=Enabled status=Connected
Image state=Enabled status=Ready
VmInstance state=Running
If everything matches, the compute-storage-network-image-VM chain is fully working.
Troubleshooting Cheat Sheet
| Symptom | Check first |
|---|---|
| Installation script exits | System time, root privileges, /tmp/zstack_installation-*.log |
| Failed to add host | SSH connectivity, root password, time sync, firewall |
| Failed to add image | Image URL readability, image format, free image storage capacity |
| VM gets no IP | Segment overlapping gateway/reserved addresses, DHCP enabled |
| Console won’t open | zstack-ctl status, browser certificate |
For a more complete list, see the installation docs.
What’s Next
Once the minimal environment works, continue in this order:
- Change the default password and create individual admin accounts;
- Configure NTP so the management node, hosts, and storage share the same time;
- Switch the local datastore to shared storage and try cross-host live migration;
- Build standard Linux/Windows template images and install VMTools for complete in-guest monitoring;
- When you need dual-node high availability, see the HA chapter of the Installation and Upgrade Tutorial.
A fully illustrated step-by-step reference is also available on the Quick Start docs page.
If you run into issues during deployment, feel free to open an issue or join the discussion in the GitHub community.