
Quick Start
A complete minimal path from installation to your first VM: prepare the environment, deploy the management node, finish basic initialization, add hosts/storage/networks/images, and create your first accessible VM.
ZSvirt QuickStart: From Installation to Your First VM
This guide walks administrators new to ZSvirt through a complete minimal workflow: preparing the installation environment, deploying the management node, completing basic initialization, adding hosts/storage/networks/images, and creating the first VM you can log in to.
When to use this guide:
- You want to set up a single-management-node ZSvirt environment from scratch.
- You already have the ZSvirt installation package, servers, and storage/network planning details ready.
- Your goal is to get the compute, storage, network, image, and VM chain working end to end.
What this guide does not cover:
- Dual management node HA deployment.
- Disaster recovery, migration, unified authentication, bare metal, and other modules.
- Production cutover plans, capacity planning, and security hardening.
Notes
- This guide uses ZSvirt platform terminology: VM, host, datastore, image storage, volume, distributed switch, and distributed port group.
- Low-level command and API names still use legacy fields such as
zstack-ctl,zstack-cli, PrimaryStorage, and BackupStorage. These are command-layer names and are not used as terminology in the main text. - Menu names may vary slightly across versions. If you cannot find an item, use the in-page search or locate resources by name.
1. Overall Workflow
The complete QuickStart workflow is:
Prepare the h84r ISO installation media
  -> Install the management node OS from the h84r ISO (compute node mode)
  -> Configure basic networking and time on the management node
  -> Prepare the ZSvirt installation package
  -> Install the ZSvirt management node
  -> Verify the management node and Web UI
  -> Log in to ZSvirt
  -> Initialize the datacenter and cluster
  -> Add a host
  -> Add a datastore
  -> Add image storage
  -> Create a distributed switch
  -> Create a distributed port group
  -> Add a system image
  -> Create the first VM from the system image
  -> Verify console access, IP, gateway, and login
Minimal resource relationship:
Datacenter
  └─ Cluster
      ├─ Host
      ├─ Datastore
      └─ Distributed Switch
          └─ Distributed Port Group
              └─ VM NIC
Datacenter
  └─ Image Storage
      └─ System Image
VM
  ├─ System Image
  ├─ Datastore
  └─ Distributed Port Group
2. Before You Begin
2.1 Management Node Hardware Recommendations
Prepare at least one management node server. For a minimal All-in-One environment, the hardware requirements are:
| Item | Minimum | Recommended |
|---|---|---|
| CPU | Intel VT or AMD-V hardware virtualization, at least 8 cores | 24 cores or more |
| Memory | 8 GB | 24 GB or more |
| System disk | 100 GB | 200 GB or more |
| NIC | 1 management NIC | Separate management, storage, and service networks |
| IP | Static IP | Static IP with DNS/NTP configured in advance |
Note
- The management node IP is written into the platform configuration during installation, so DHCP is not recommended.
- The management node system time must not be earlier than the build time of the installation package, or the installation script may fail.
2.2 Install the OS from the h84r ISO and Deploy the ZSvirt Management Node
This step runs on the management node server itself to install its operating system. You are not creating a VM inside ZSvirt.
Prepare the h84r ISO installation media:
- h84r ISO:
ZSvirt-x86_64-DVD-<version>-h84r.iso - Installation method: physical optical drive, a bootable USB drive, or an ISO mounted through the server's remote console
- Installation target: the local system disk of the management node server
To create a bootable USB drive, we recommend Rufus or Fedora Media Writer. Both support Legacy and UEFI boot modes.
After the server boots, follow the h84r installation wizard to complete the OS and management node installation:
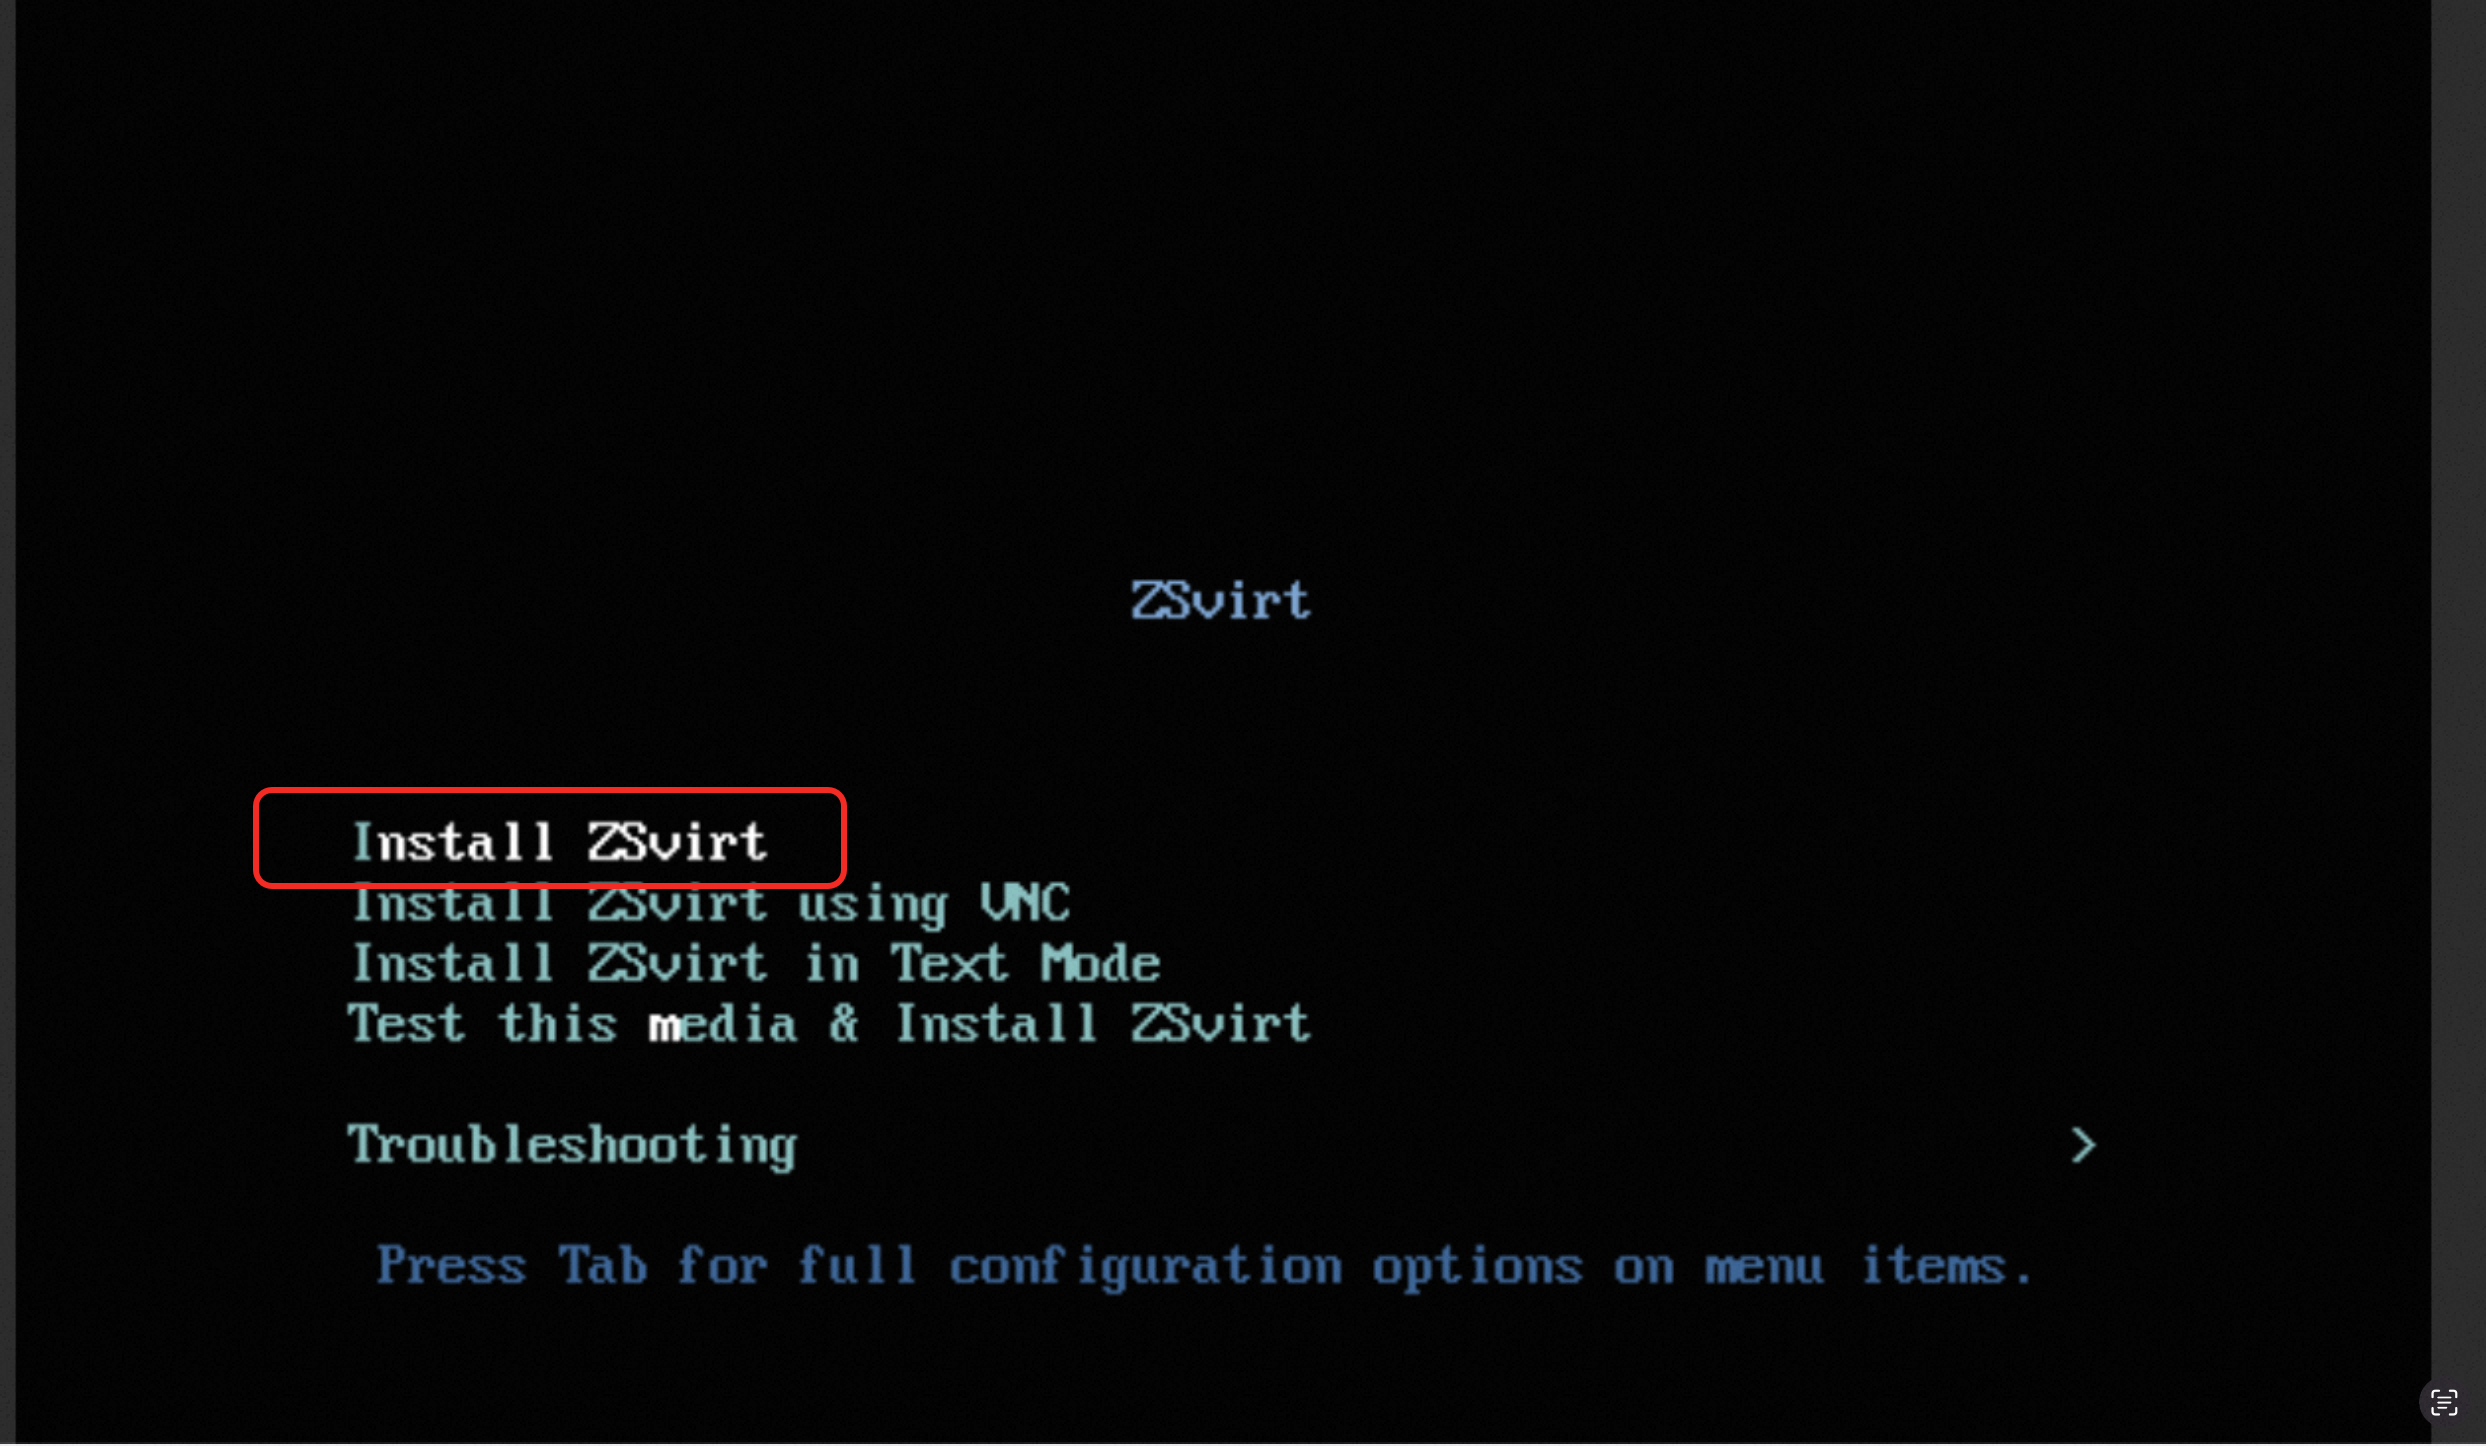
Step 1: Boot from the h84r ISO
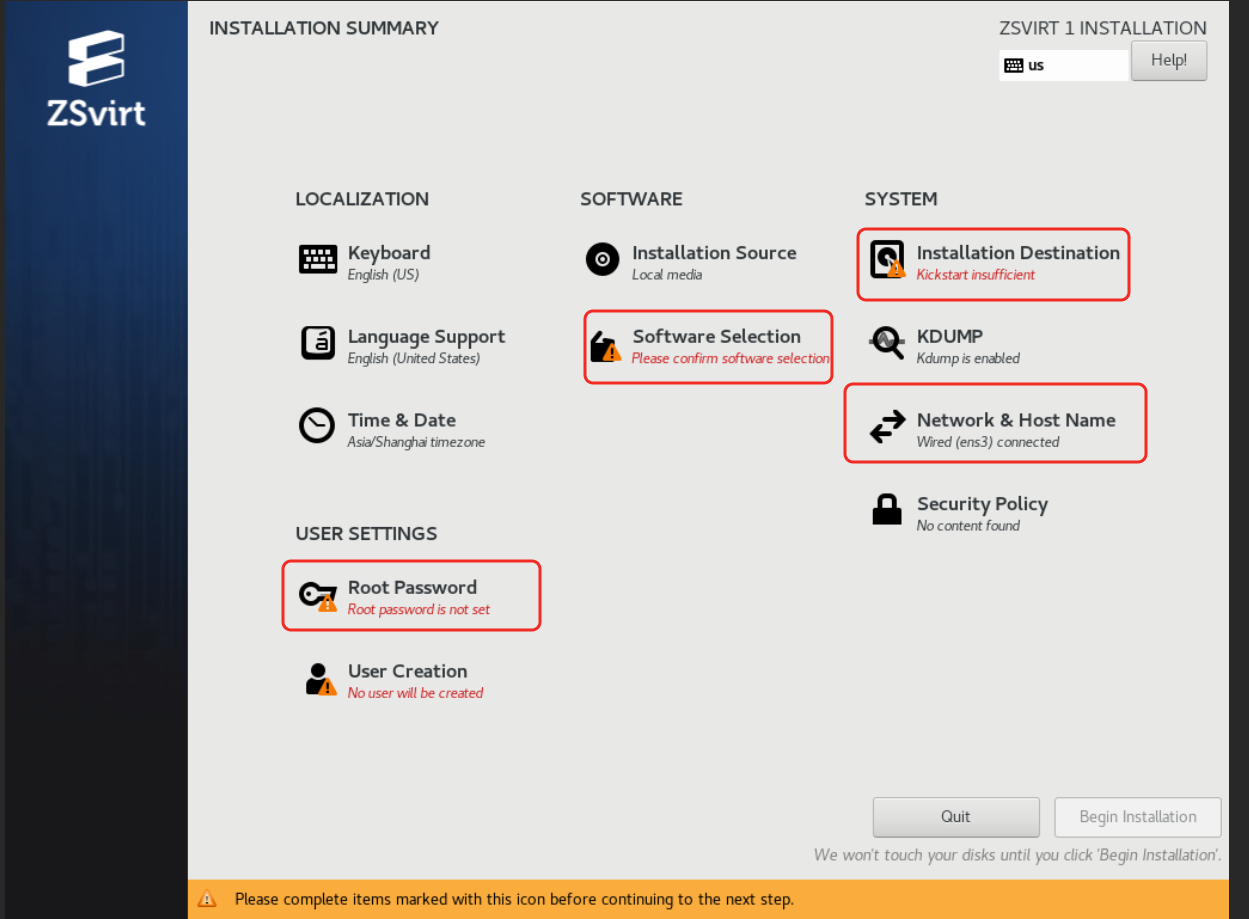
The installer boots from Install ZSVirt by default — no manual selection needed. You will then see the INSTALLATION SUMMARY screen:
Step 2: Select the System Disk
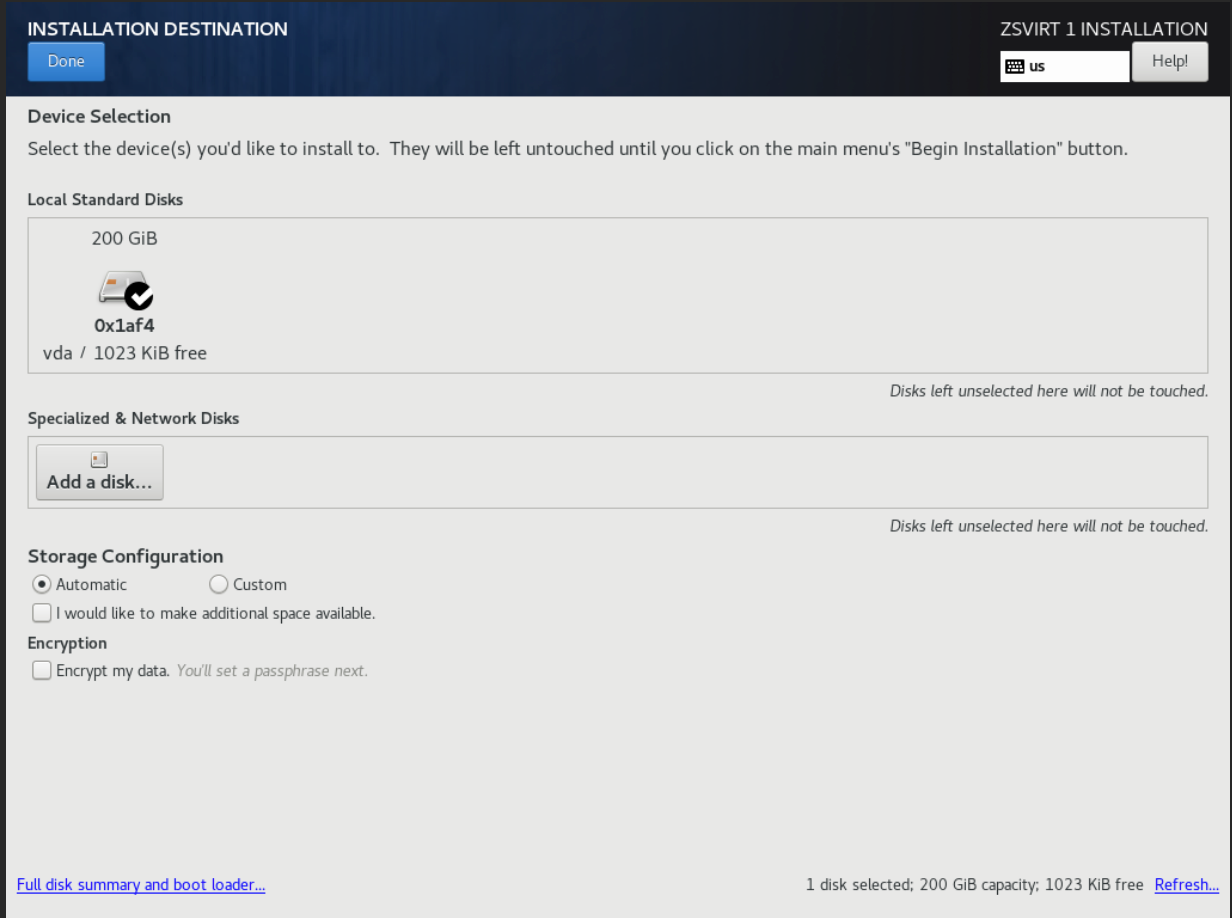
Select Installation Destination to enter the disk partitioning screen, choose a disk as the system disk, and click Done to confirm:
Step 3: Select the Installation Mode
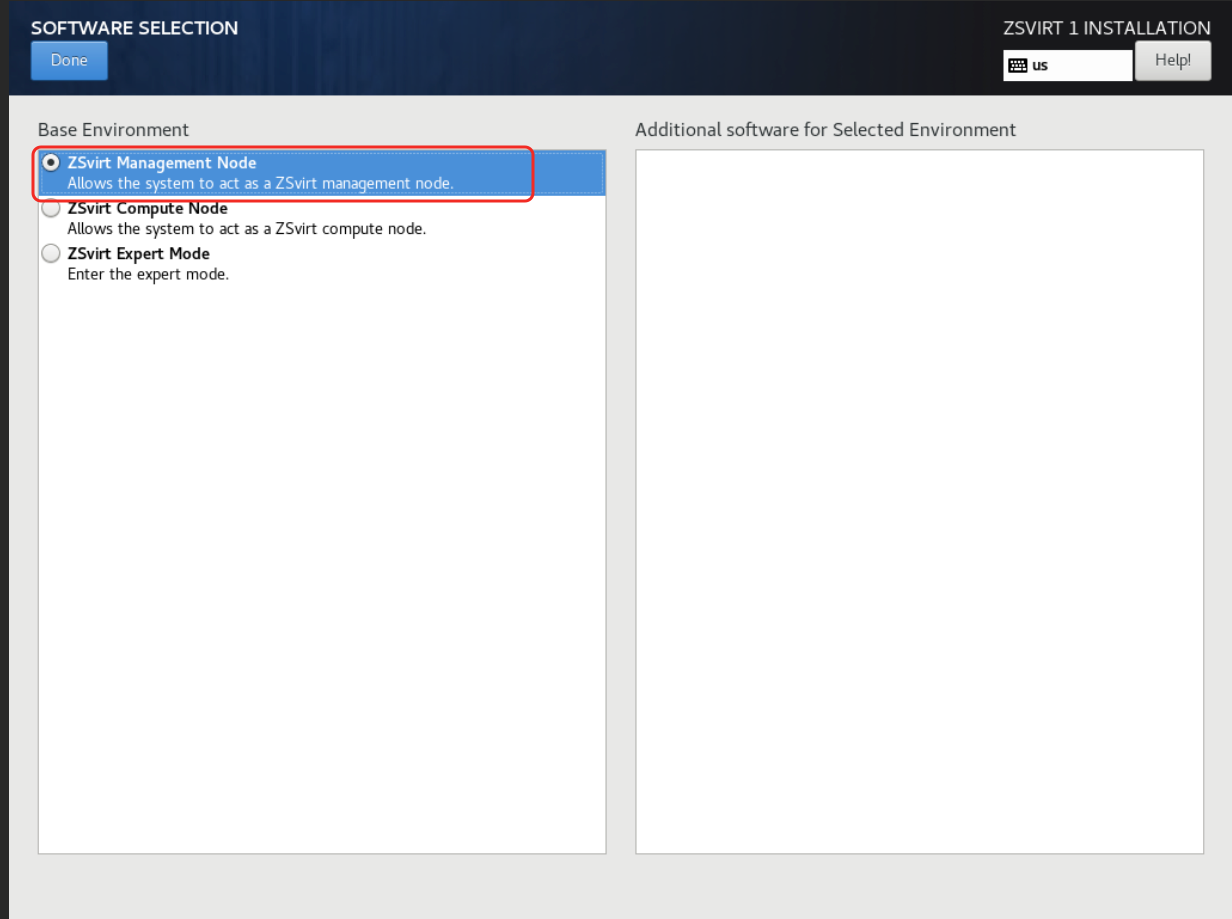
Go to the Software Selection screen, select ZSvirt Management Node, and click Done to confirm the installation mode:
Step 4: Configure Networking
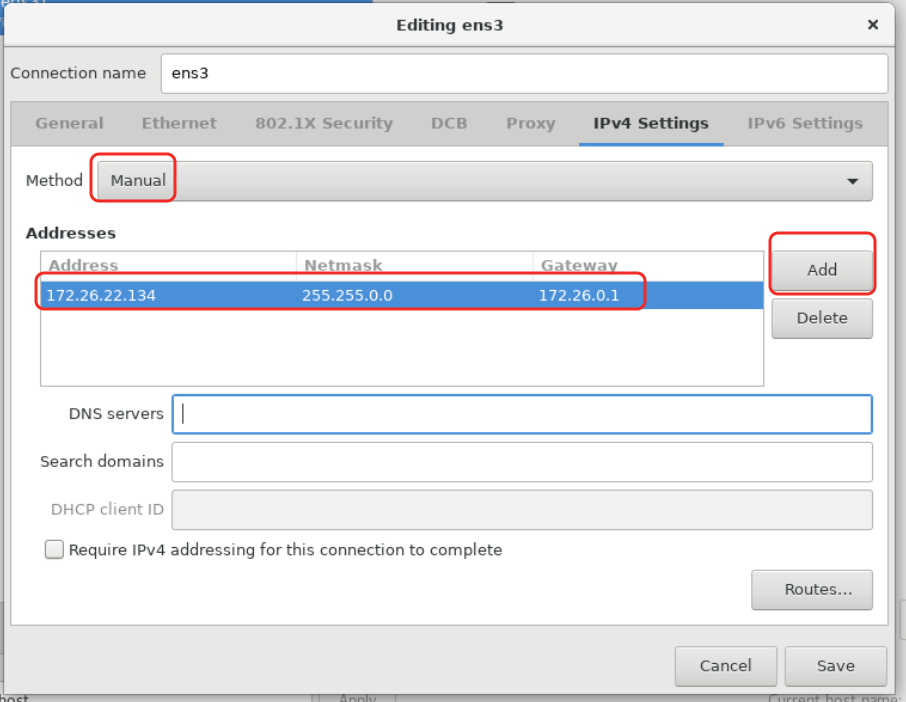
Go to the Network & Host Name screen and click Configure... to open the ens3 configuration dialog:
(1) Click IPv4 Settings > Method > Manual to switch from DHCP to a static IP assignment;
(2) Click Add to add an IP address entry, fill in the IP address, netmask, and gateway as planned, then click Save;
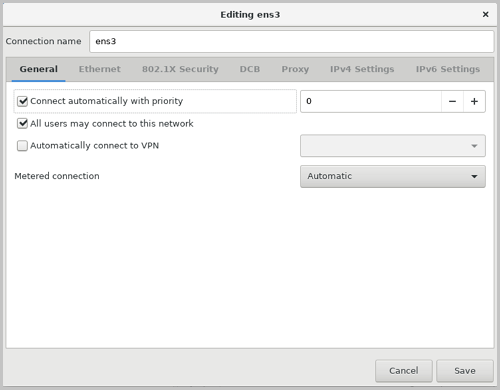
(3) In the ens3 configuration dialog, go to General > Connect automatically with priority (0) > Save so the NIC is activated automatically;
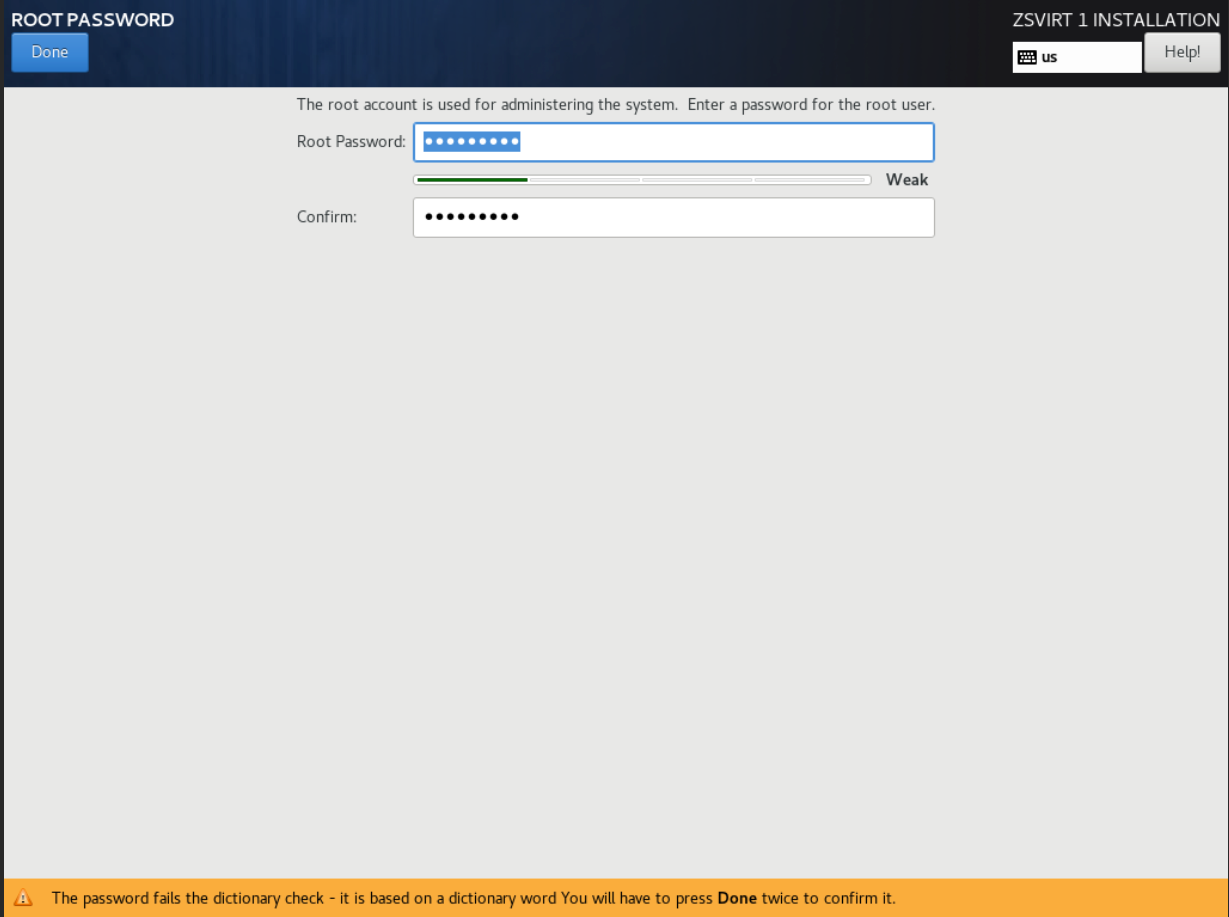
Step 5: Set the Root Password
Go to the Root Password screen, enter the root password twice to confirm, and click Done.
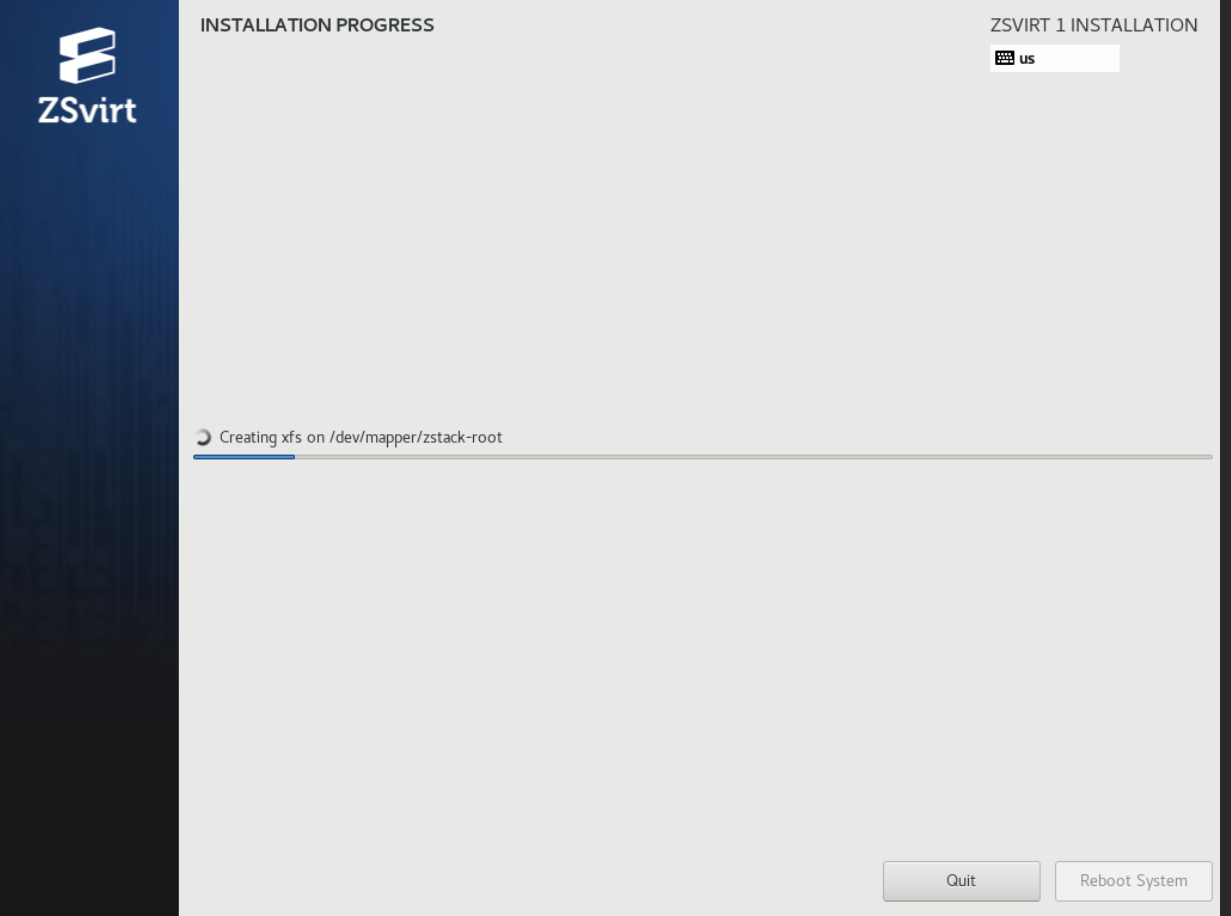
Step 6: Begin Installation
Once Installation Destination, Software Selection, Network & Host Name, and Root Password are all configured, click Begin Installation to install the OS in ZSvirt management node mode. This takes about 10 minutes, and the system reboots automatically when finished.
Step 7: Confirm the Management Node Installation
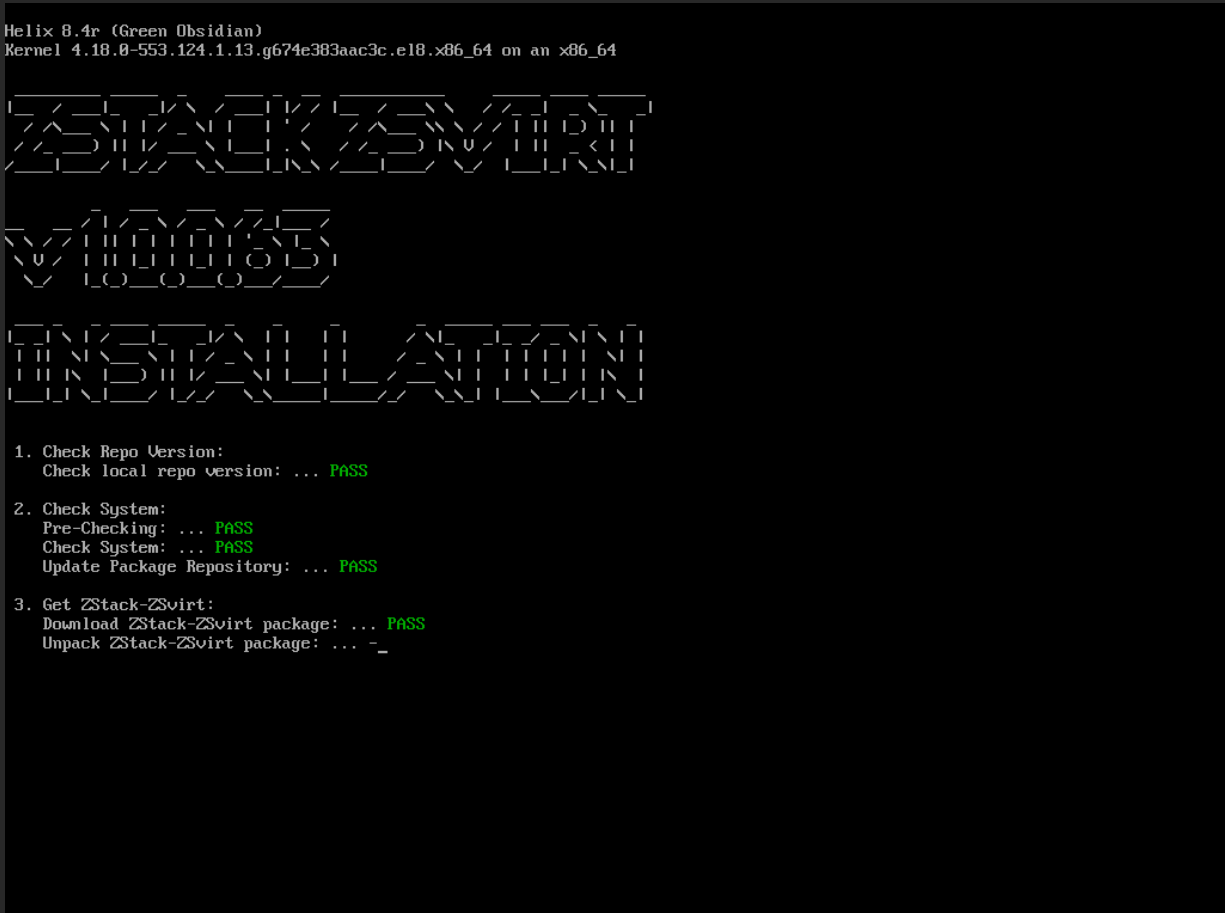
After the automatic reboot, the system automatically installs the ZSvirt management node service:
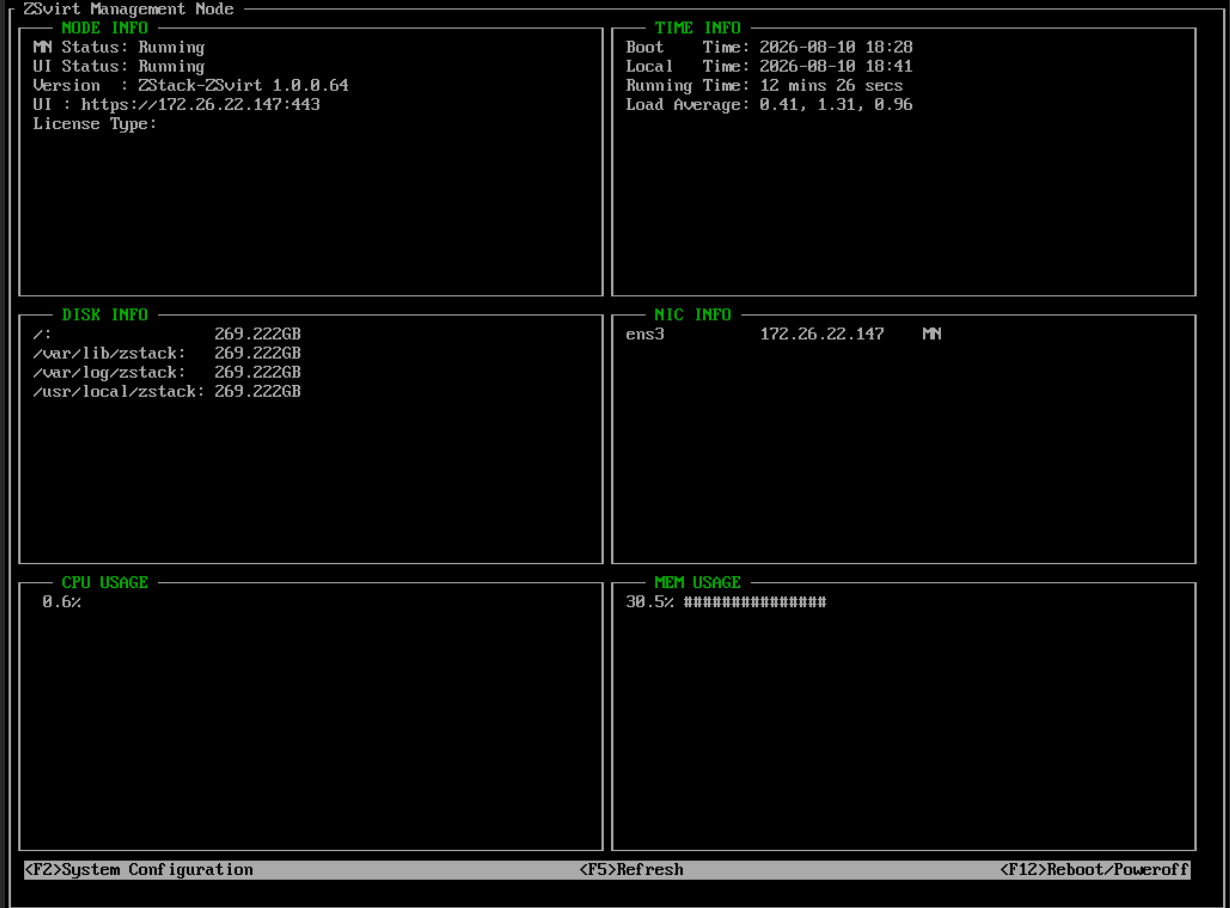
Once the installation finishes, the system enters the TUI. When MN and UI both show Running, the ZSvirt management node is installed:
2.3 Installation Log Locations
If the installation fails, check these first:
ls -lh /tmp/zstack_installation-*.log
ls -lh /tmp/zstack_ctl_installation-*.log
ls -lh /tmp/zstack_installation_timestamp-*.log
Common way to view them:
tail -n 200 /tmp/zstack_installation-*.log
tail -n 200 /tmp/zstack_ctl_installation-*.log
If the Web UI installation fails, check:
tail -n 200 /usr/local/zstack/zstack-ui/logs/ui-install.log2.4 Post-Installation Verification
(1) Check the management node service, UI service, and version information
zstack-ctl statusIf the node is not running:
zstack-ctl start_nodeCheck the management node IP:
zstack-ctl show_configuration | grep management.server.ip3. Initialize the ZSvirt Management Node
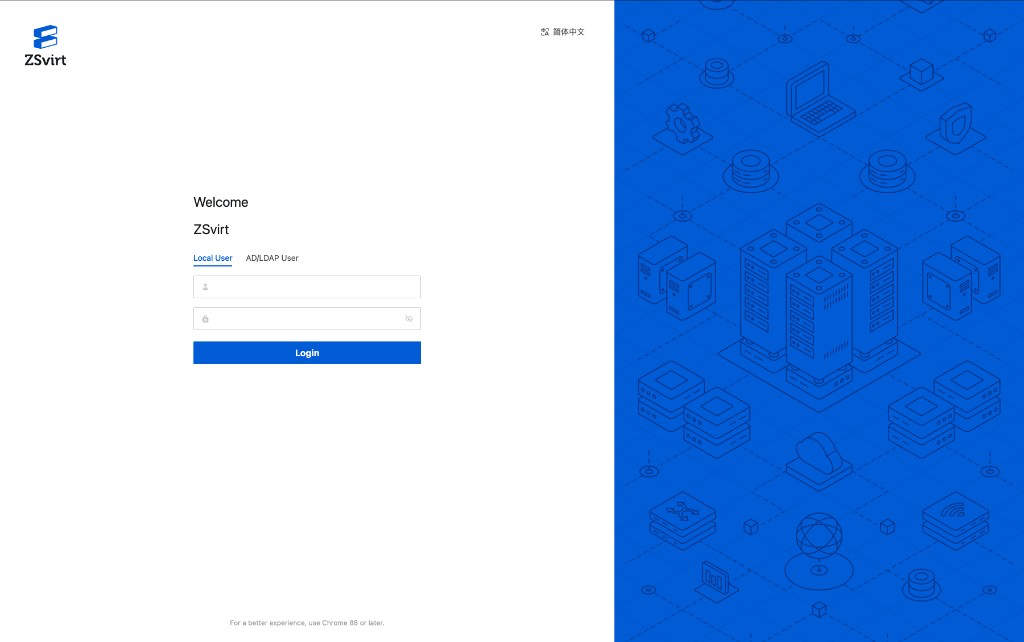
Log In to the Management Platform
Enter the management node IP address directly in your browser to open the ZSvirt management platform. The default username and password are admin/password.
After logging in with the default password, we recommend doing the following right away:
- Change the default password from the user menu in the top-right corner.
- Verify the platform time.
- Make sure there are no management-node-level alerts on the home page.
Security Notice
In production environments, always change the default password admin/password immediately after the first login.
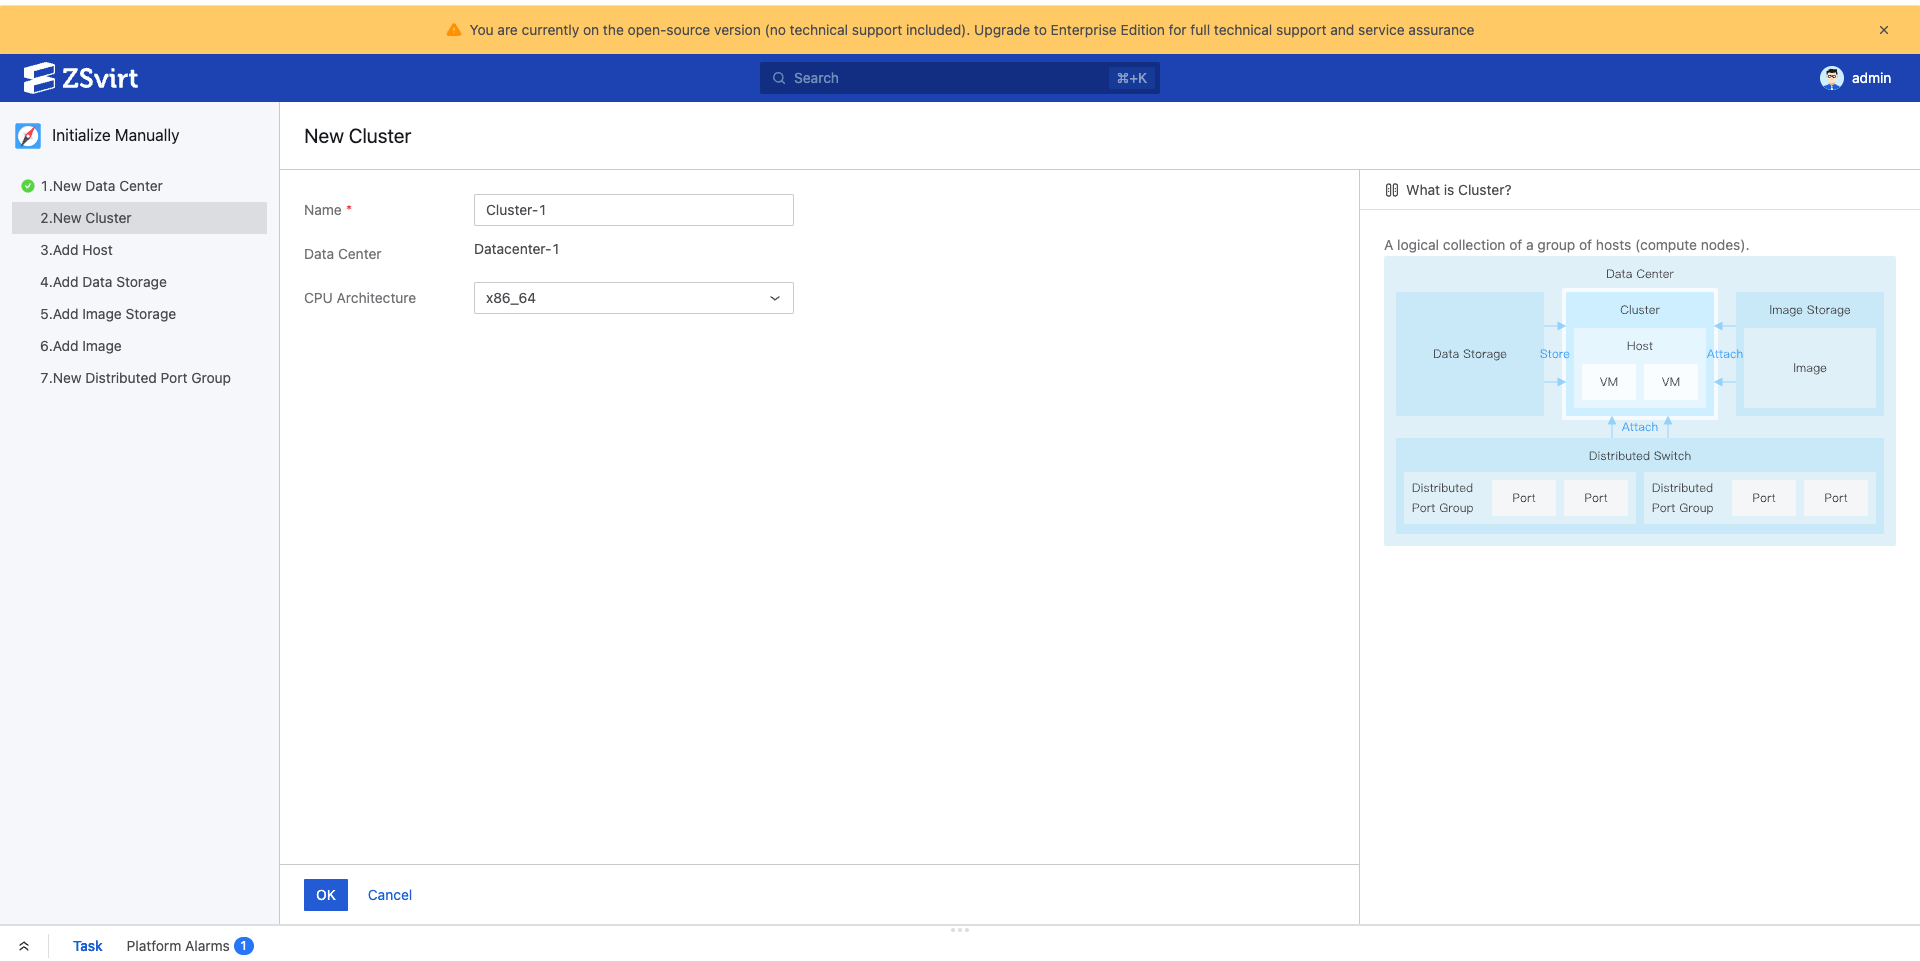
Initialize the Datacenter and Cluster
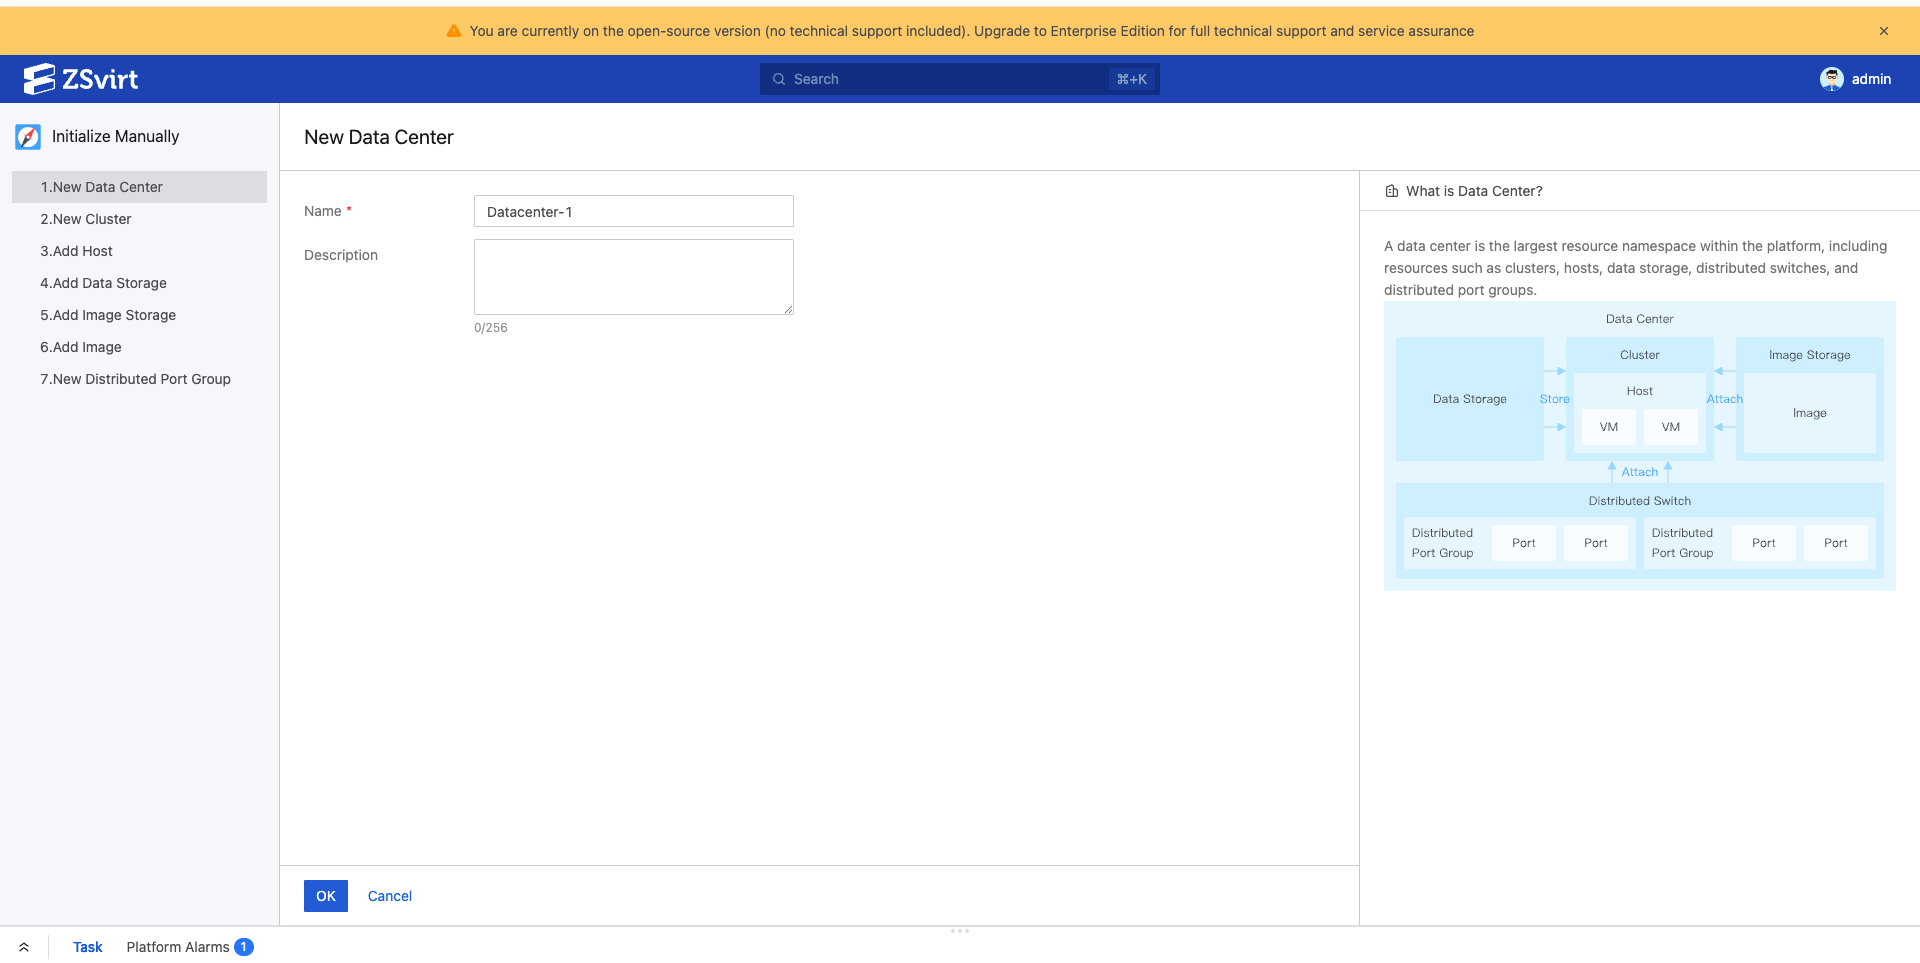
Enter the datacenter name Datacenter-1 and click OK. On the cluster creation screen, enter the cluster name Cluster-1 and click OK.
Guidelines
- A datacenter hosts a group of compute, storage, and network resources.
- A cluster organizes hosts, datastores, and distributed switches.
- QuickStart only needs 1 datacenter and 1 cluster.
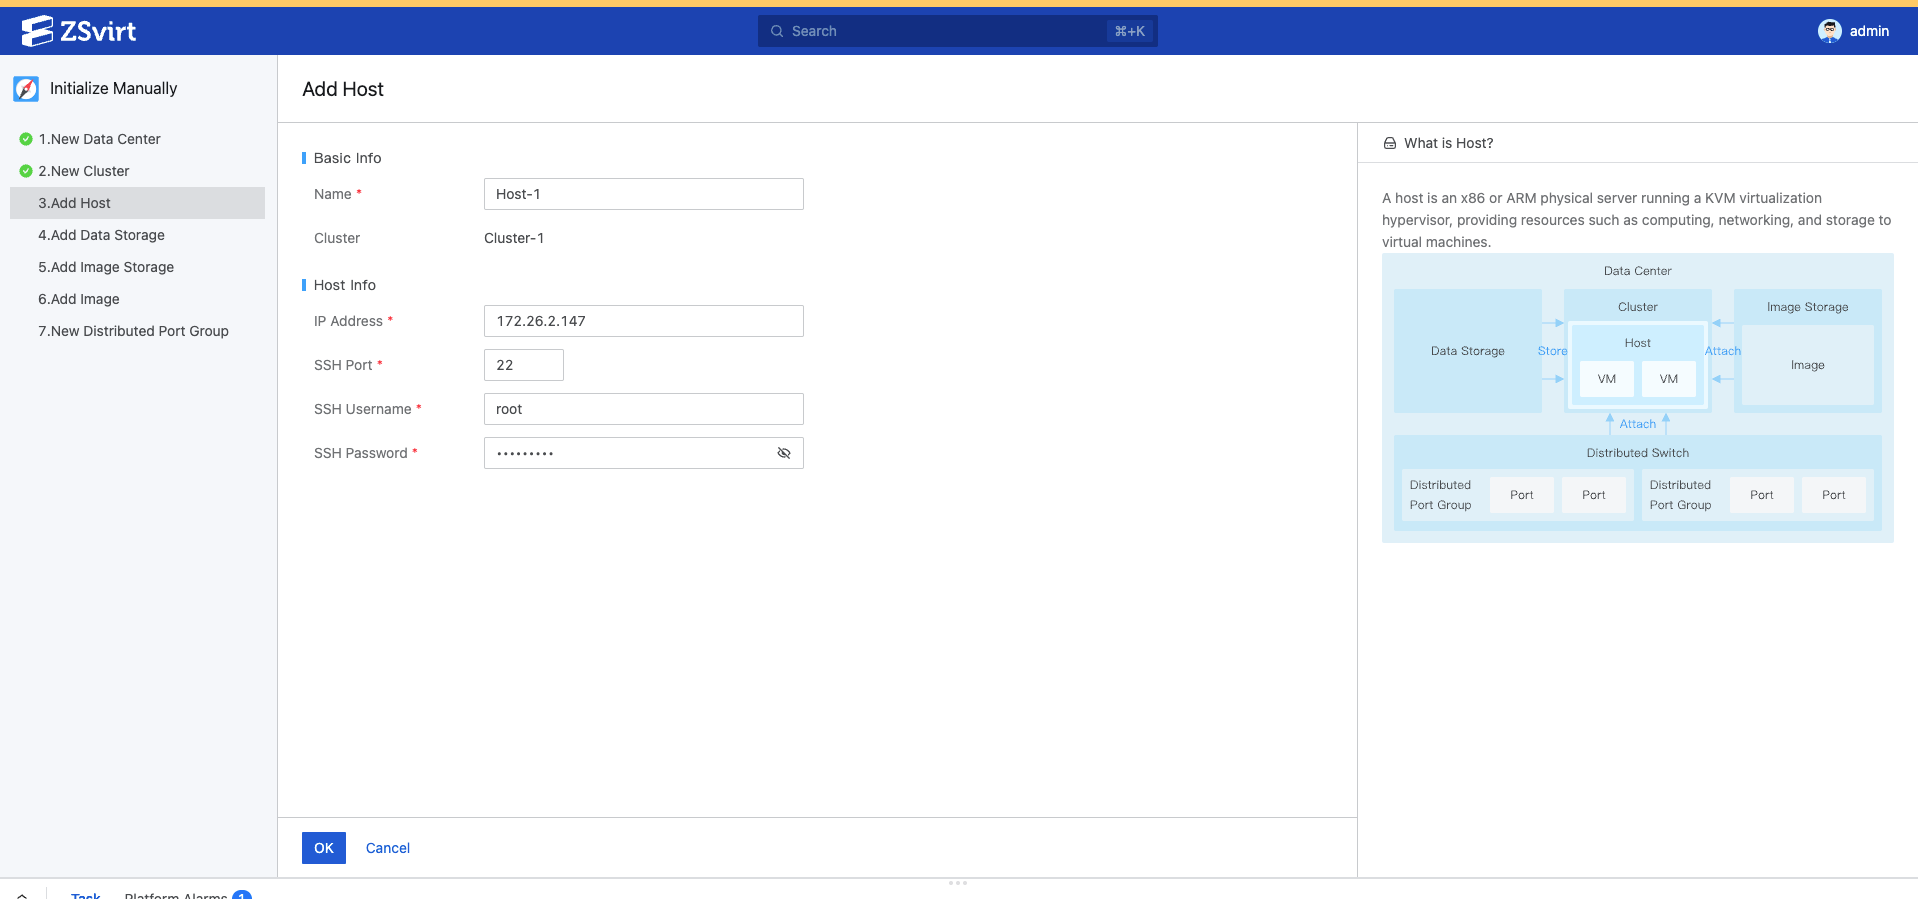
Add a Host
Enter the name, IP address (use the management node IP here), and the root password, then click OK and wait for the host to be added.
Afterwards, double-check the host's time, gateway, DNS, hostname, and firewall rules.
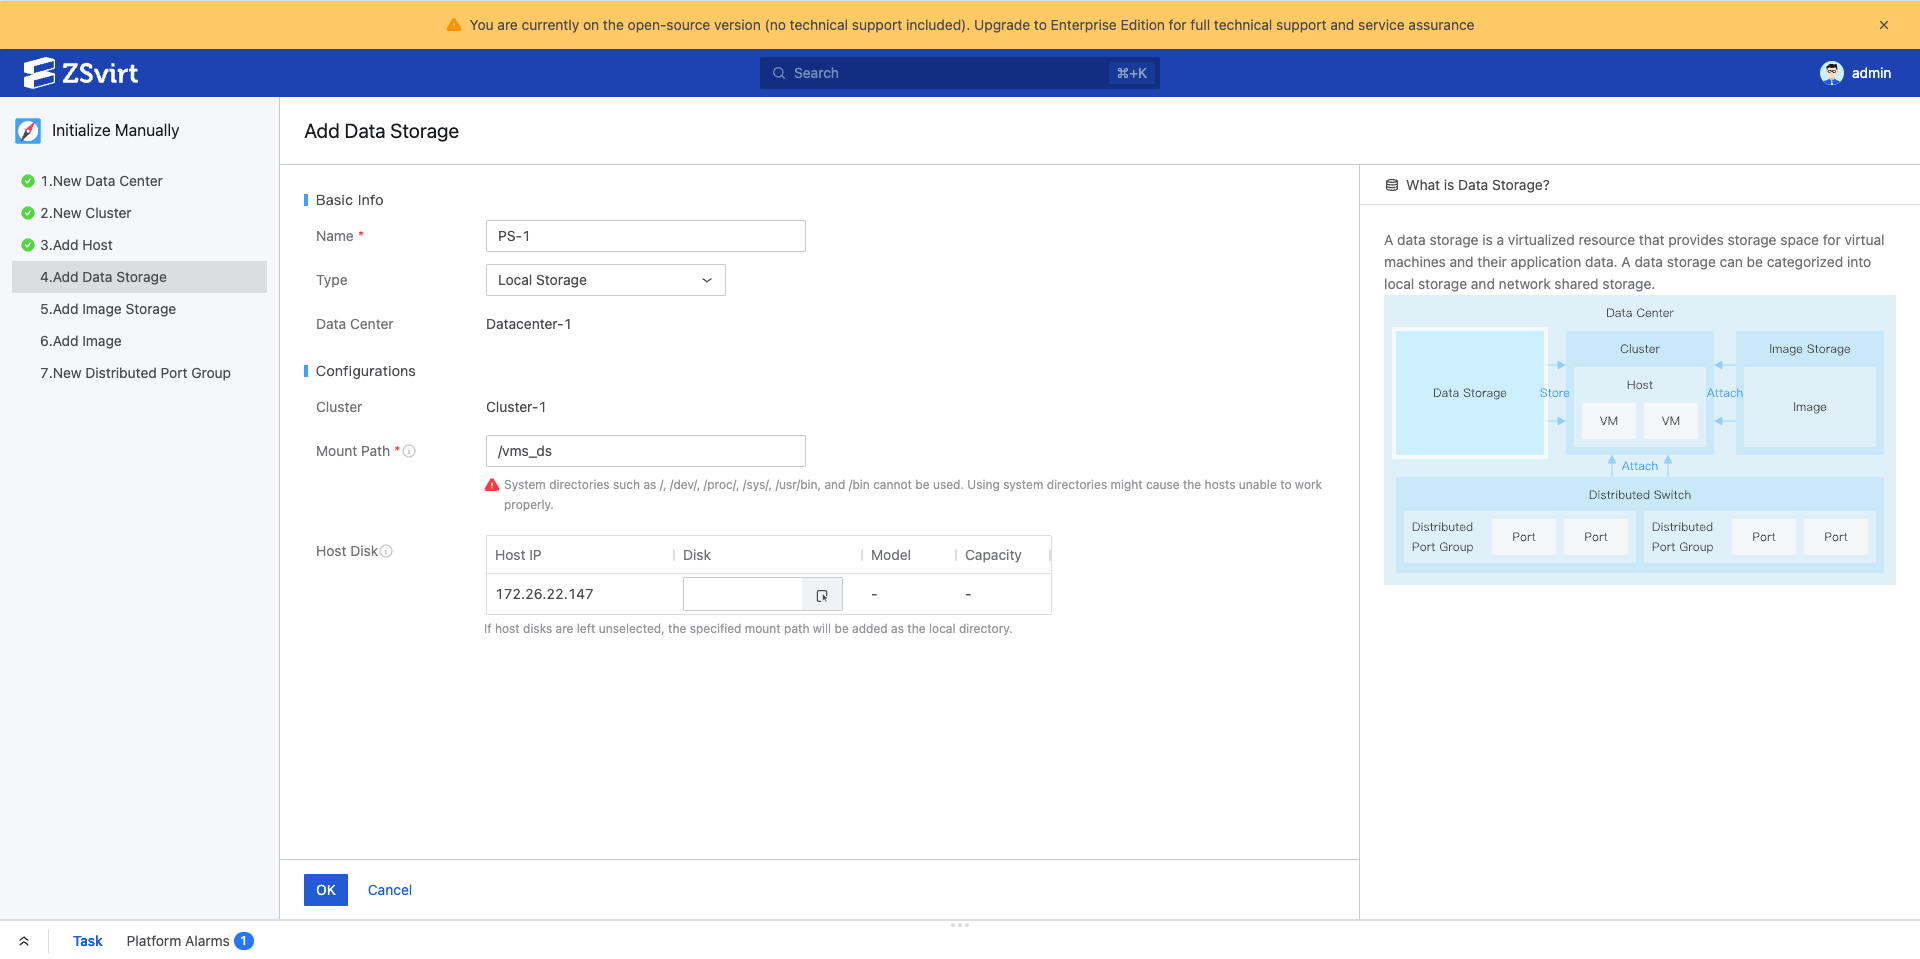
Add a Datastore
Add a local datastore by entering a name and a mount path, then click OK.
Note
- Local datastores are fine for single-host verification but cannot be used to test cross-host migration.
- Shared storage must be accessible from all target hosts.
- Do not reuse the system root directory or a temporary directory as the datastore path.
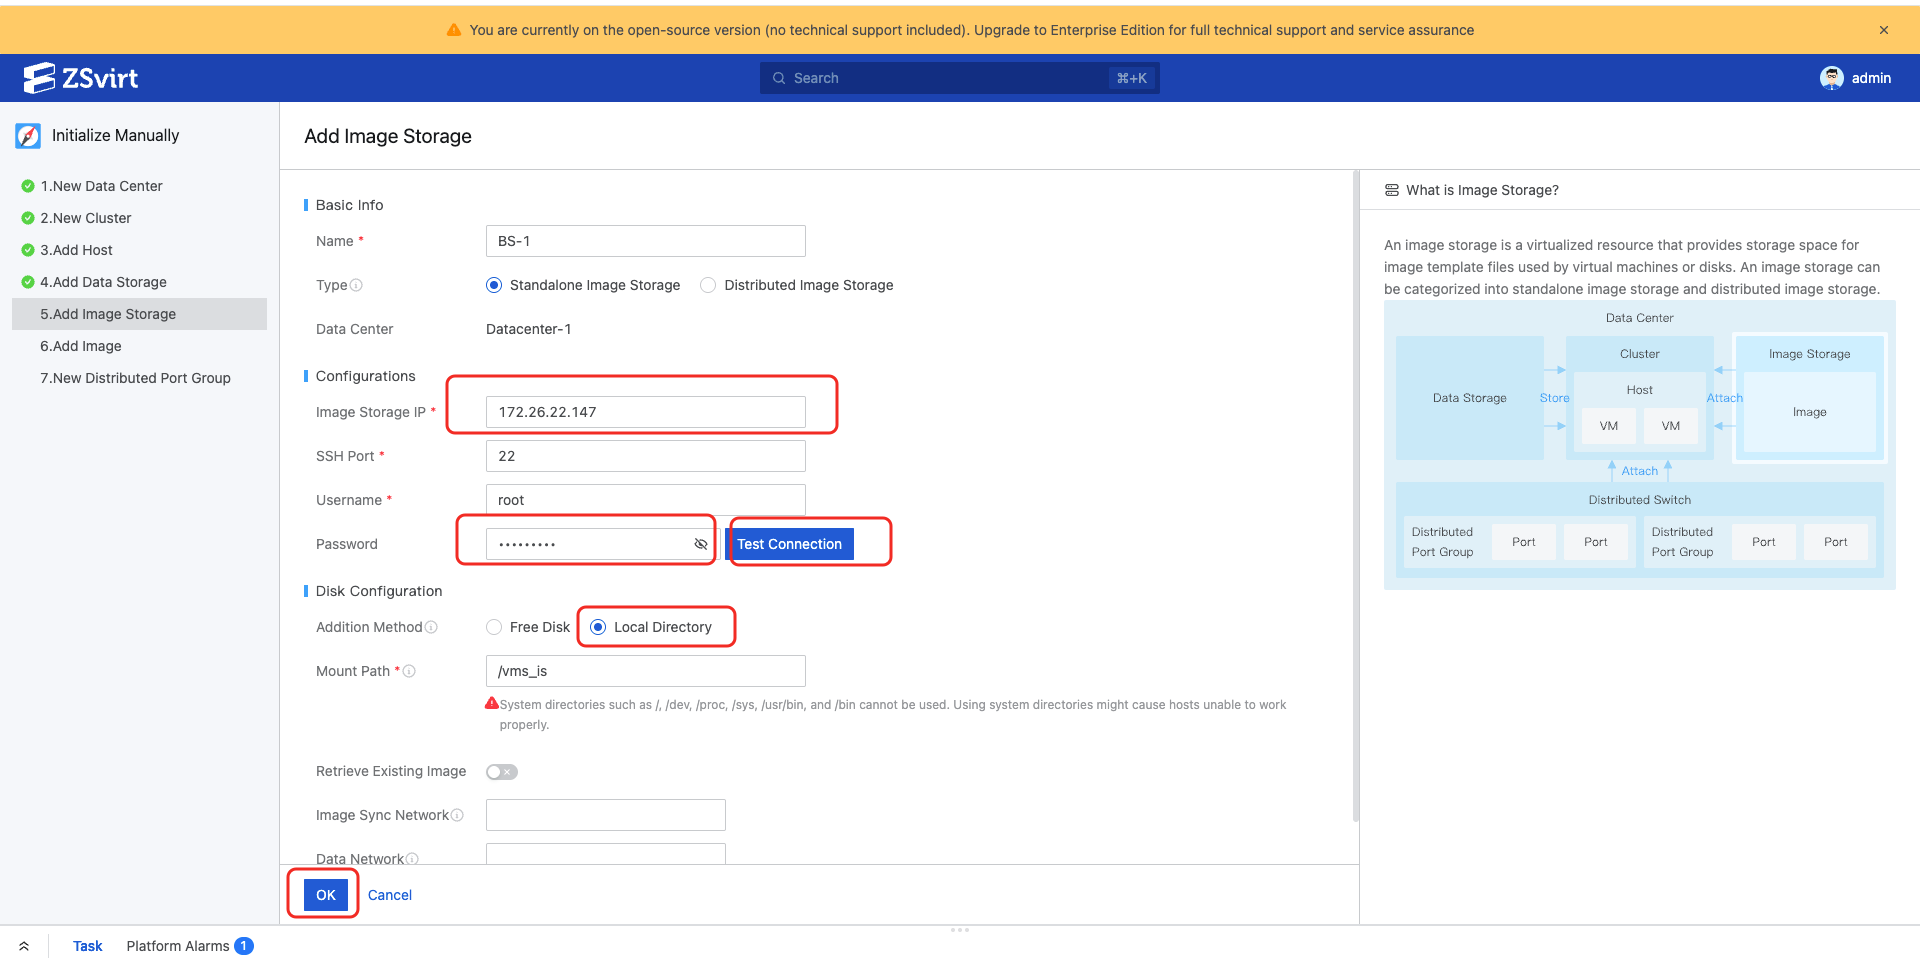
Add Image Storage
Enter the name, image storage IP (use the management node IP here), and password, click Test Connection, select Local Directory, and click OK.
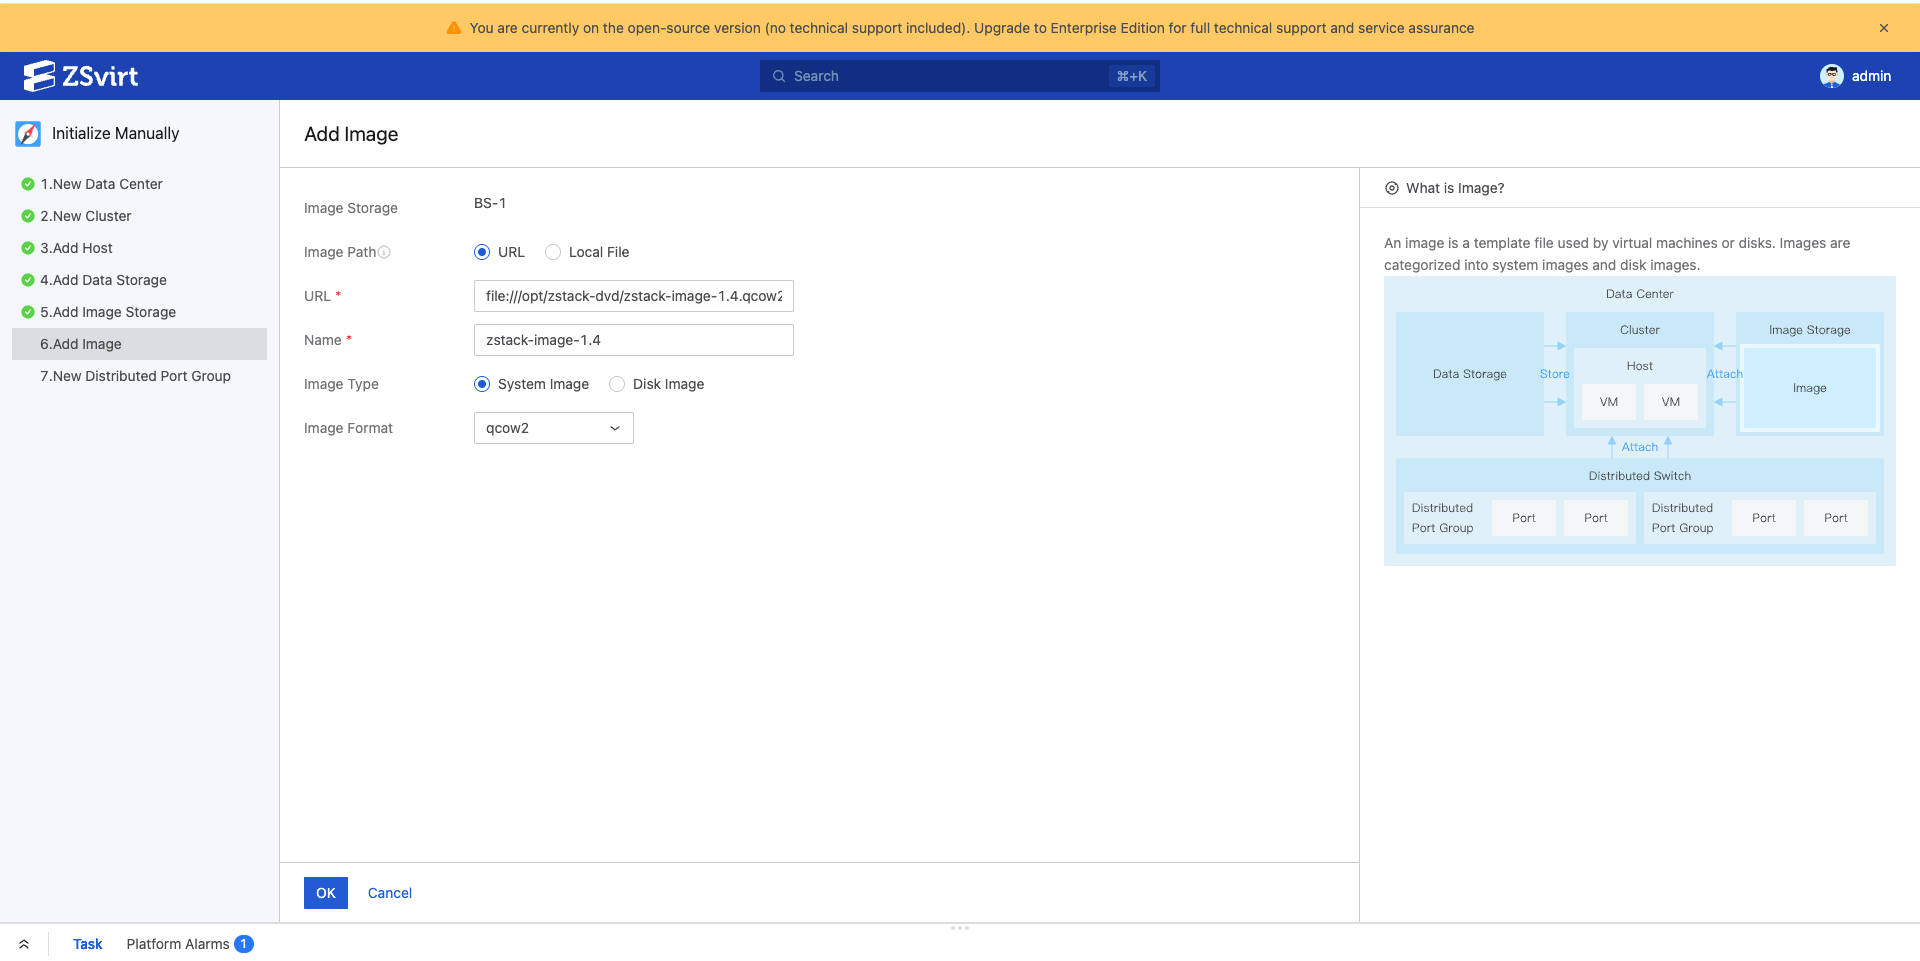
Add an Image
For testing purposes, the defaults are fine — just click OK.
Note
- Image import speed depends on the network path between the image storage, management node, hosts, and datastores.
- If adding an image fails, first confirm that the image file URL or local path is readable by the platform.
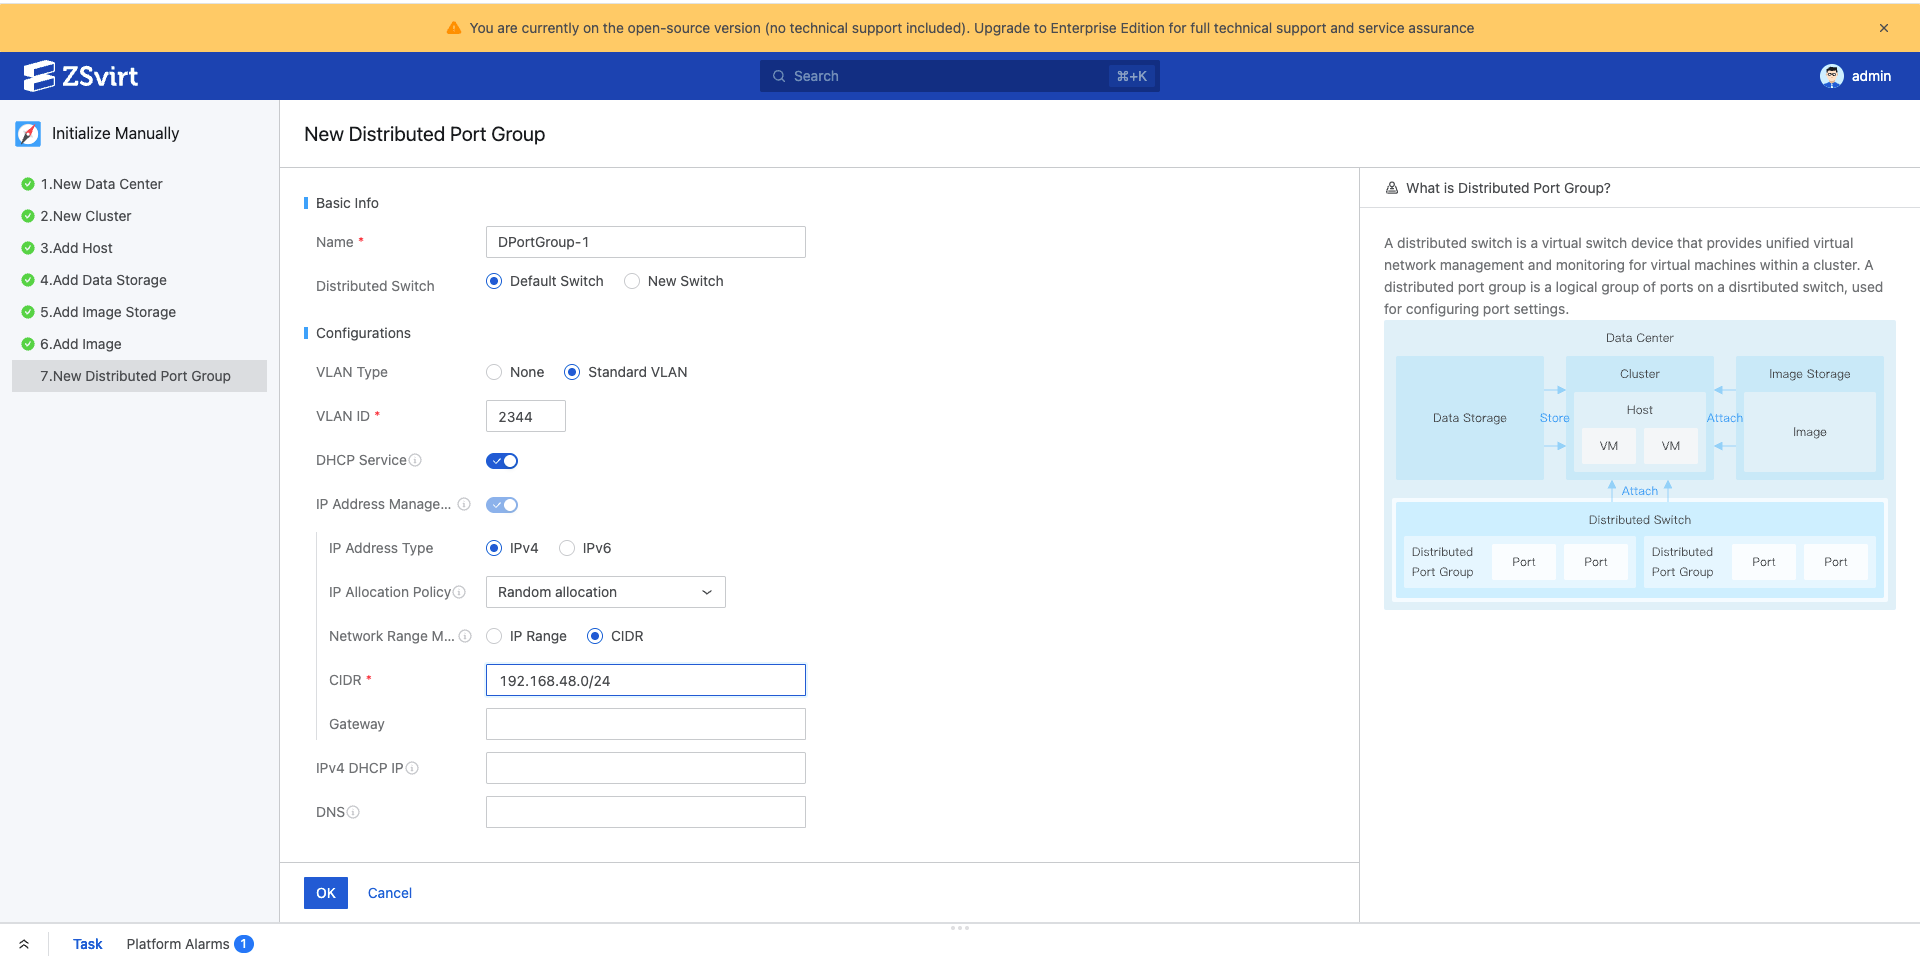
Create a Distributed Switch and Distributed Port Group
Using vlan-2344 as an example, configure the VLAN ID, IP allocation method, DNS, and related settings as shown below, then click OK to finish the network configuration.
Note
- All hosts in the cluster must have a physical interface or bond with the same name.
- When using VLANs, the trunk/access configuration on the physical switch must match the platform configuration.
- In production, we recommend separating the management, storage, and service networks.
- For QuickStart, enable IP address management and DHCP so VMs can obtain IPs automatically.
- Do not let the network segment overlap the gateway, DHCP service IP, reserved addresses, or existing service addresses.
- If the network segment uses CIDR notation, confirm the allocatable range before creating it.
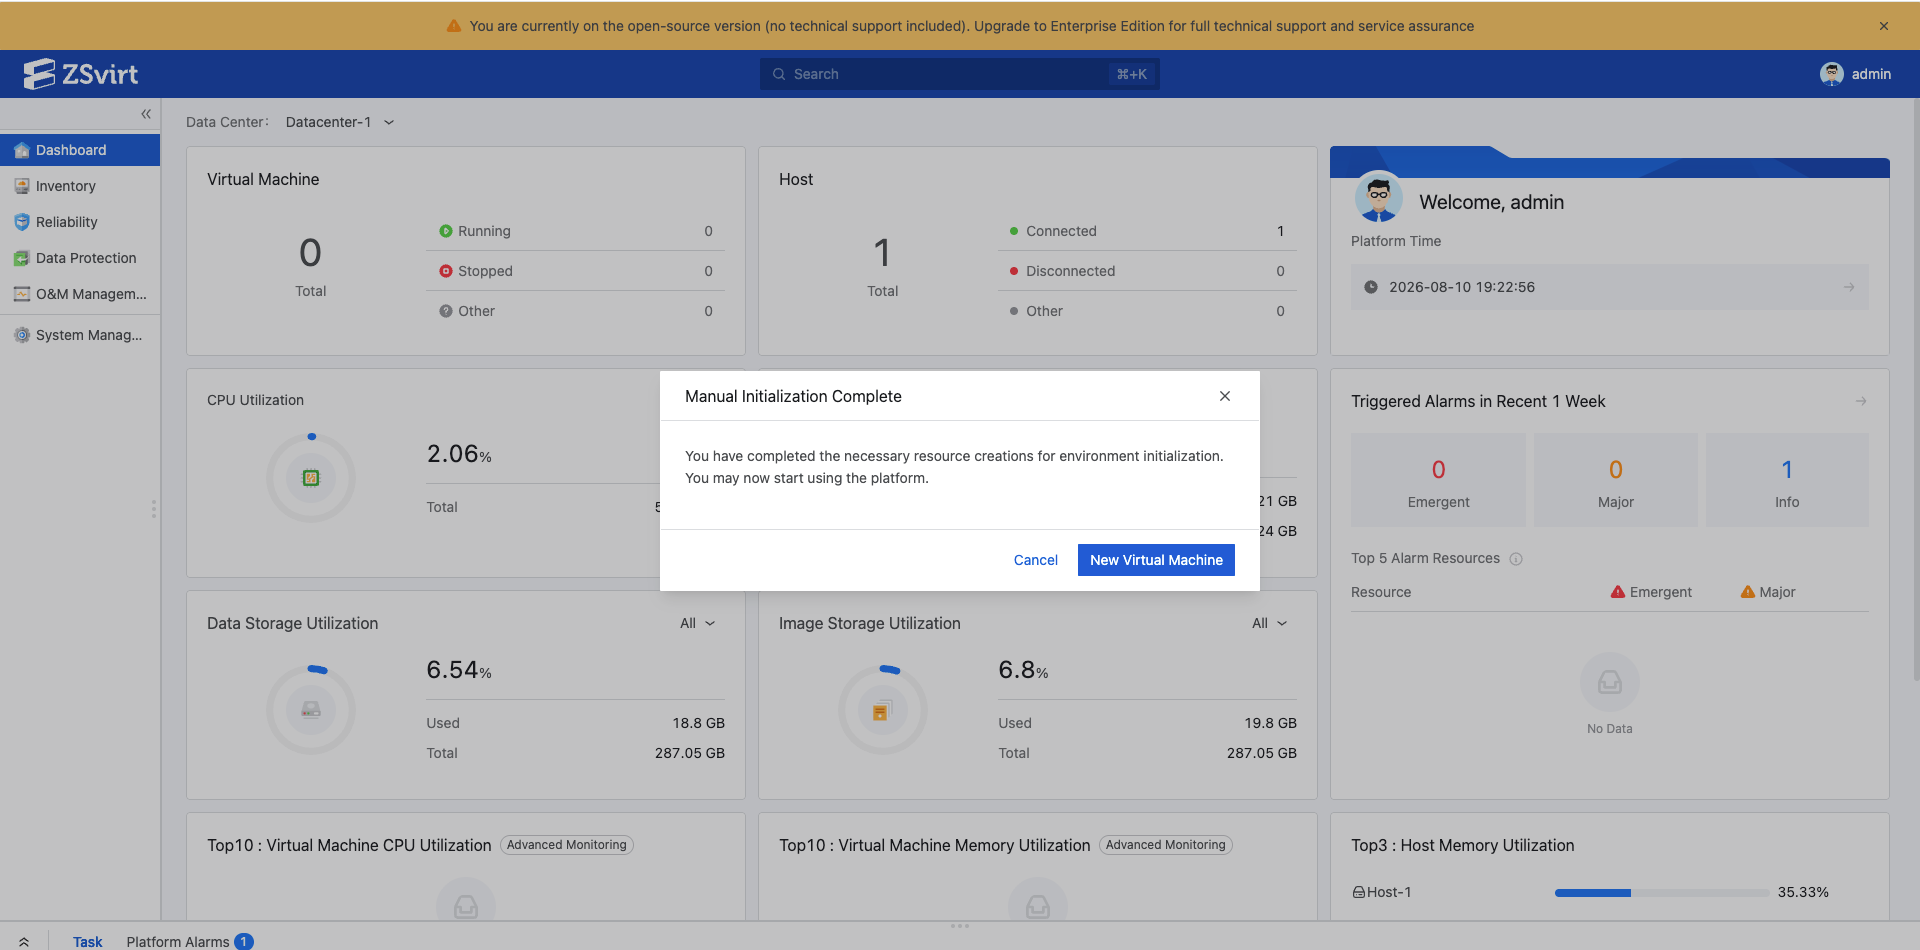
Create Your First VM from a System Image
Click Create VM, enter the VM name, select the system image (qcow2, raw) for disk 1, select NIC 1, and click OK. This section applies when you already have a qcow2/raw system image ready and want to create a VM directly from it.
Verify the VM
(1) Verify in the UI: open the VM details page and check:
- State: Running
- Host: assigned
- IP address: obtained
- NIC: loaded
- System volume: loaded
Open the console and confirm that the OS has reached the login screen or has finished booting.
(2) Verify inside the guest OS
If you can log in to the VM, run:
ip addr
ip route
ping -c 4 <gateway IP>
ping -c 4 223.5.5.5
ping -c 4 www.baidu.com
How to interpret the results
- Gateway reachable: the distributed switch, distributed port group, DHCP, and VLAN are basically working.
- External IP reachable: upstream routing is basically working.
- Domain name resolves and responds: DNS is working.
4. Management Node CLI Verification
Enter the CLI on the management node:
zstack-cliLog in:
LogInByAccount accountName=admin password=<admin password>Query the basic resources:
QueryHost fields=uuid,name,managementIp,state,status
QueryPrimaryStorage fields=uuid,name,type,state,status
QueryBackupStorage fields=uuid,name,type,state,status,availableCapacity,totalCapacity
QueryL3Network fields=uuid,name,type
QueryImage fields=uuid,name,state,status
QueryVmInstance name=<vm-name> fields=uuid,name,state,hostUuid
Expected results:
Host state=Enabled status=Connected
PrimaryStorage state=Enabled status=Connected
BackupStorage state=Enabled status=Connected
Image state=Enabled status=Ready
VmInstance state=Running
5. Quick Troubleshooting
| Symptom | What to check first | Common commands or locations |
|---|---|---|
| Installation script exits | root privileges, CPU/memory, system time, installation media, leftover installation directories | /tmp/zstack_installation-*.log |
| Web UI installation fails | UI installation log, certificate configuration, database initialization | /usr/local/zstack/zstack-ui/logs/ui-install.log |
| Management node not running | Management node service, database, configuration files | zstack-ctl status |
| Web UI not accessible | UI service, ports, browser certificate, management node IP | zstack-ctl ui_status |
| Failed to add host | SSH, root password, time sync, gateway, firewall | ssh root@<host IP> |
| Host not connected | Management network, host agent, libvirt/qemu status | systemctl status libvirtd on the host |
| Datastore not connected | Mount path, shared storage connectivity, host permissions | df -h, mount, multipath -ll, ceph -s |
| Image storage not connected | Storage node status, capacity, network path | UI events, management node logs |
| Failed to add image | Image URL, image format, image storage capacity | curl -I <image URL>, qemu-img info <image file> |
| VM stuck in creation | Image cache, datastore I/O, host capacity, scheduling events | Task center, events, management node logs |
| VM did not get an IP | DHCP, IP address management, remaining addresses in the segment, port group configuration | Port group details, VM NIC details |
| VM network unreachable | Gateway, VLAN, upstream routing, DNS, security policies | ip route, ping <gateway> inside the VM |
| Console does not open | Console proxy, browser certificate, management node service | zstack-ctl status, UI events |
| No monitoring data | Prometheus service, VMTools, time sync | systemctl status prometheus2 |
6. Minimum Success Criteria
When you finish, you should have at least:
- A successfully installed ZSvirt management node.
- A Web UI you can log in to.
- At least 1 host in the Enabled and Connected state.
- At least 1 datastore in the Enabled and Connected state.
- At least 1 image storage in the Enabled and Connected state.
- At least 1 distributed switch attached to the cluster.
- At least 1 distributed port group with available IP addresses.
- At least 1 usable system image.
- Your first VM in the Running state.
- A working VM console.
- A VM that obtains an IP address and can ping the gateway.
If all of the above pass, your minimal ZSvirt deployment and resource chain are working end to end.
7. Recommended Next Steps Before Production
After completing QuickStart, we recommend the following before moving to production:
- Change the default admin password and create individual administrator accounts.
- Configure NTP so the management node, hosts, storage, and network devices share the same time.
- Create distributed switches, distributed port groups, and network segments according to your service plan.
- Prepare standard Linux/Windows template images.
- Install or configure VMTools for more complete in-guest monitoring and management.
- Set up backup policies for the management node, database, images, and critical service VMs.
- Document the datacenter, cluster, hosts, datastores, image storage, VLANs, IP ranges, gateways, DNS, and service ownership.